
Setting Up SSO (Single Sign-On)
This guide walks you through configuring SAML SSO for your Foyer organization. SSO lets your staff sign in through your company's Identity Provider instead of managing a separate Foyer password.
Requirements:
- Foyer Ultimate plan or above
- Admin access to Foyer
- Admin access to your Identity Provider
Step 1: Get Your Foyer Service Provider Details
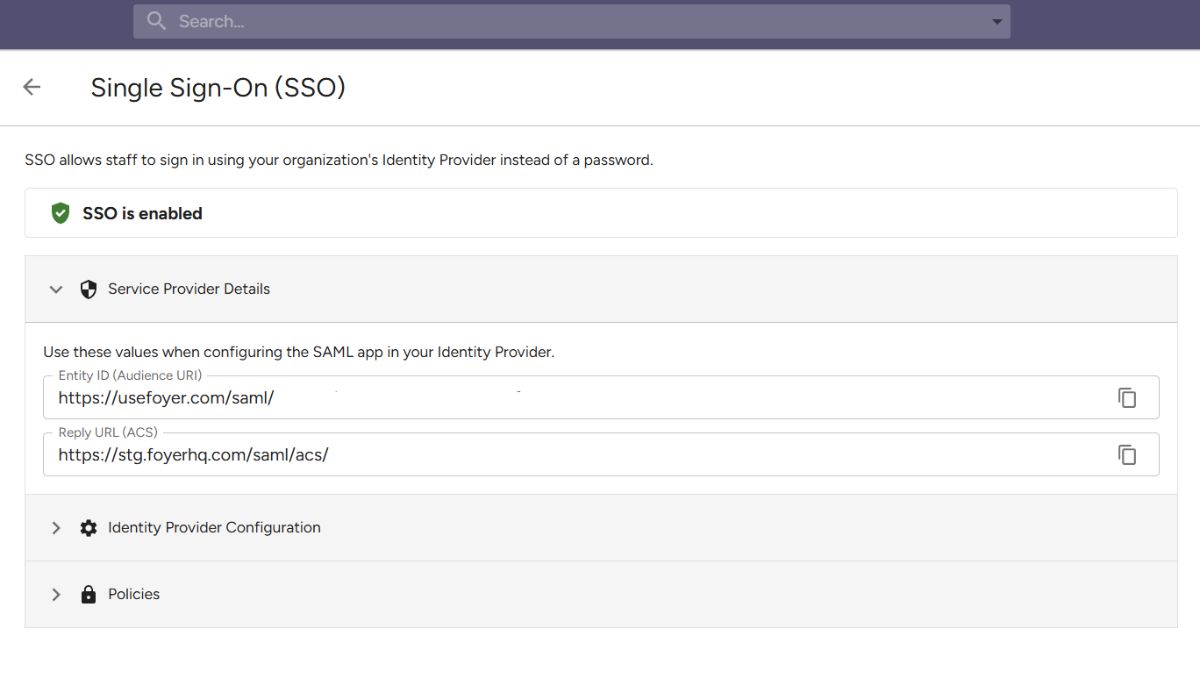
- Go to Org Settings * Single Sign-On (SSO)
- Expand Service Provider Details
- Copy these two values - you'll need them in your IdP:
- Entity ID (Audience URI) - looks like
https://usefoyer.com/saml/<your-org-id> - Reply URL (ACS) - looks like
https://yourorg.usefoyer.com/saml/acs/<your-org-id>
- Entity ID (Audience URI) - looks like
Step 2: Configure Your Identity Provider
Choose your IdP below for specific instructions.
Microsoft Entra ID (Azure AD)
- Sign in to the Entra Admin Center
- Go to Identity * Applications * Enterprise applications
- Click New application * Create your own application
- Name it "Foyer" and select "Integrate any other application you don't find in the gallery (Non-gallery)"
- Click Create
- In the app's sidebar, click Single sign-on * select SAML
- Under Basic SAML Configuration, click Edit:
- Identifier (Entity ID): Paste the Entity ID from Foyer
- Reply URL (Assertion Consumer Service URL): Paste the Reply URL (ACS) from Foyer
- Click Save
- Under Attributes & Claims, click Edit:
- Ensure the Unique User Identifier (Name ID) is set to
user.mail(email format) - Optionally add claims for
user.givennameanduser.surname(used for JIT provisioning): http://schemas.xmlsoap.org/ws/2005/05/identity/claims/givenname*user.givennamehttp://schemas.xmlsoap.org/ws/2005/05/identity/claims/surname*user.surname
- Ensure the Unique User Identifier (Name ID) is set to
- Under SAML Certificates, download Certificate (Base64)
- Under Set up Foyer, copy:
- Microsoft Entra Identifier - this is your IdP Entity ID
- Login URL - this is your IdP SSO URL
- Assign users: Go to Users and groups * Add user/group and assign the staff who should have access
Okta
- Sign in to your Okta admin dashboard
- Go to Applications * Create App Integration
- Select SAML 2.0 and click Next
- App name: "Foyer", click Next
- Under SAML Settings:
- Single sign-on URL: Paste the Reply URL (ACS) from Foyer
- Audience URI (SP Entity ID): Paste the Entity ID from Foyer
- Name ID format: EmailAddress
- Application username: Email
- Optionally add attribute statements:
http://schemas.xmlsoap.org/ws/2005/05/identity/claims/givenname*user.firstNamehttp://schemas.xmlsoap.org/ws/2005/05/identity/claims/surname*user.lastName
- Click Next, then Finish
- On the app's Sign On tab, under SAML Signing Certificates, click Actions * View IdP metadata. From the metadata:
- Copy the entityID - this is your IdP Entity ID
- Copy the SingleSignOnService Location URL - this is your IdP SSO URL
- Copy the X509Certificate content - this is your IdP Certificate
- Under the Assignments tab, assign users or groups who should have access
Google Workspace
- Sign in to Google Admin Console
- Go to Apps * Web and mobile apps * Add app * Add custom SAML app
- Name it "Foyer" and click Continue
- On the Google Identity Provider details page, copy:
- SSO URL - this is your IdP SSO URL
- Entity ID - this is your IdP Entity ID
- Certificate - download this, it's your IdP Certificate
- Click Continue
- Under Service provider details:
- ACS URL: Paste the Reply URL (ACS) from Foyer
- Entity ID: Paste the Entity ID from Foyer
- Name ID format: EMAIL
- Name ID: Basic Information > Primary email
- Optionally add attribute mappings:
- Click Finish
- On the app page, click the User access section and turn ON access for the organizational units that should use Foyer
Other SAML 2.0 Providers
Foyer works with any Identity Provider that supports SAML 2.0. You need three things from your IdP:
- IdP Entity ID (also called Issuer)
- IdP Login URL (also called SSO URL or Single Sign-On Service URL)
- X.509 Certificate (the signing certificate in Base64/PEM format)
Configure your IdP with Foyer's Entity ID and ACS URL, set the Name ID format to email, and you're good to go.
Step 3: Complete Setup in Foyer
- Back in Org Settings * Single Sign-On (SSO), expand Identity Provider Configuration
- Paste in:
- IdP Entity ID (Issuer) from your IdP
- IdP Login URL from your IdP
- X.509 Certificate from your IdP
- Click Save
- Click Enable SSO
Your staff will now see a "Sign in with SSO" button on the login page.
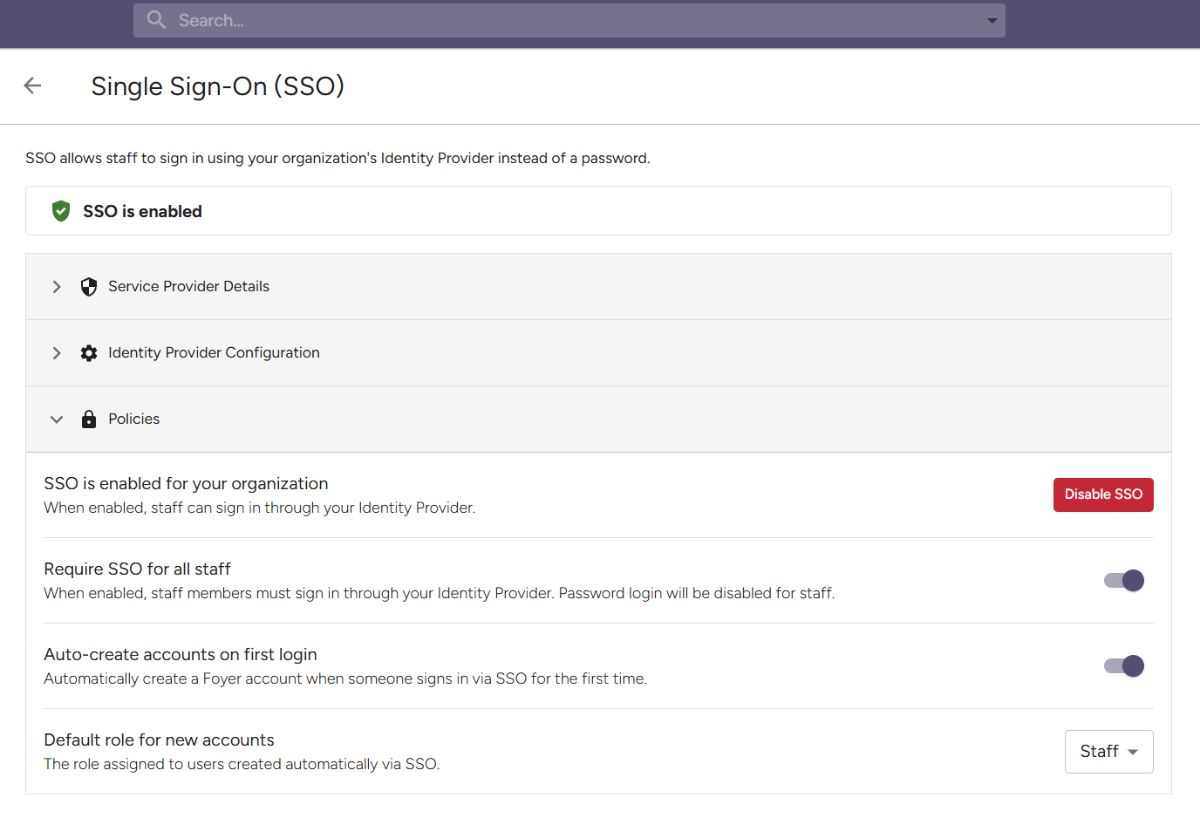
Step 4: Configure Policies (Optional)
Under the Policies section you have two additional options:
Require SSO for all staff - When enabled, staff can only sign in through SSO. Password login is completely disabled for staff accounts. Clients are not affected.
Auto-create accounts on first login (JIT Provisioning) - When enabled, staff who sign in via SSO for the first time will automatically get a Foyer account created. You can set their default role to Staff or Admin. This means you don't need to invite each person individually in Foyer - just assign them in your IdP.
Troubleshooting
"SSO is not configured for this organization" - Make sure you've clicked "Enable SSO" after saving your IdP configuration.
"No account found for this email" - The email address in your IdP doesn't match any staff account in Foyer. Either invite them first, or enable JIT Provisioning to auto-create accounts.
SAML validation errors - Double check that:
- The ACS URL in your IdP exactly matches what's shown in Foyer (including the protocol and trailing path)
- The certificate was copied completely (including the BEGIN/END lines if present)
- Your IdP is sending the email address as the Name ID
Staff don't see the SSO button - The SSO button only appears after a staff member enters their email on the login page. It won't show for clients or guest accounts.
Certificate Rotation
When your IdP's signing certificate is about to expire:
- Add the new certificate as the Secondary Certificate in Foyer
- Update the certificate in your IdP
- Once confirmed working, move the new certificate to the primary field and clear the secondary
This ensures zero downtime during rotation - Foyer will accept signatures from either certificate during the transition.
FAQ
Does SSO affect my clients? No. SSO is for staff accounts only. Client login is completely unchanged.
Can staff still use passwords when SSO is enabled? Yes, unless you turn on "Require SSO for all staff". Without enforcement, staff see both the SSO button and the password field.
What happens if my IdP goes down? If you have not enforced SSO, staff can still log in with their password. If SSO is enforced, staff will not be able to log in until your IdP is restored. Consider keeping at least one admin account with password access for emergency scenarios.
Can I use SSO with a custom domain? Yes. If your org uses a custom domain, the ACS URL will reflect your custom domain automatically.