Sharing Files
Introduction
This guide covers how clients and staff can share files with each other. We will also cover some tips such as using folders, seeing file details, downloading and previewing files, and how to delete files and folders. The guide is for all business owners, employees, and clients. Refer to the applicable section based on which kind of user you are.
Sharing Files as a Client
If you are a client, you can share files with your organization by first logging in, then navigating to the "Files" page. You can find a link to the "Files" page on the left drawer.
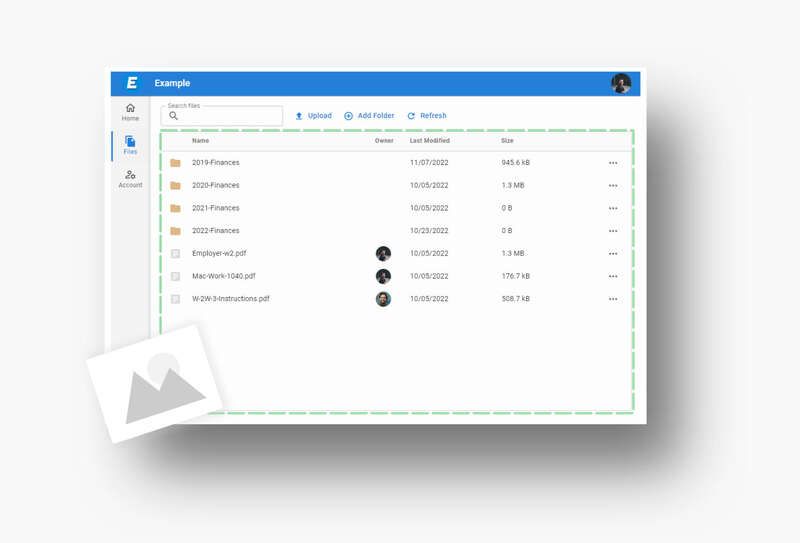
You will see a file viewer, and several buttons on the top of the page. To share a file, you can simply drag and drop a file from your computer onto the file viewer. The image above shows the draggable area in green. Additionally, you can click the "Upload" button on the top of the page, and select a file from your file system. If you have several files you would like to share at once, you can drag and drop, or select multiple files at once and they will be uploaded together. As your files upload, there is a status box on the bottom right of the screen that will show the file's progress.
If you are looking for a particular file sent to you, can search for it in the file viewer by scrolling, or using the search bar at the top of the page. Just type in as much of the file name as you know, and the results will be filtered. The file viewer shows additional information about the files that have been uploaded. You can see the size of each file, as well as who uploaded each file.
Each file has 3 dots to the right of the entry in the file viewer. You can click the dots to reveal a menu that has several options: Preview, Download, and Delete. You can use the Preview option to view a file quickly. This can be useful to view PDFs and images before downloading. The download option will immediately start saving the file to you local computer. The delete option can be used to delete both files and entire folders.
If you are not seeing an expected file, you can try clicking the "Refresh" button on the top of the page. This will refresh the file viewer, revealing any updates that have been made.
Sharing Files as Staff
If you are a business owner or employee (i.e. if you have a staff account), then you have the option to share files with any client in your organization via the "Spaces" page. The "Spaces" page can be found on the left drawer after you've logged in to your account.
On this page you'll see an additional left drawer that features all of the clients your organization does business with. You can scroll or search using the textbox to find a particular user you want to share files with.
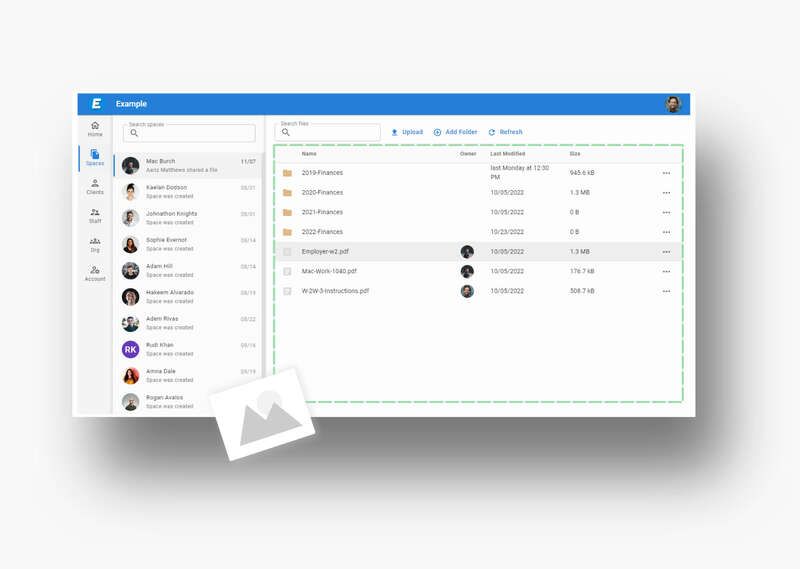
The image above highlights in green the area where you can drag and drop files to clients. Take any file from your local computer and drop it in that area, and you will see a status box pop up on the bottom right of your screen that shows the file upload progress. You can also upload files using the "Upload" button on the top of the screen. There you can select one or more files from your computer to upload.
For both the "Upload" button and drag-and-drops you can upload multiple files at once. All file upload status will be shown on the bottom right of your screen.
Each file has additional options under the 3 dots on the right side of the file viewer. Click on the dots to see the options for all files: Preview, Download, and Delete. Click on preview to get a pop-up window that displays the file. Many file types are supported by preview including: PDF, PNG, JPG, MP3, and WAV. Clicking download immediately starts downloading that file to your local computer. Deleting can be used on both files and entire folders.
You will also see that each file shows the file size, and who uploaded the file. You can use this to see which other employees have uploaded files to this space, and which files the client uploaded.
Using Folders
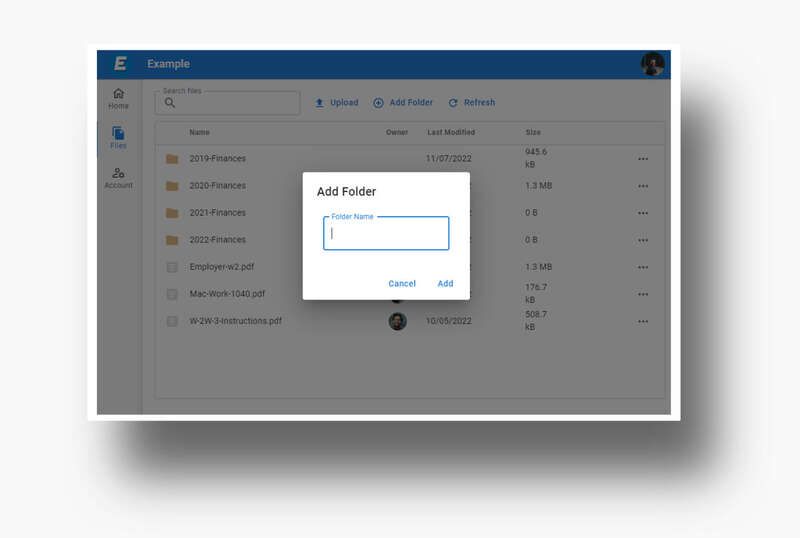
You can create folders to better organize your files. Folders can even have folders of their own! Both clients and staff can create folders. Go to your Files page (for clients) or Spaces page (for staff), and you will find a "Add Folder" button on the top of the page. You will get a pop-up like the one shown above. Enter your new folder name, save, and it will immediately appear in your file viewer.
Using folders is easy. Just click on the folder, and your file viewer will go into the folder. You will see which folder you are in directly under the file viewer under the column names. You can go back out of a folder by clicking on that toolbar. Clicking on the "/" button will take you back to the top of your space, if you are multiple folders deep, you can click on any subfolder to move to that one. To upload files to a folder, you first navigate to the folder, then drag-and-drop or use the "Upload" button. Just like you would have done without folders!
When viewing folders, you can see how much data all files in the folder take via the "Size" column, and see when the last file was uploaded via the "Last Modified" column. The 3 dots on the right size of the folder (when viewing from the folder above), can be used to delete the folder.
Conclusion
Go ahead! Make some folders and organize your files. Use one of your newly learned tricks like the "Preview" feature. We hope this guide has made your file collaboration even better.
Have feedback for this guide? Tell us what you think using comment section below. Interested in upgrading your plan to Standard, Premium, or Enterprise? Check out the pricing page for more information. Thank you for choosing Foyer. We are excited to be a part of your business' success.