How to Create a Bubble Client Portal [Step-by-Step]
![How to Create a Bubble Client Portal [Step-by-Step]](https://foyercus.blob.core.windows.net/287a2408185e68c371c/blog/739/c/acf560f0-9863-4cf2-a21a-e8687b23c4c0.jpg)
Bubble is one of the original no code web app builders. Its visual editor, responsive engine, and rich plugin ecosystem let founders and product teams launch SaaS products without touching code. What Bubble doesn’t ship with, however, is a secure Bubble Client Portal—a private area where customers can log in, share files, sign documents, and collaborate with your team.
That’s where Foyer comes in. In this guide we’ll show you exactly how to bolt a full featured Bubble Client Portal onto your Bubble app in minutes, then white label it so it feels 100% native. Let’s dive in!
How to Create a Client Portal for Bubble.io
A Foyer client portal gives your business all the tools you need to simplify and streamline client collaboration—secure file sharing, encrypted messaging, and seamless e-signature integrations. All data is fully protected with built-in encryption, ensuring both your business and your clients stay secure.
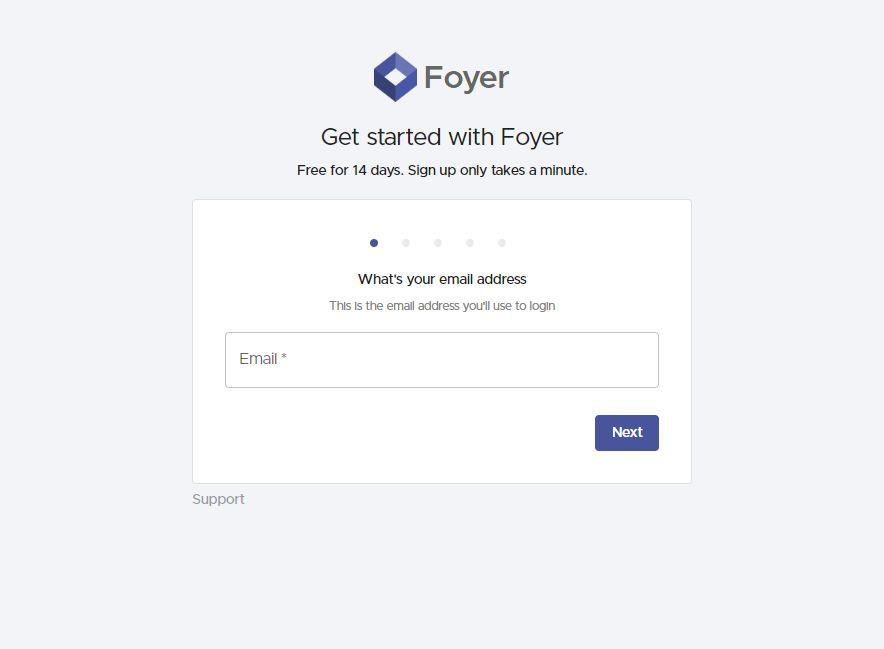
Getting started is fast and easy. Just follow Foyer’s simple onboarding flow: enter your business name, email, and a few key details. In less than a minute, your portal will be ready to use—no upfront commitment required.
You can host your client portal on a Foyer subdomain like example.usefoyer.com, or for a fully branded experience, configure a custom subdomain such as portal.yourbusiness.com. And if you need any assistance during setup, Foyer’s support team is always ready to help.
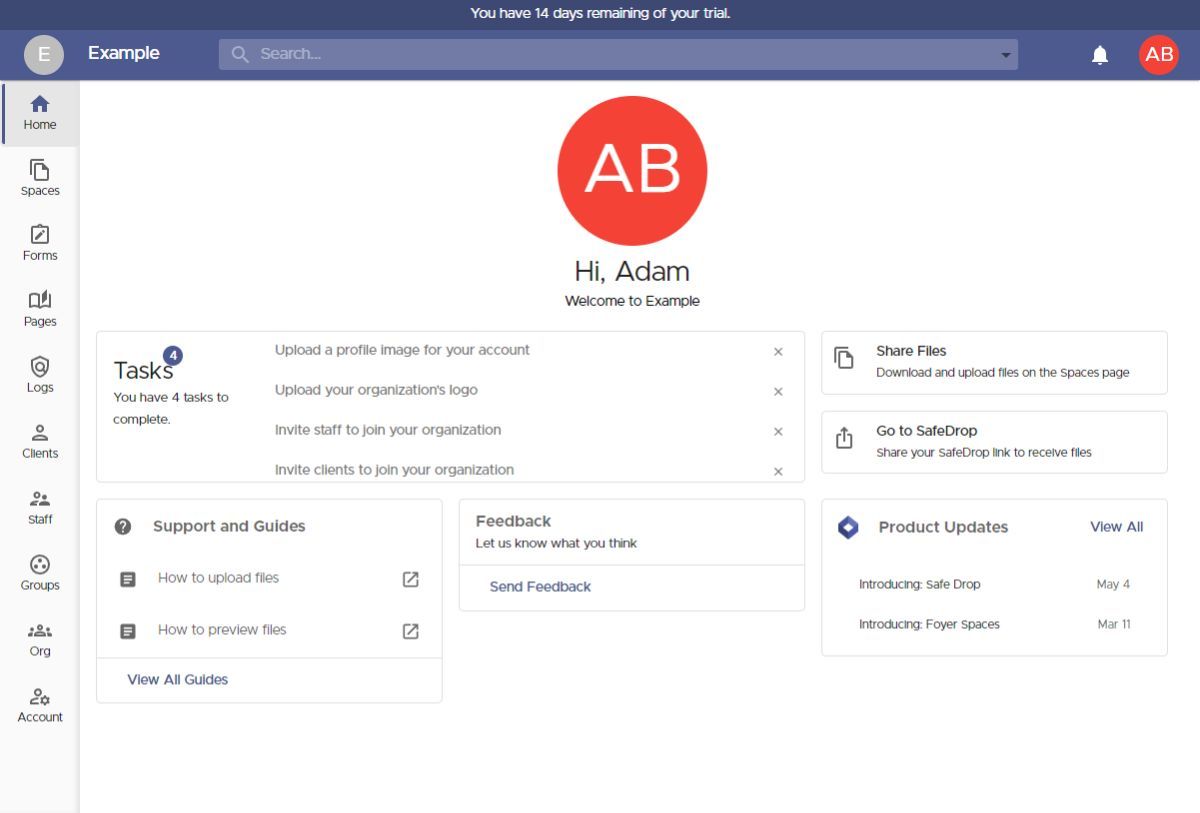
Once you complete the onboarding process, you’ll land on your client portal’s homepage. The left-hand navigation gives you access to powerful tools, including secure file sharing, custom forms, and knowledge base pages.
To start, we’ll focus on how to share files with your clients. Later in this guide, we’ll cover additional features you can use to further enhance your portal and elevate the client experience.
File sharing is a core part of client collaboration, and Foyer makes it easy with two simple options:
- Invite clients directly to Spaces, using their email address.
- Share a link to your SafeDrop page, allowing clients to upload files without logging in.
We’ll walk through both methods—starting with inviting clients to a Space. But first, here’s a quick overview of what a Space is.
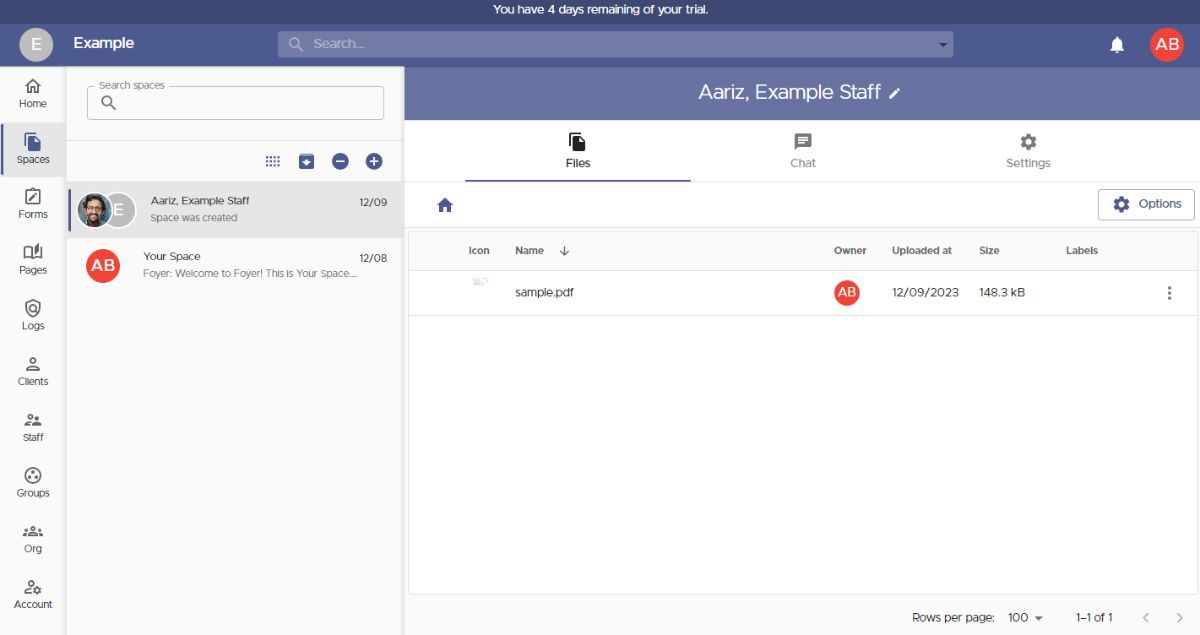
Spaces are secure, private areas where you and your clients can share files and exchange encrypted messages. Only members of a Space can access its content, similar to a private group chat in tools like Slack, Microsoft Teams, or iMessage. To create a new Space, click Spaces in the left-hand menu, then click the + icon.
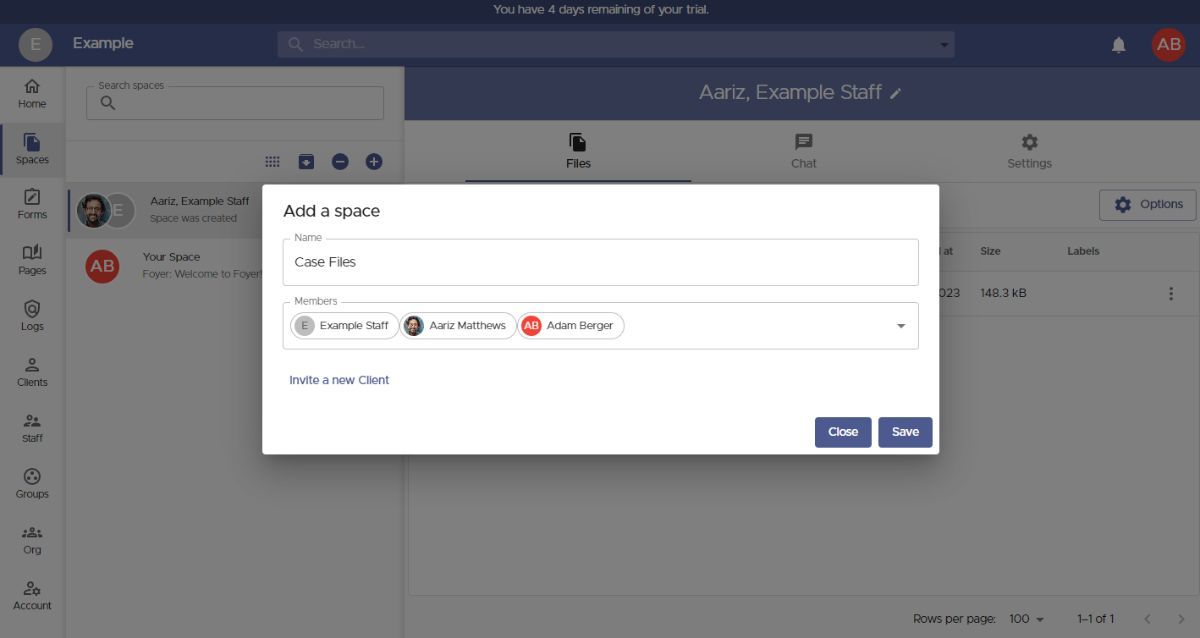
When creating a new Space, a dialog box will appear where you can name the Space and select which members will have access to its shared files and messages.
You can also assign Spaces to groups, making it easy to manage business contacts by granting access to an entire external organization at once.
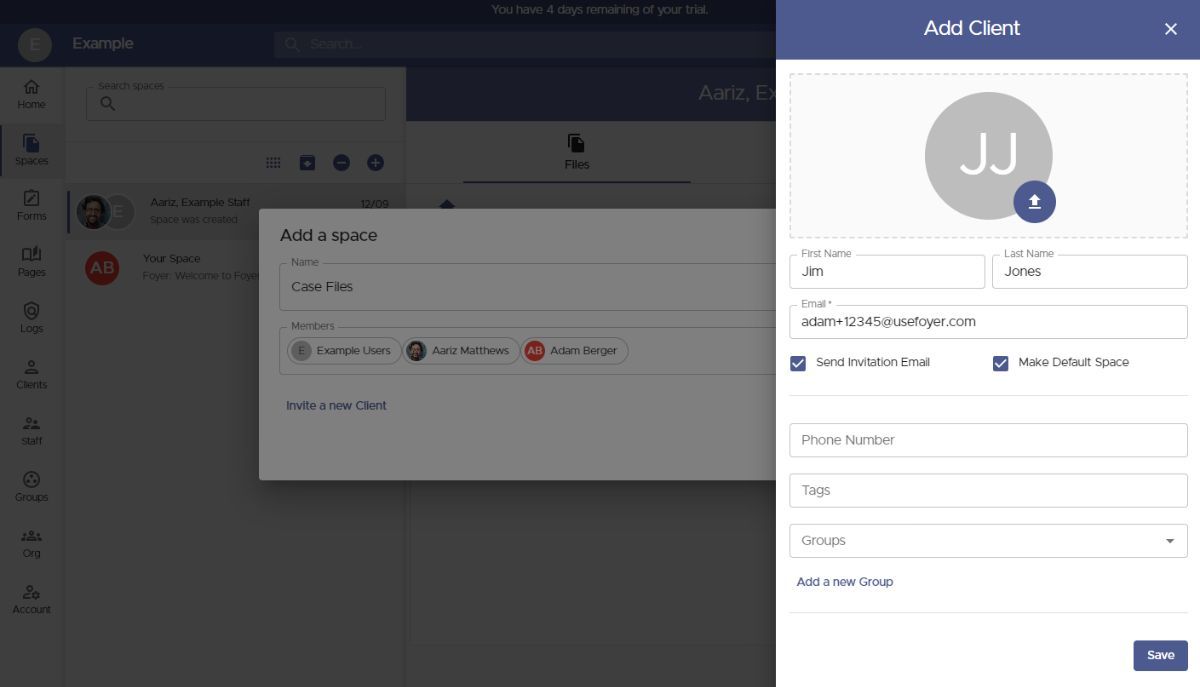
To invite a new client, simply click the Invite a New Client button.
To invite a new client, all you need is their email address. Additional details—such as their name, phone number, and profile picture—are optional and can be added by the client later if they wish.
Before saving the client, there are two useful features to keep in mind. First, tags allow you to categorize clients with labels, such as by industry (e.g. Law Firm or Healthcare), helping you stay organized.
Second, groups let you organize clients based on their associated business or organization. This makes it easy to grant access to resources like Spaces and Pages to an entire organization at once—saving you from having to manage individual permissions manually.
When you invite a new client in Foyer, they’ll automatically appear in the Members list and gain access to any files or messages shared within the assigned Space.
To add a group, simply start typing the group name and select it from the suggestions. Groups are added just like individual clients, allowing you to manage access quickly and efficiently.
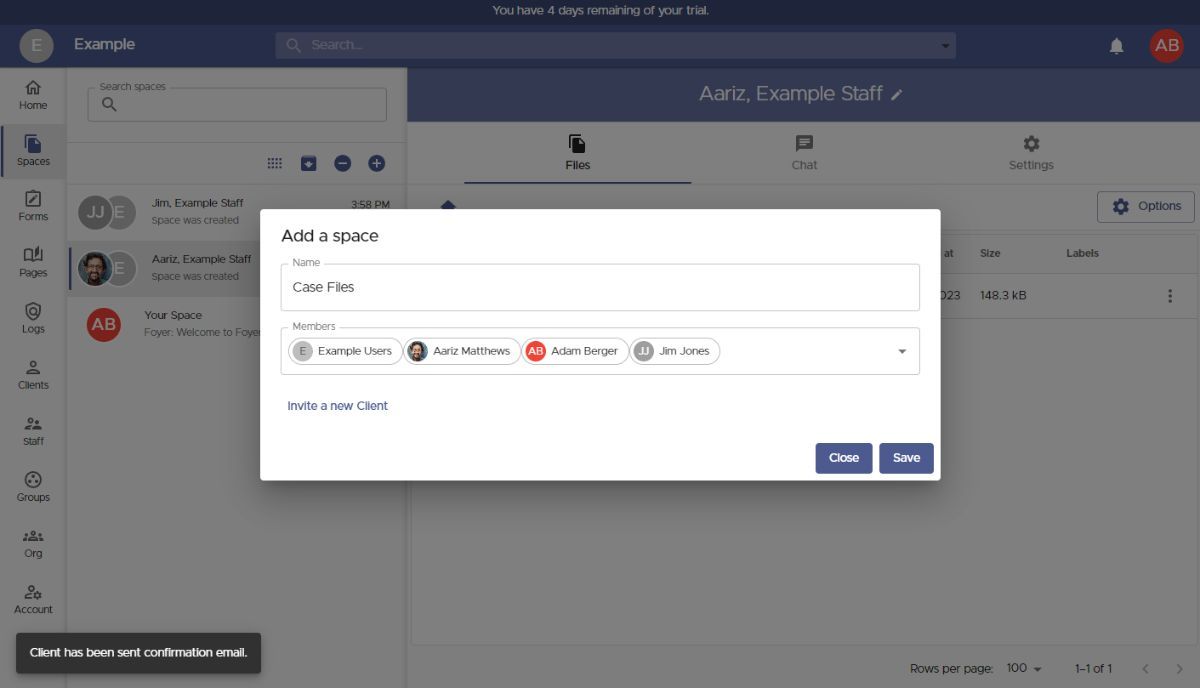
Once you’ve added all the necessary users and groups, click Save to complete the setup and open your newly created Space.
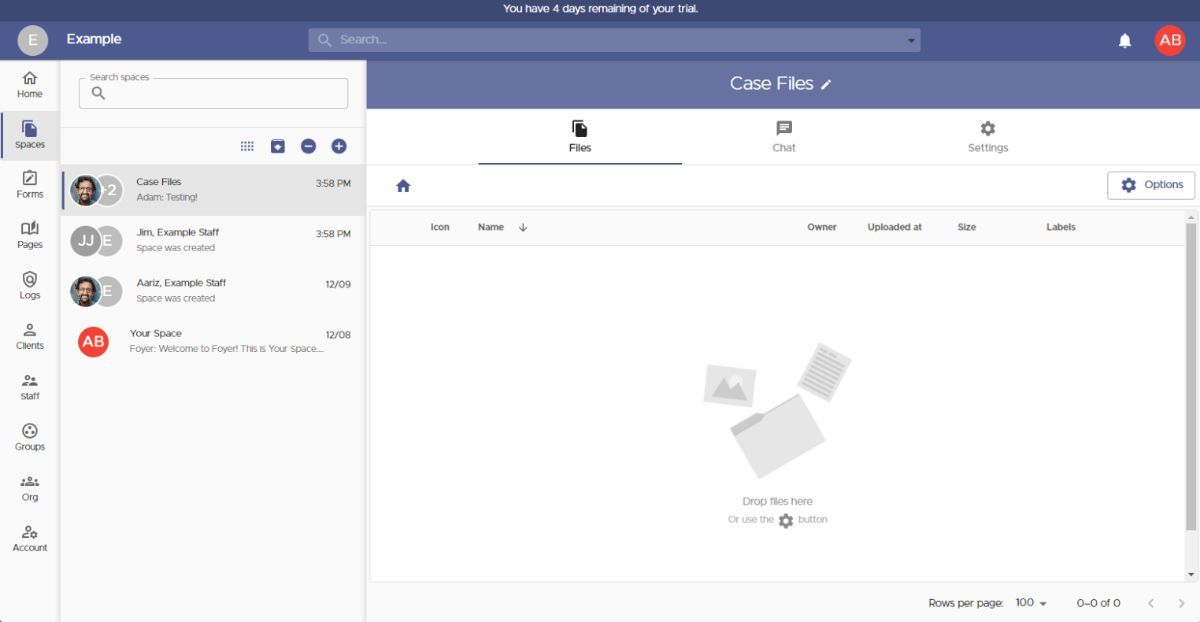
To share files with everyone in the Space, simply drag and drop them in, or use the Options button. There are no restrictions on file size or type, and you can even upload entire folders for greater convenience.
If you ever need to update access, you can easily add or remove users or groups by navigating to the Settings tab and adjusting the members list as needed.
That wraps up the first method of sharing files through your client portal using Spaces. Now, let’s explore the second option—perfect for situations where your business clients need to send files without logging in.
This feature, called SafeDrop, is built right into your Foyer client portal. Each organization has its own dedicated SafeDrop page. You can find your unique SafeDrop link under the Home tab, or by visiting example.usefoyer.com/upload (just replace example with your organization’s subdomain).
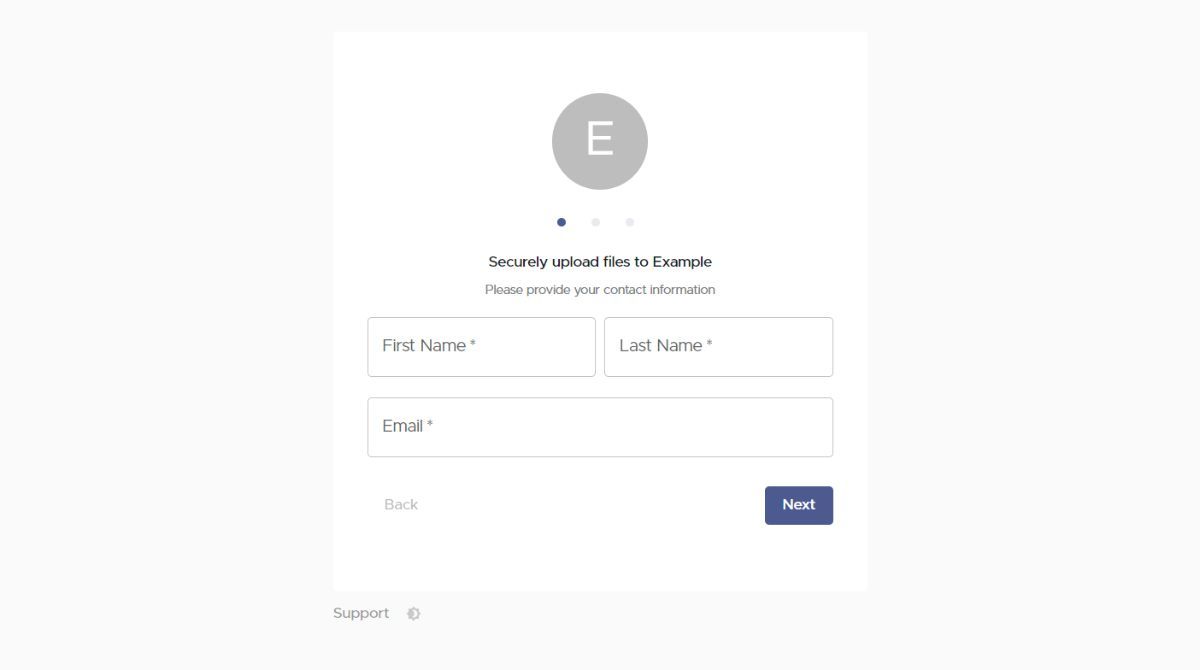
You can share your Foyer SafeDrop link with any client, making it simple for them to upload files from any device. All they need to do is enter their name, email, an optional message, and select the files they wish to send.
Files submitted via SafeDrop will appear on your Spaces page, labeled as “SafeDrop from...”. Just like with standard Spaces, both you and the client will receive notifications whenever a new file is uploaded.
Anyone who submits files through your SafeDrop portal is automatically added as a guest client on your Clients page. To keep your contacts organized, you can click on any guest entry and assign them to the appropriate tags or groups.
How to Embed the Portal Inside Your Bubble App
Now that the portal exists, let’s make it feel native to Bubble. The quickest option is to add a new menu item that opens your portal in a new tab.
- In the Bubble editor, go to "Design" and then "Header." This maybe different depending on how you've set up your website. We really just need to identify the location where your menu is saved. If you're having trouble finding it, you may want to refer to Bubble.io documentation.
- Decide how you want to link to your Bubble client portal. Here are two options to choose from:
- If you want clients to log in and access their files, enter your Foyer subdomain, formatted like this: example.usefoyer.com
- If you only want clients to upload documents without viewing them, use your Foyer SafeDrop link: example.usefoyer.com/upload
- Set the workflow: When this link is clicked, Open external website, URL =
example.usefoyer.com/upload(replace with your sub-domain).
You've completed the hard part! You now have a client portal for your Bubble.io website. We're not quite done yet though as we need to configure a few more settings on the Client Portal to ensure your users have a seamless experience.
White-Labeling Your Bubble Client Portal
Branding plays a key role in delivering a seamless, professional experience through your customer portal. White-labeling helps ensure your portal matches your brand identity, building trust and recognition among your business clients—while providing added value.
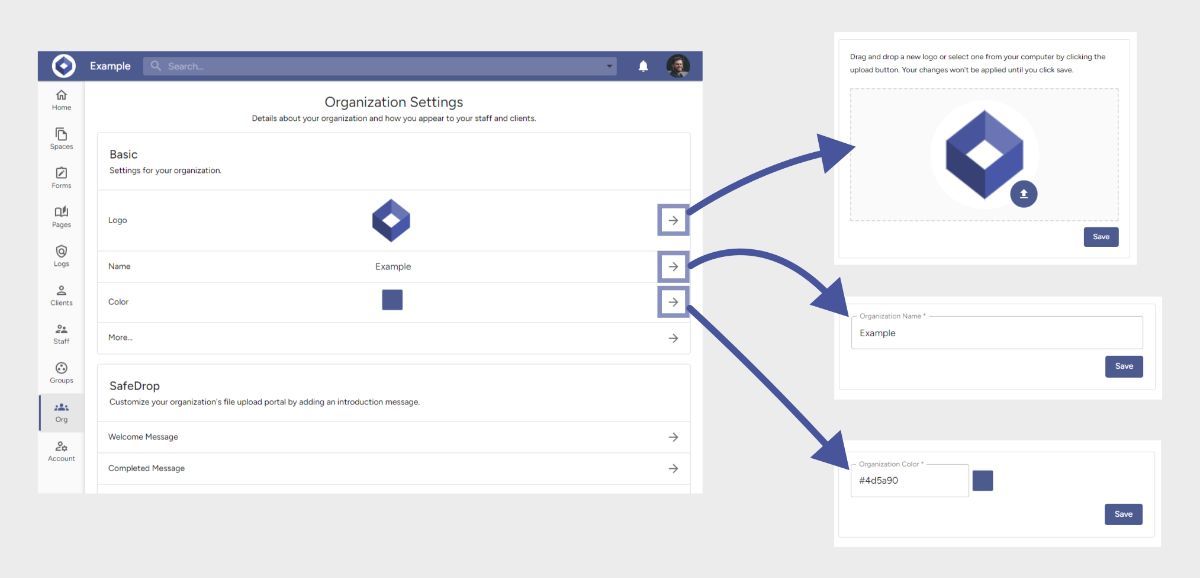
With Foyer’s client portal, you can easily customize key branding elements, including colors, logos, email templates, and your domain.
On the Org page, you can personalize:
- Logo — Displayed on login and sign-up pages, throughout the portal after login, on all forms, and on your SafeDrop page.
- Name — Shown in the portal header and on login/sign-up pages.
- Color — Applied to the header and all buttons across the portal for a consistent visual style.
Additionally, further down the Org page, you’ll find Foyer’s email template editor. This lets you fully customize all client and staff invitation emails—ensuring a cohesive brand experience from first touch to ongoing interactions.
How to Create a Knowledge Base In Your Client Portal
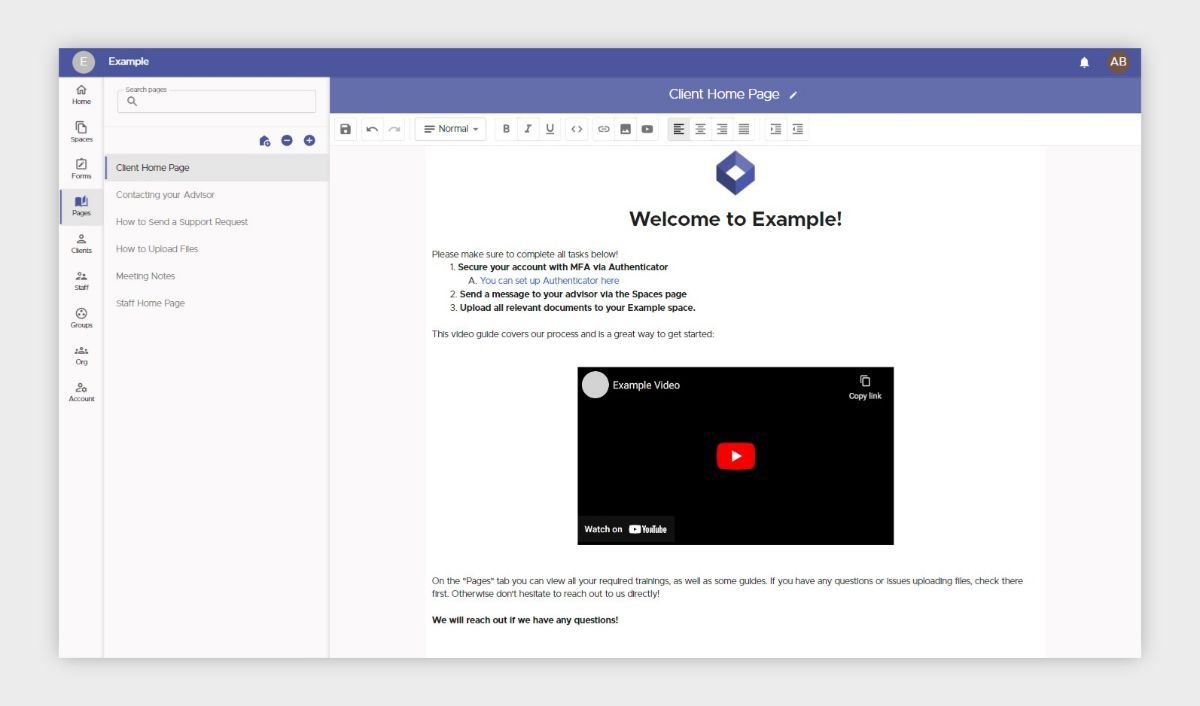
With your Foyer client portal, sharing knowledge between your team and clients is both simple and efficient. To create a knowledge base page, navigate to the Pages section and click the + icon in the left-hand menu. Give your page a name, then use the rich-text editor to add content—such as embedded videos, images, and formatted text.
You can easily manage access by clicking the edit icon next to the page title and selecting which users and groups can view it. Shared pages will appear under the Pages tab for recipients—staff members can collaborate on content, while clients will have read-only access.
For even greater impact, you can set a knowledge base page as the home page, ensuring that specific content is displayed to clients or staff immediately upon login. This is especially useful for onboarding new users and providing quick access to important resources—helping to further enhance your customer portal experience.
While some businesses rely on separate knowledge base tools like Notion, having a built-in knowledge base within your Foyer client portal keeps everything centralized—streamlining both your internal workflows and client experience.
How to Make Custom Forms For Your Client Portal

When working with other businesses, you’ll often need to collect custom data—whether it’s gathering feedback, onboarding new clients, or managing compliance requirements. Foyer makes this easy with its built-in Forms feature, allowing you to collect exactly the information you need using a variety of field types, including text fields, file uploads, and multiple-choice options.
All data submitted through your forms is securely captured and fully integrated into your client portal, making it simple to share and manage within your organization. You can even collect files of any type or size—including large uploads—by adding a file upload field to your form.
To ensure your team stays informed, both you and your staff will receive email notifications whenever a form is completed. Users can also adjust their personal notification settings if they prefer not to receive alerts.
Getting started is easy. Navigate to the Forms tab, click Form Definitions, and select Add Form. Each form is organized into steps, and within each step you can add different field types—such as text inputs, file uploads, or multiple-choice checkboxes.
You can choose from two built-in form layouts:
- Stepper — Displays each step as its own page, ideal for mobile-friendly experiences.
- Row — Presents the entire form on a single page, making it perfect for desktop use.
While many businesses use external tools for form collection, having an integrated form builder within your Foyer client portal offers greater convenience—and keeps all your client data centralized in one secure location.
How to Keep Your Customer Portal Secure Using Audit Trails
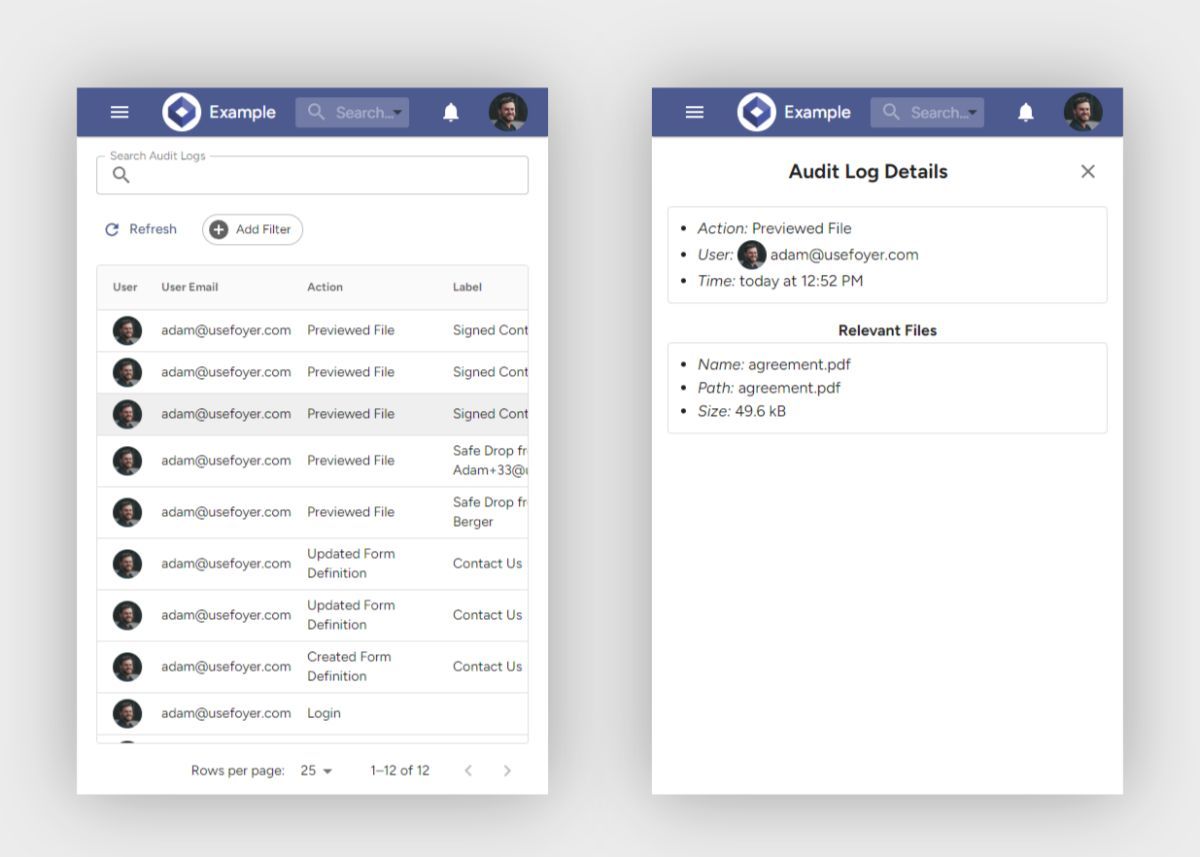
Client portals aren’t just about enhancing efficiency—they also play a vital role in maintaining security. That’s why Foyer includes robust audit trails, giving you complete visibility into security-related events across your organization to help protect both your business and your clients.
Each audit log entry captures the exact timestamp, the user involved, and a detailed description of the action performed. For added security and compliance, audit logs cannot be deleted—ensuring a permanent and reliable record of all activity. Key actions tracked include:
- File deletions
- File previews
- Enabling or disabling Two-Factor Authentication (2FA)
- Failed login attempts
In total, Foyer tracks over 50 different audit log actions, giving you comprehensive insight into everything happening within your client portal. This level of transparency is especially valuable for industries like healthcare, where maintaining detailed audit trails is essential for managing HIPAA-compliant data and other sensitive personally identifiable information (PII).
To streamline review and compliance workflows, Foyer also provides built-in options to search, filter, and sort your audit logs—helping your team efficiently monitor and manage security events.
How Will You Use Your Bubble Client Portal?
I hope this guide has helped you learn how to create a Bubble Client Portal and take advantage of key features like secure file sharing, custom forms, knowledge bases, and audit trails to boost both your productivity and your security.
If you're still evaluating options, check out our breakdown of the best client portals to see how Foyer stacks up.
If you’re not sure where to start, I recommend beginning with a secure file-sharing portal using either Spaces or SafeDrop (as covered above). This gives you a fast, reliable way to exchange files with your business clients. Once that foundation is in place, you can expand your portal by adding custom forms for feedback or onboarding, and integrating e-signature functionality with services like DocuSign.
If you need help migrating existing data into your new client portal, our Support team is happy to assist—just reach out to explore available migration options.
Thanks for reading! We’d love to hear your feedback—feel free to share any questions or comments below.