How to Create a Google Drive Client Portal (For Free)
Google Drive is a great tool that enables anyone, businesses and individuals alike, to securely store files online. But, did you know you can actually use Google Drive to create a client portal?
I'll be sharing three ways that you can create a Google Drive client portal for free, just using services from Google.
This will enable your business to quickly and securely share files with your clients.
Because we exclusively use Google services to accomplish this, your clients will need a Google account to create a Google client portal. This shouldn't be a problem because creating a Google account is free.
Before We Start: Consider Using a Dedicated Client Portal
The truth is, there's no seamless client portal solution within Google Drive where you can manage and share files with your clients in a portal. The solutions we will cover here can work, but they are cumbersome for both you and your clients.
If you want a true client portal, I suggest checking out Foyer. Foyer is low cost ($19 per staff user per month) and includes every feature you'd need out of a client portal.
You can even try it out for free without a credit card. Onboarding to Foyer is quick (takes 1 minute) and their support will help you migrate any existing data you have.
Here's a list of some of Foyer's client portal features:
- Secure file sharing with clients
- A secure messenger to send clients encrypted messages
- Email and desktop notifications for all portal activity
- Audit trails for every action (login, file download, file upload, etc...)
- Client multi-factor authentication (MFA/2FA) support
- Requesting e-signatures from clients
- Custom forms to collect specific client information
- Secure email via Microsoft Outlook
- An internal knowledge base builder to share internal business documents and trainings
- Desktop and mobile support
But, if you're set on using Google Drive as a client portal, then read on! We will go over a few ways you can share files with your clients using just Google services. But first, you'll want to know how much storage your business needs.
How Much Google Drive Storage Do You Need?
The amount of storage you need depends on what kind of business you are. Accounting and legal firms generally require less storage (100GB is often more than enough) than businesses like marketing agencies (may need 1TB).
Google Drive has a few different pricing options that come with increasing amounts of storage (visit the Google Drive pricing page for more info):
- Personal (free): 15GB
- Business Starter ($6): 30GB
- Business Standard ($12): 2TB
- Business Plus ($18): 5TB
If you're not sure, just start with the free option with 15GB, you can always upgrade later.
With that out of the way, let's get right into discussing our three options!
Decide Which Google Drive Client Portal You Need (3 Methods)
Let's figure out which option is the best for your business. Here's a brief summary of the three ways to create a client portal in Google Drive and some pros and cons:
- By creating a Google Form that submits data into Google Drive
- Pros:
- Secure (files are not publicly accessible)
- Easy one-time setup
- Completely self-serve (don't need to invite clients)
- Cons:
- Clients can only upload files (not download)
- Recommended for:
- Accounting firms (tax preparation, bookkeeping)
- Law firms (legal services)
- By sharing folders within Google Drive to specific users
- Pros:
- Secure (files are not publicly accessible)
- Clients can both upload and download files
- Cons:
- Requires manually inviting each client
- You need to know each client's email address beforehand
- Recommended for:
- Marketing agencies, photography, videography businesses
- Accounting firms, law firms
- By sharing folders within Google Drive publicly
- Pros:
- Quick to setup (takes around 1 minute)
- Clients can both upload and download files
- Completely self-serve (don't need to invite clients)
- Cons:
- Not secure (files are public to anyone with the link)
- Recommended for:
- Marketing agencies
- Photography and videography businesses
We'll jump right into the first option which is to use a Google Form that sends files into your Google Drive.
Option 1: Creating a Client Portal with Google Forms and Google Drive
You can make a Google Drive client portal by making a public Google Form with a file upload field. With this method, you can create a secure file drop-off page, where clients can send you files.
Step 1: Create a Google Form with a File Upload Field
First, go to Google Forms and create a new form.
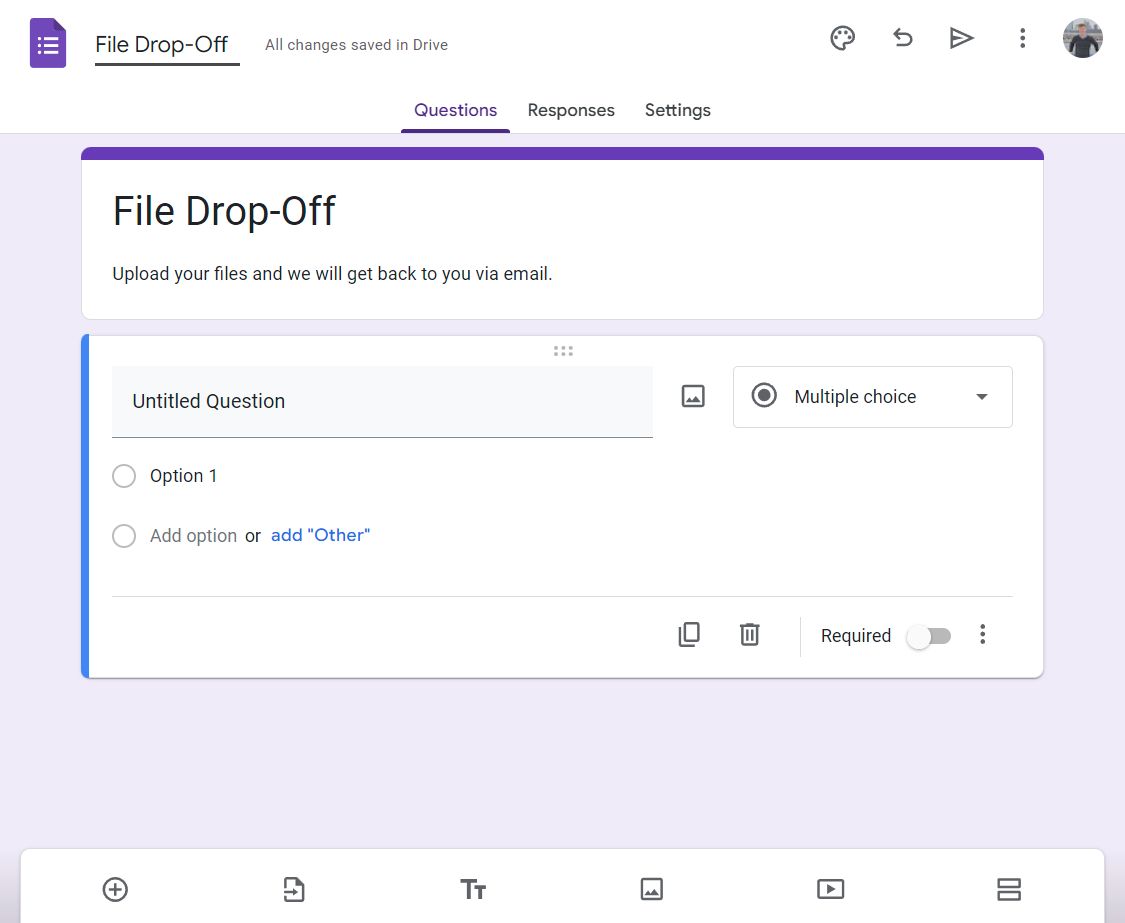
You'll want to rename your form so clients know what the form is for like "File Drop-Off". Adding a description will help guide your clients too.
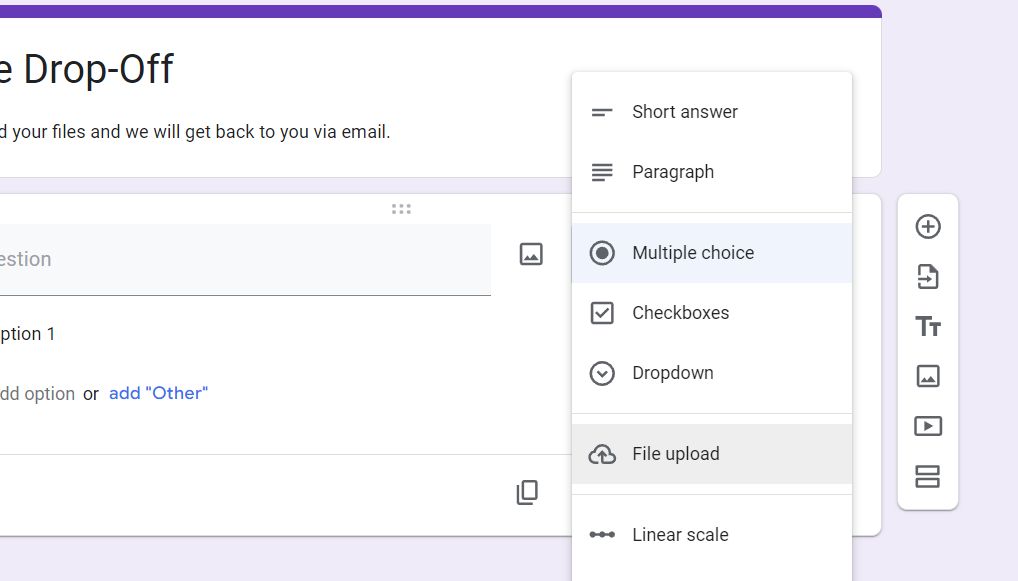
All we need in the Google Form is one "File Upload" field. To add that field, click the "Multiple choice" dropdown and select the "File Upload".
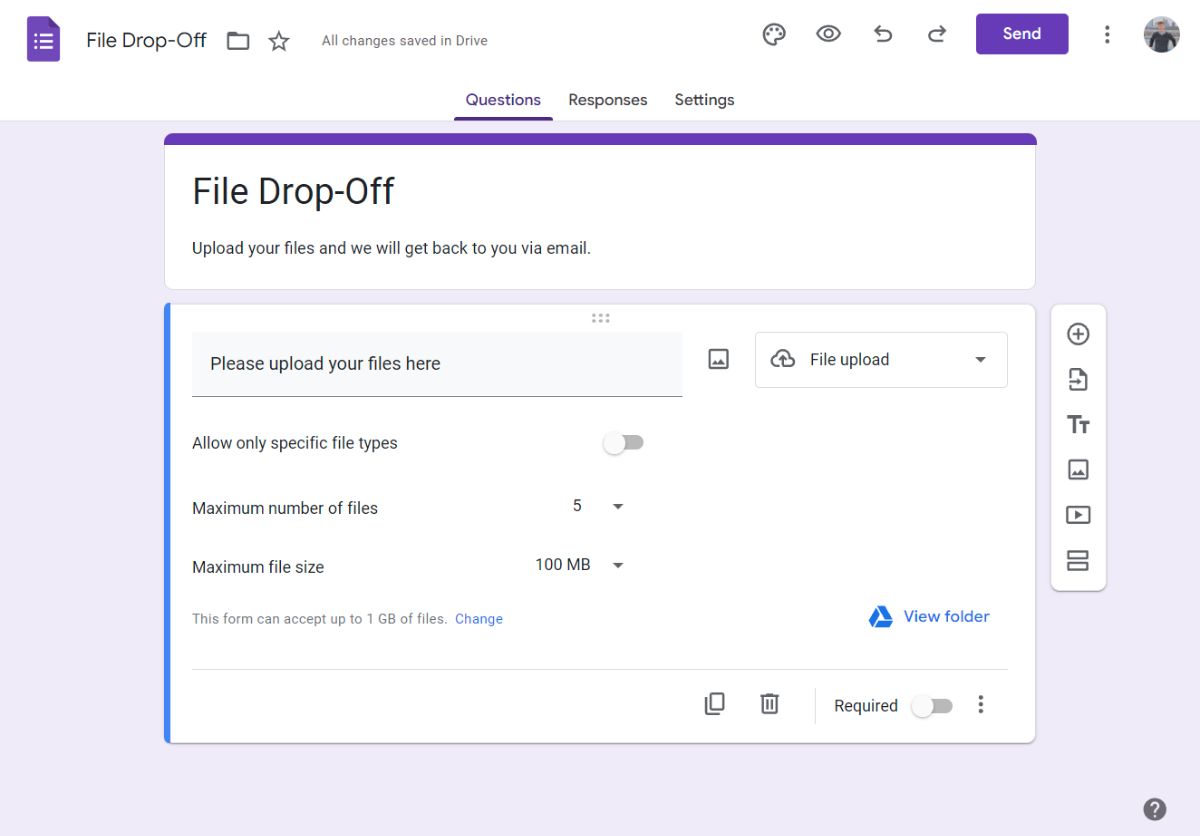
Step 2: Configure the File Upload field
Make sure to set the following settings on your File Upload field:
- Allow only specific file types Disable it you want to accept any file
- Maximum number of files: Increase it to more than 1 for most use cases
- Maximum file size: Increase to 1GB if you accept large files like videos or ZIP archives
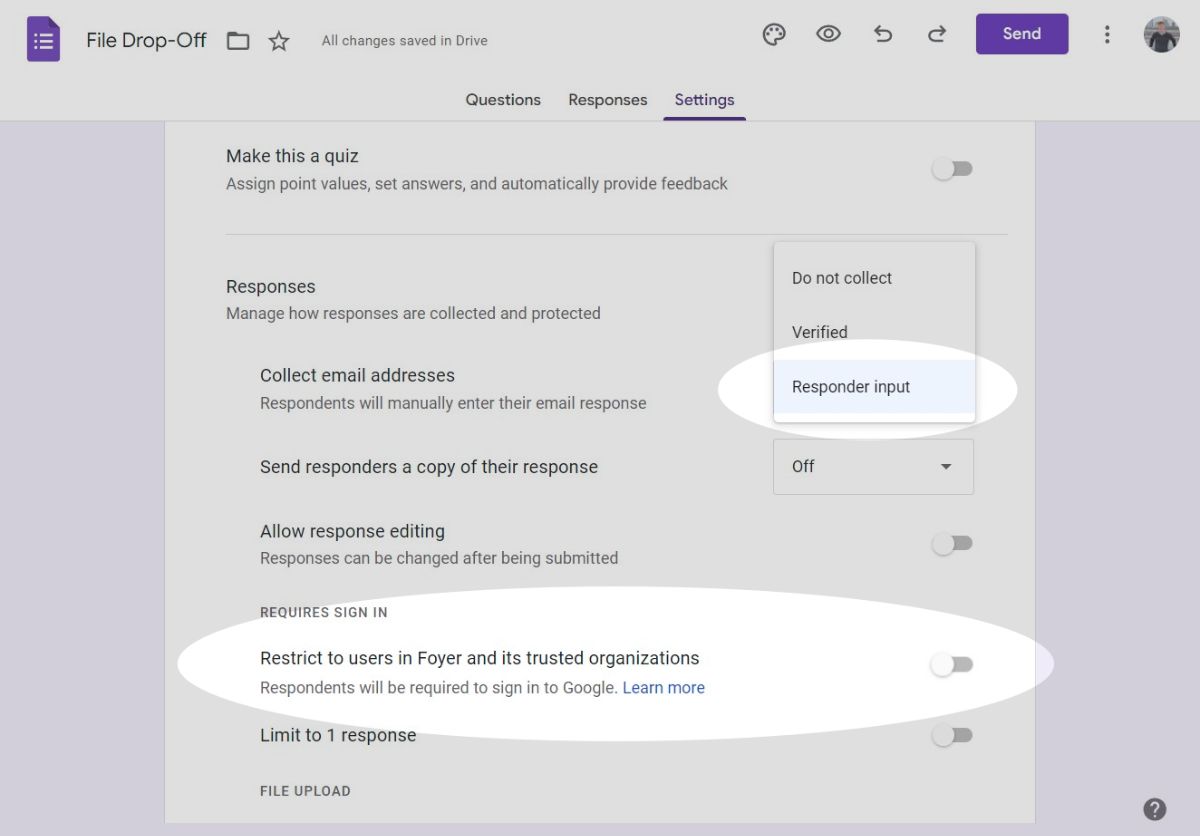
Step 3: Allow Users Outside Your Organization and Collect Email Addresses
In the settings tab, we need to change two settings to make the form accessible publicly.
Update "Collect email addresses" to be "Responder input". This makes sure that our form has a required field that collects the client's email address. This email address is the primary email of your clients (which could be different than the Google account they used to upload their files).
Then, disable "Restrict to users in ____ and its trusted organizations". This makes sure your form is available publicly.
Step 4: Sharing Your Google Form
You'll want to share this Google Form with your clients somehow. Most businesses choose to share by:
- Embedding the Google Form into their website (See here how to do this in Google Sites)
- Adding a link to the Google Form on their website (typically in the navigation bar)
- Adding a link to the Google Form via email (or in their email signature)
All of these are effective options. I suggest you both embed it in your website, and add it to your email signature this way clients always have a link.
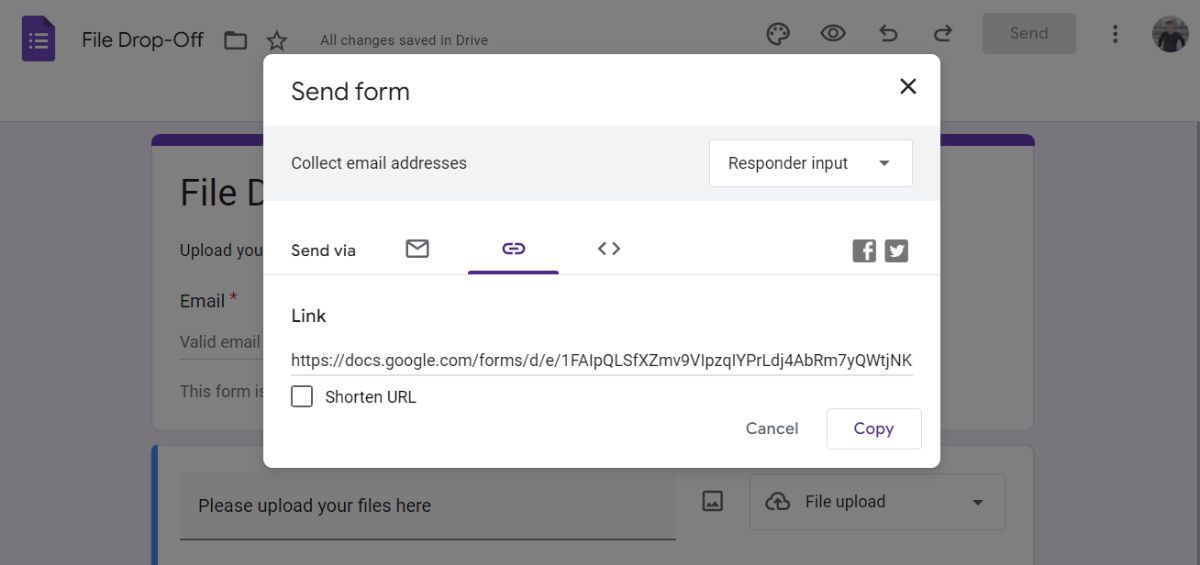 You can access all you need to link to and embed the form by clicking "Send" at the top of the screen. By default, Google Forms assumes you want to email a link to the form, but if you click on the link icon, you can copy the link directly. Also, there's a "<>" icon, which is useful if you want to embed the form into your website (your website builder like Wix, GoDaddy, SquareSpace, or Google Sites should have instructions for that).
Step 5: Testing Your Google Form
Before you share your form, you should try submitting the form yourself to make sure it works!
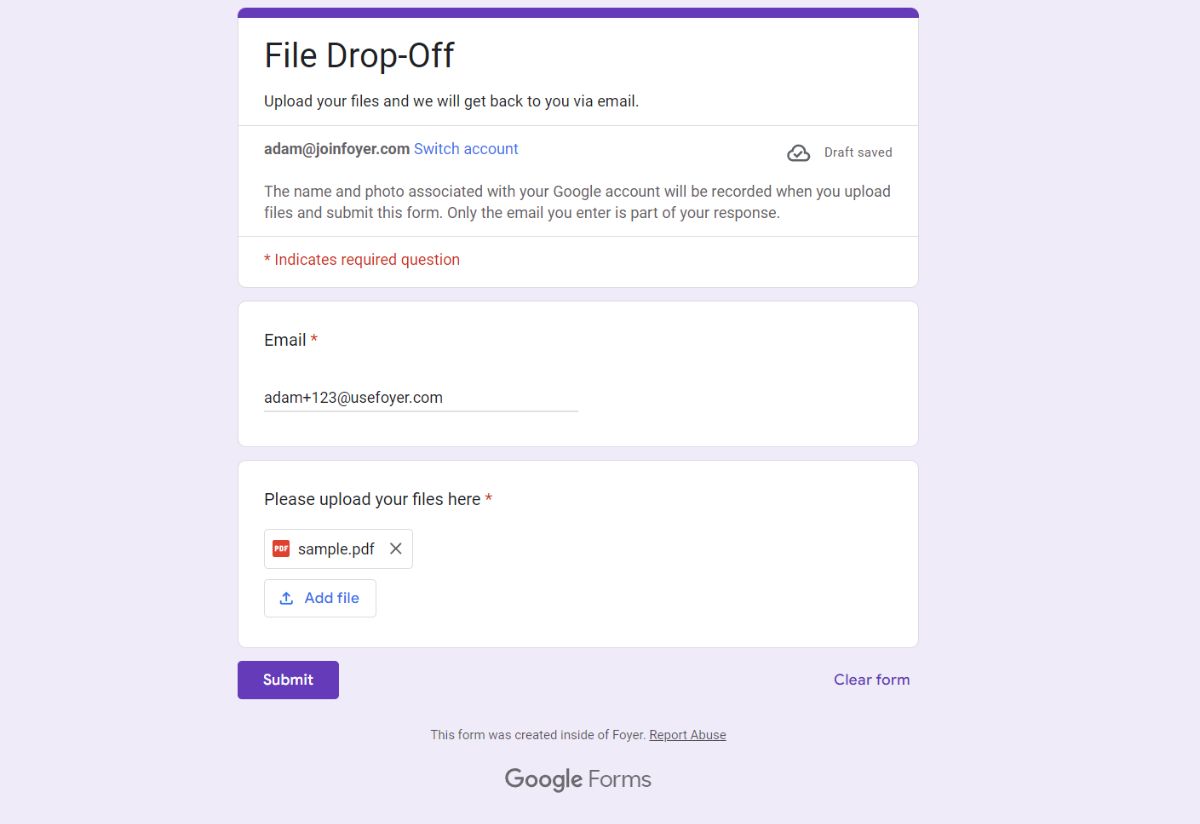
To test your form:
- Open a new browser window (if possible, open it in Incognito mode)
- In the address bar, paste in the link to your form (from the "Send" dialog)
- You will be asked to login. Login with a personal Google account
- Make sure to use a different Google account than what you made the form with!
- Enter a personal email address and select a file to upload
- If possible, use some email address that is not associated with the Google account
- Click submit
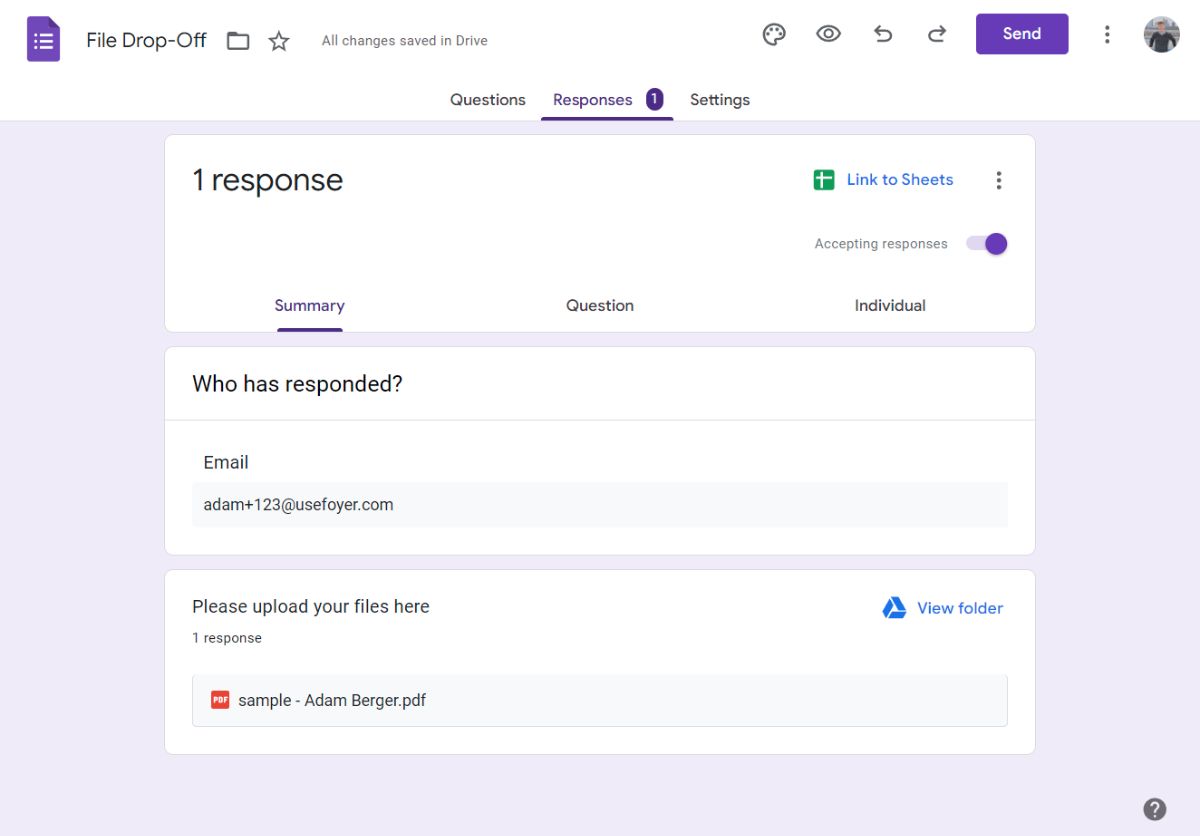
Step 6: Viewing Form Responses In Google Forms
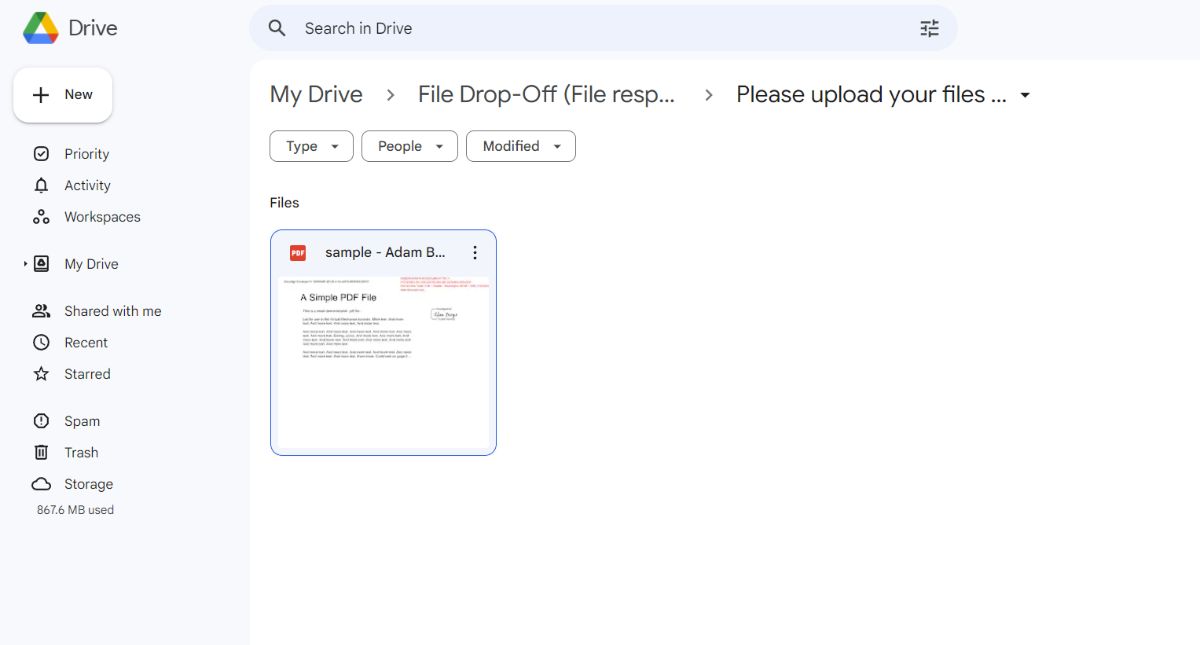
Every time a client submits a form, you'll get a notification in Google Forms in the "Responses" tab. In the screenshot below, you can see how it looks to view a form response. You have access to the client's email address, and each file they submitted. You can easily navigate to the folder in Google Drive where the files are located by clicking "View folder".
Step 7: Viewing Form Responses In Google Drive
The files your clients upload can be viewed both from Google Forms, and directly in Google Drive. After you receive your first form response, you'll find that several folders have been automatically generated in your Google Drive. Each File Upload field is given its own folder in Google Drive.
To find your client's files, look for a folder that matches the name of your Google Form. Inside that folder, there will be another folder that matches the name you gave to the File Upload field. Click on that folder, and you'll see all the files your clients have securely uploaded to you.
Pros and Cons of Using Google Forms to Collect Documents
Your Google Drive client portal is now ready for use, but is it the right solution for your business? Here are some pros and cons of this method.
- Pros
- It is either free (if you only need 15GB of storage) or at least inexpensive
- It is secure (See why here)
- It is relatively easy to set up
- Cons
- Your clients cannot view or download the files they submitted
- You cannot securely share files back to your clients
- Requires clients to make a Google account
- Missing some features you may need (e.g. file signatures, messenger, client login)
If you need features like client login, file signatures, or a secure messenger, you should probably use a dedicated client portal.
I suggest Foyer because it is low cost (as low as $10 per month) and includes all those features and more. You can even try it out for free without a credit card. Onboarding to Foyer is quick (takes 1 minute) and their support will help you migrate any existing data you have.
But, before you decide, let's check out the second way you can create a Google Drive client portal.
Option 2: Creating a Client Portal with Google Drive Using Shared Folders
Our second option will give your clients the ability to not only upload, but also securely download files.
The flexibility comes at a price: this method requires a bit more work to setup. That's because you'll have to create a new folder for each client, and make that folder accessible by inviting each client individually.
Step 1: Create a New Folder for Each Client
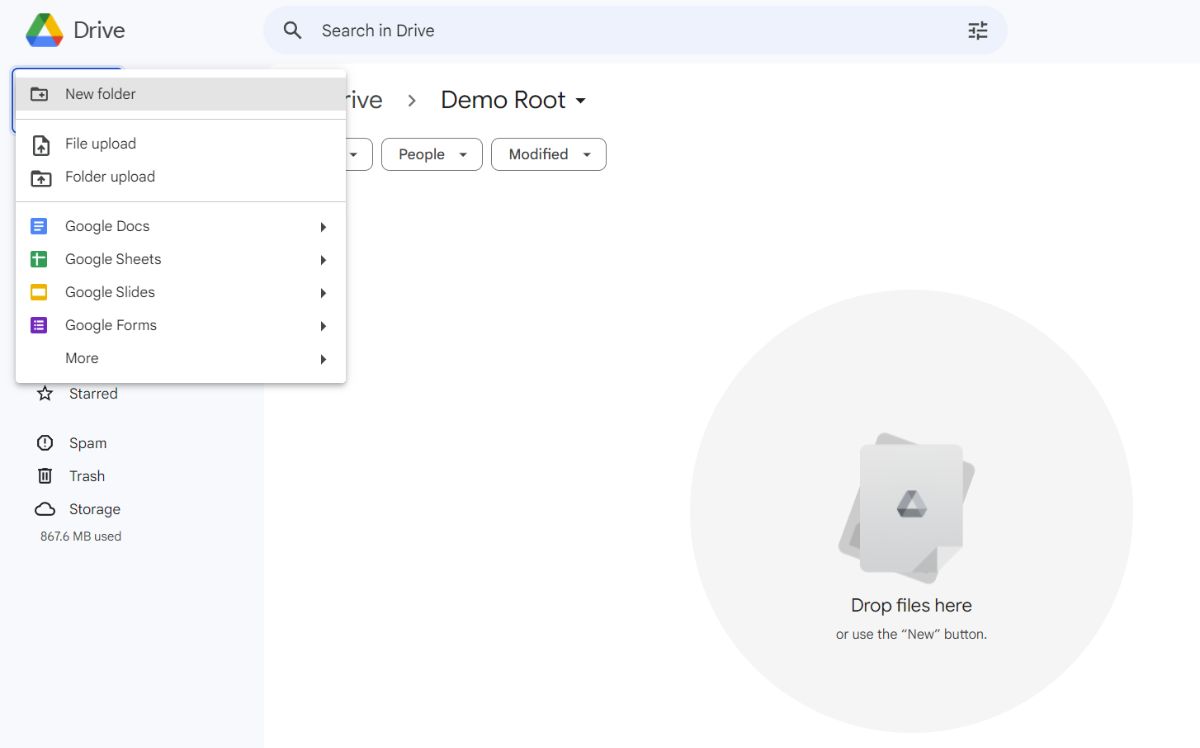
Go to Google Drive and create a new folder (using the "+ New" button on the top left). You'll need to do this for each client or business you want to share files with (to isolate each party's files from each other).
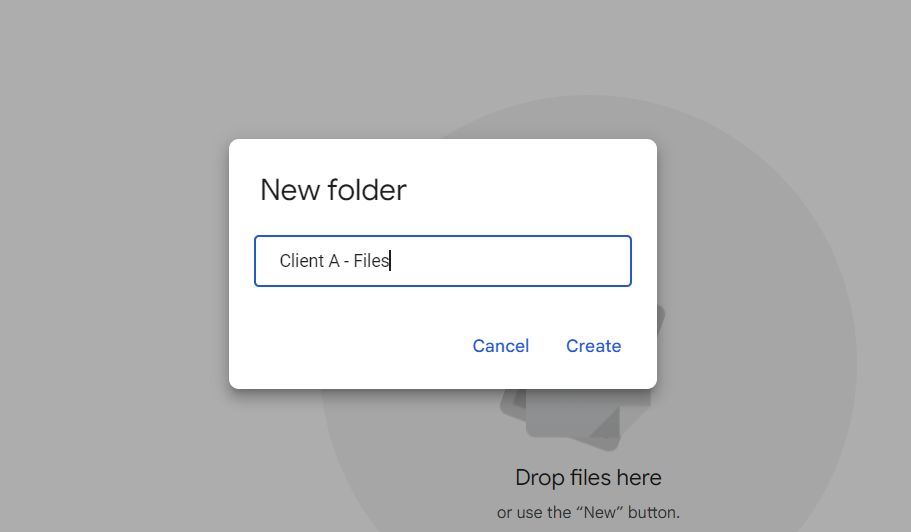
To get started, we can just make a single folder just for testing out this method. I called my folder "Client A - Files" (to make it clear that this is for one specific client).
Step 2: Share Each Folder With The Relevant Client
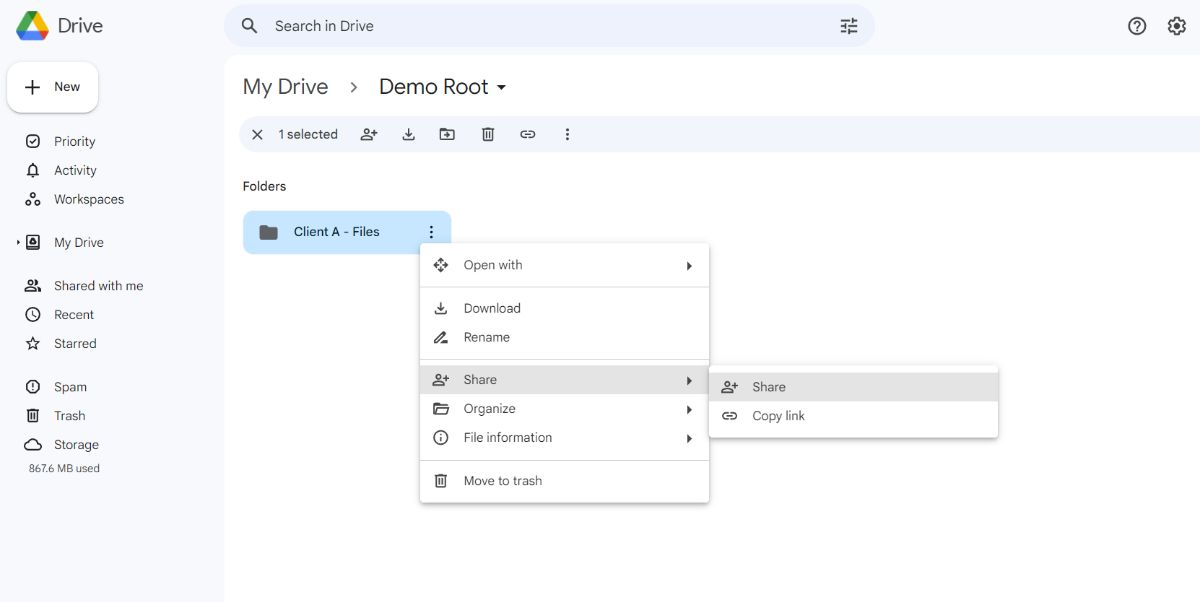
In Google Drive, there is an option to "share" any folder. You can access it by hovering on the folder, and clicking the three dots on the right.
Navigate to "Share", then click the "Share" option. Most things from Google are well designed... having two "Share" options is an exception.
 In the "Share" dialog, you'll see an option to "Add people and groups". As you type in that field, you may see there are automatic suggestions. These are pulled from any contacts you have in Gmail. Note, we also have a guide on a Gmail client portal too.
If the client you need doesn't show up automatically while typing, you'll have to ask your client directly for their email address (and paste it in).
Make sure to add your clients as "Editor" if you need them to upload files!
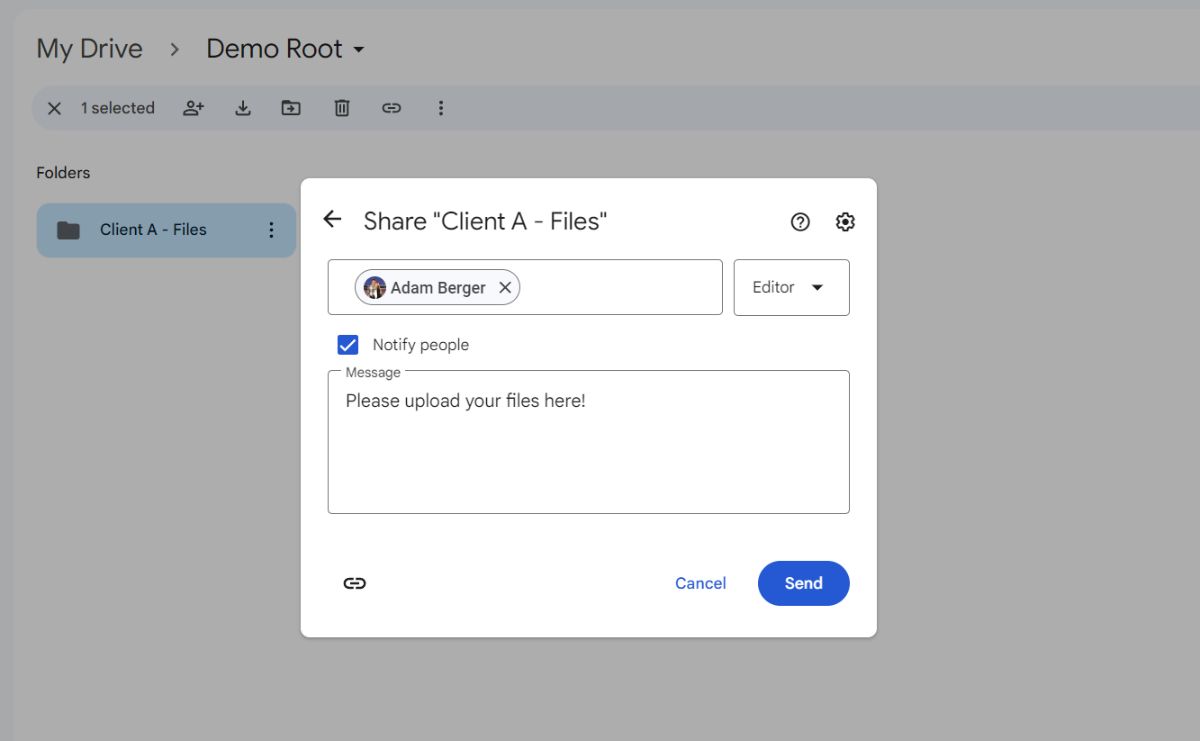
You can choose to either notify the client via email or share silently. Typically, you'd want to send a notification. This makes it easy for your client to locate their files.
If you choose to add a message, it will be added to the notification email. This is ideal when you need specific files from clients (for example, if you need their W2 form).
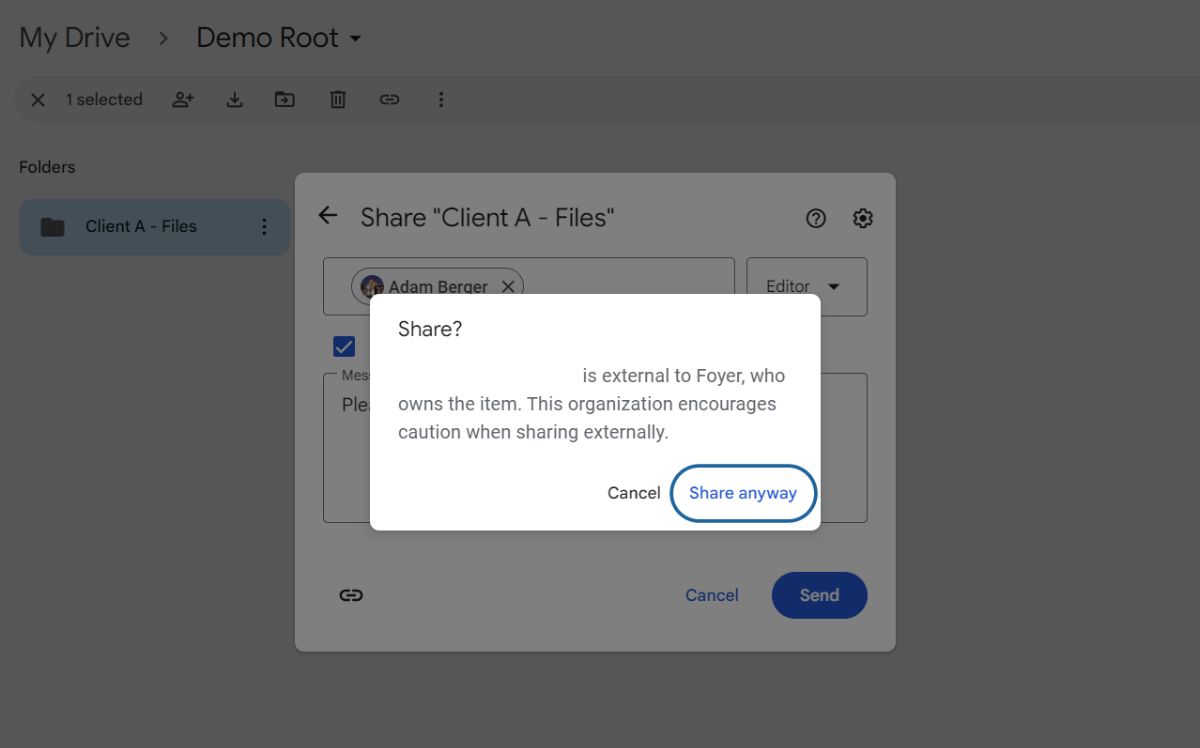
After clicking "Send" you may receive a dialog warning that this folder will be accessible outside of your organization. This is actually exactly what we want, so we can click "Share anyway". Just be aware that any data in this folder will be accessible to the client you added!
Step 3: Clients Can Now Upload and Download Files
After sharing a folder with a client, your client will receive an email from Google notifying them of this new folder. They will be able to click on the email, and access any files you had in the folder, and they can even add their own.
You will both be notified whenever there is a new file upload.
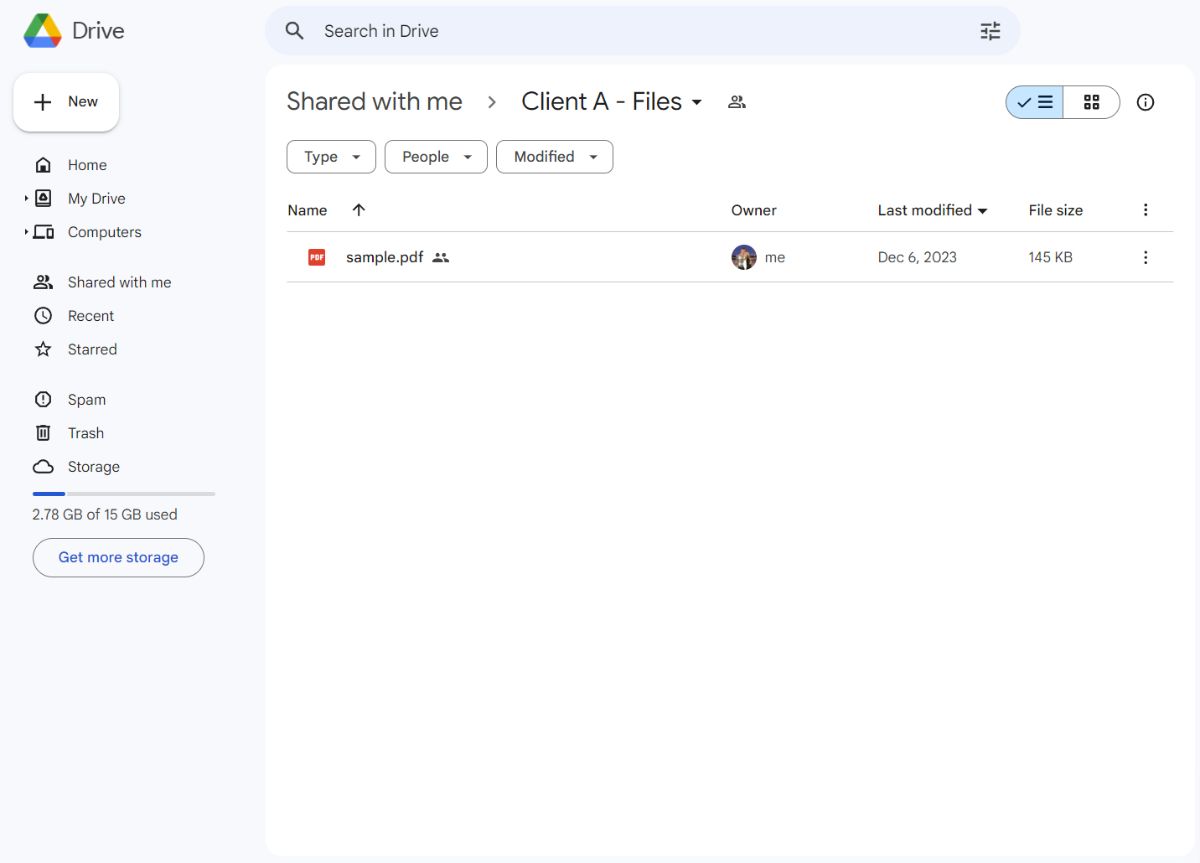
 Below is a screenshot of a client who just uploaded an example contract to the shared folder.

Your Google Drive client portal is ready for business. You can now go ahead and repeat the process for each client.
Pros and Cons of Using Shared Folders in Google Drive
Using shared folders in Google Drive is a great way to securely share files, but is it the right solution for your business? Here are some pros and cons of this method.
- Pros
- Clients can both upload and download files
- It is secure (See why here)
- It is either free (if you only need 15GB of storage) or at least inexpensive
- Cons
- You need to know each client email, and invite them yourself
- Requires clients to make a Google account
- Missing some features you may need (e.g. file signatures, messenger, client login)
I find it really cumbersome to invite each client manually. For new clients, you may not know their email (if they found your business online), and it is unscalable to manually add each new client. If you agree, you might want a dedicated client portal.
Dedicated client portals have client registration pages and enable clients to upload without making accounts. Onboarding new clients is completely self-serve, and doesn't require any manual work.
I suggest Foyer because it is low cost (as low as $10 per month) and has every feature you'd need (e.g. file signatures, messenger, client login, 2FA). You can even try it out for free without a credit card. Onboarding to Foyer is quick (takes 1 minute) and their support will help you migrate any existing data you have.
Let's get back to our third, and final, method which is to create a Google Drive client portal using public folders.
Option 3: Creating a Client Portal with Google Drive Using Public Folders
The quickest, but least secure, way to create a Google Drive client portal, is to create a new folder for each client and make that folder publicly accessible for uploads and downloads. This method is not secure and should not be used for any sensitive information.
That said, this is a great option if you're sharing photos, videos, or marketing assets that you don't mind being public.
For example, if you're a marketing agency who creates video advertisements, you could use this method to share large video advertisements (1GB+) with your clients.
Step 1: Create a New Folder for Each Party
Go to Google Drive and create a new folder (using the "+ New" button on the top left). Just like our previous method, you'll need to do this for each client or business you want to share files with (to isolate each party's files from each other).
For this demonstration, I just make a single folder to test it out called "Client A - Files".
Step 2: Make Each Folder Public
In Google Drive, there is an option to "share" any folder. You can access it by hovering on the folder, and clicking the three dots on the right.
Navigate to "Share", then click the "Share" option.
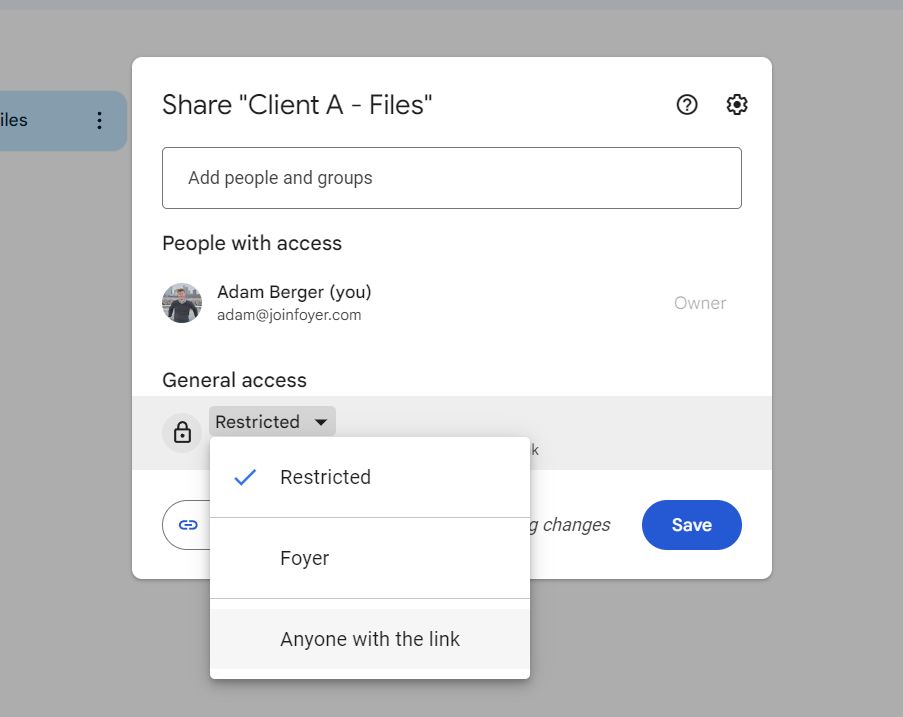
A dialog will come up that gives you several options on how to share this folder. In our case, we want to make this folder publicly accessible.
To do that, under "General Access" select "Anyone with the link".
Then, on the bottom left of the dialog, click the button "Copy Link".
Step 3: Send Each Client a Link
Finally, send the link we copied from the previous step to any client who needs access to the folder. You'll have to do this for each folder.
Clients who have a Google account will be able to both upload and download into the folder, and any storage they use will be used from your Google Drive subscription.
Clients can actually download files without logging into a Google account (only upload requires login).
The screenshot below shows a client using this public folder to upload a new file.
Pros and Cons of Using Public Folders in Google Drive
Using public folders in Google Drive is a quick way to share files, but it is not secure. But, don't count it out! It still could be the perfect solution for your business. Here are some pros and cons of this method.
- Pros
- Clients can both upload and download files
- It is either free (if you only need 15GB of storage) or at least inexpensive
- Cons
- You need to know each client email, and invite them yourself
- It is not secure (anyone can access and modify the files)
- Missing some features you may need (e.g. file signatures, messenger, client login)
For most businesses, sharing files publicly is going to be a deal-breaker. If that's the case for you, you should look into dedicated client portals.
I suggest Foyer because it is low cost (as low as $10 per month) and has every feature you'd need (e.g. file signatures, messenger, client login, 2FA). You can even try it out for free without a credit card. Onboarding to Foyer is quick (takes 1 minute) and their support will help you migrate any existing data you have.
Is a Google Drive Client Portal Enough?
If one of the options I brought up in this article is a perfect fit for your business, that's great! It's better to use tools you already have, especially when they are free.
But, for many businesses, even though a Google Drive client portal could work, it is not enough. You'll likely need a dedicated secure client portal. Foyer offers all the essentials (secure file sharing, client messenger, email notifications, 2FA) for a low price per internal user. Onboard your business or contact us directly and we can help you get started.
Still comparing solutions? Start with our roundup of the best client portals, then choose client portal software that works alongside Google Drive without the folder-link chaos.
Hopefully, you found a solution here that works for your business. If not, contact us and we could provide some suggestions.