How to Set Up SharePoint for Your Business (Step-by-Step)
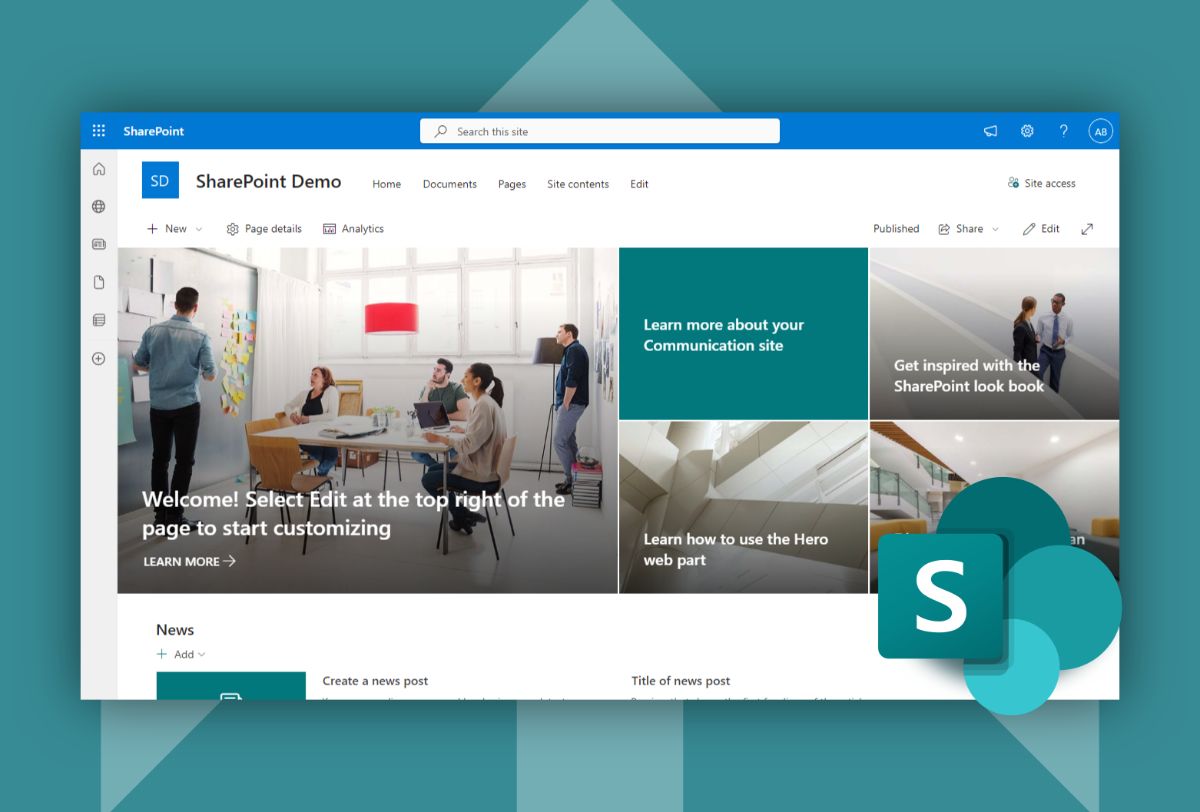

Microsoft SharePoint is a great way for businesses to create websites, and share files all within the Office 365 ecosystem. But, with the different versions of SharePoint (e.g. on-premises vs online) and subscriptions, it can be tricky to understand how to get started.
In this guide, I'll be going step-by-step how you can set up SharePoint for your business so you can create a knowledge base for your business, and share files.
But it's important to know: SharePoint currently does not support creating a public website. There are a few options if you need to create a client portal or customer facing website.
If you need to set up SharePoint as a customer portal, the best options are to either:
- Create a SharePoint Client Portal using Microsoft Power Pages
- Use a dedicated client portal like Foyer
If you're looking to make an internal site for your business, this guide should be all you need to get started with SharePoint.
We will start off by choosing which version of SharePoint is best for your business, then move along to creating a website and sharing files in SharePoint.
Let's get right into how to set up SharePoint for business by choosing which version of SharePoint your business should choose.
SharePoint Server vs SharePoint Online
Microsoft provides two options for using SharePoint: on-premises with SharePoint Server, or in the cloud with SharePoint Online (also known as "SharePoint in Microsoft 365" or SPO).
If you're a small business trying to get up-and-running with SharePoint as fast as possible, it is best to stick to SharePoint Online.
There are a few cases when medium or large businesses would want to choose SharePoint Server (e.g. more control over data and updates), but for the most part, you're better off choosing to use the SharePoint service Microsoft provides in the cloud.
This guide assumes you are going with the SharePoint Online route.
That is the most common way to set up SharePoint, and best choice for almost every business.
What Office 365 Subscription Do You Need For SharePoint
Microsoft provides two plans for using SharePoint in Microsoft 365: SharePoint (Plan 1) or Microsoft 365 Business subscriptions.
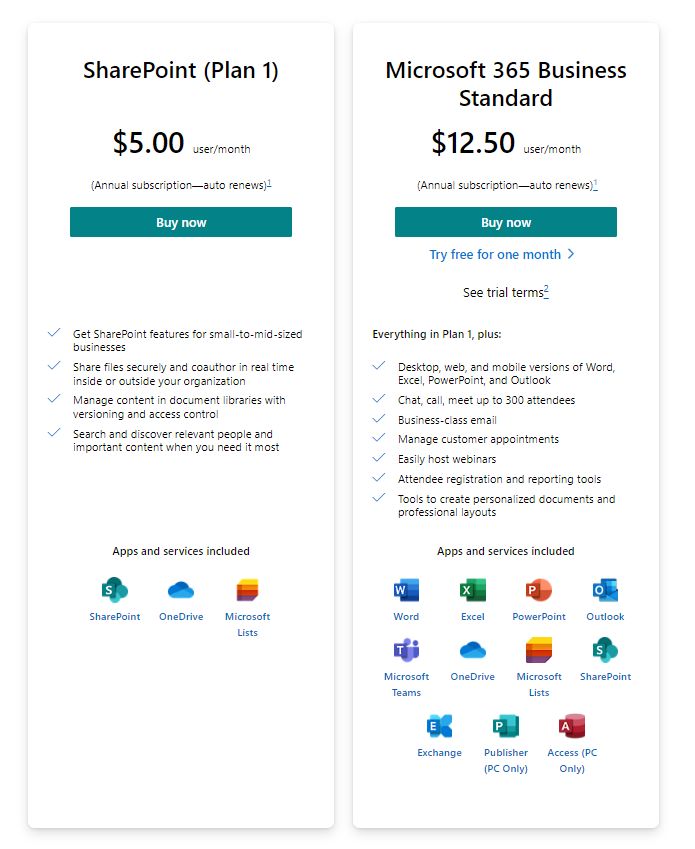
SharePoint (Plan 1) basically just comes with SharePoint and OneDrive (for personal file storage), while Microsoft 365 Business Standard comes with SharePoint and a whole suite of Office 365 products including Word, Excel, PowerPoint, Teams, Outlook and more.
If you only need SharePoint, you're better off choosing the SharePoint (Plan 1), as you won't be paying for services you don't need.
However, there's no denying that getting all the Office 365 services included in one bundle is a great deal. If I had to guess, I would assume most businesses who create SharePoint sites are on the Business Standard plan, as they have committed to the Microsoft ecosystem by using Teams for internal chats, and Outlook for email.
Keep in mind SharePoint is priced per user. This means anyone internal to your business who needs access SharePoint must have their own license.
If you'll be following along to this guide, I suggest you just buy one license. You can always add more licenses later on as you roll out SharePoint to your whole business.
How to Create a SharePoint Site
After you've selected your SharePoint subscription, you have everything you need to create your first SharePoint site.
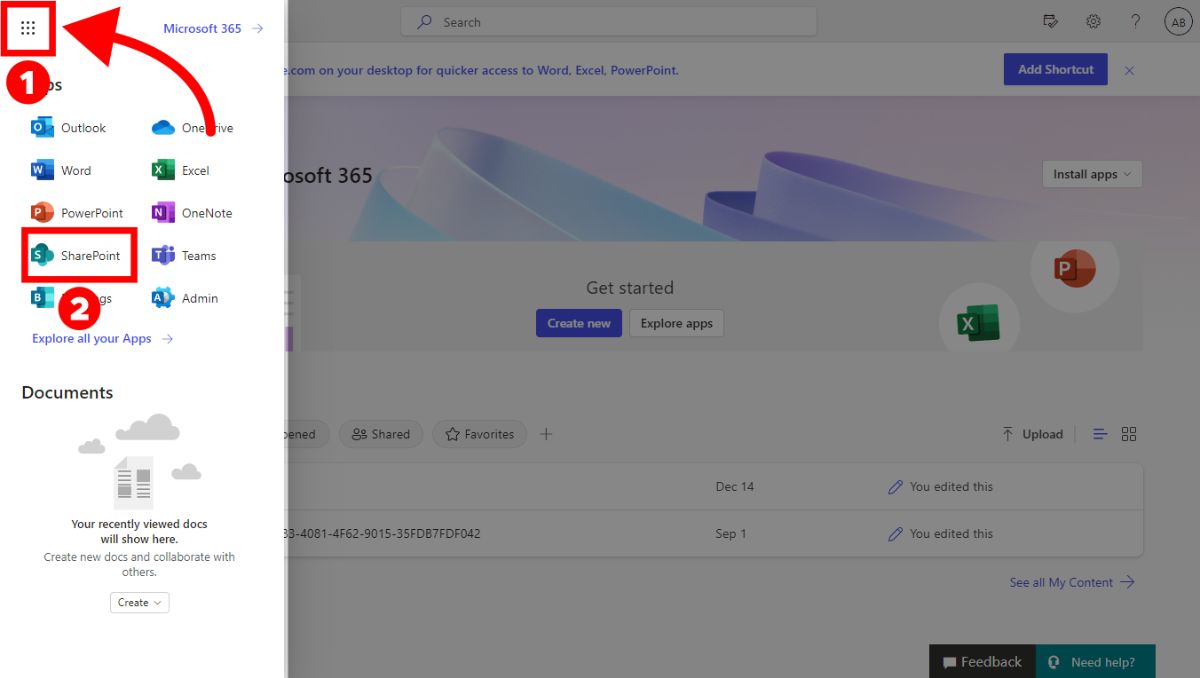
To create a SharePoint site, first login to Office 365 and click the App Launcher on the top left corner of your screen (see screenshot below). Then, select the SharePoint option.
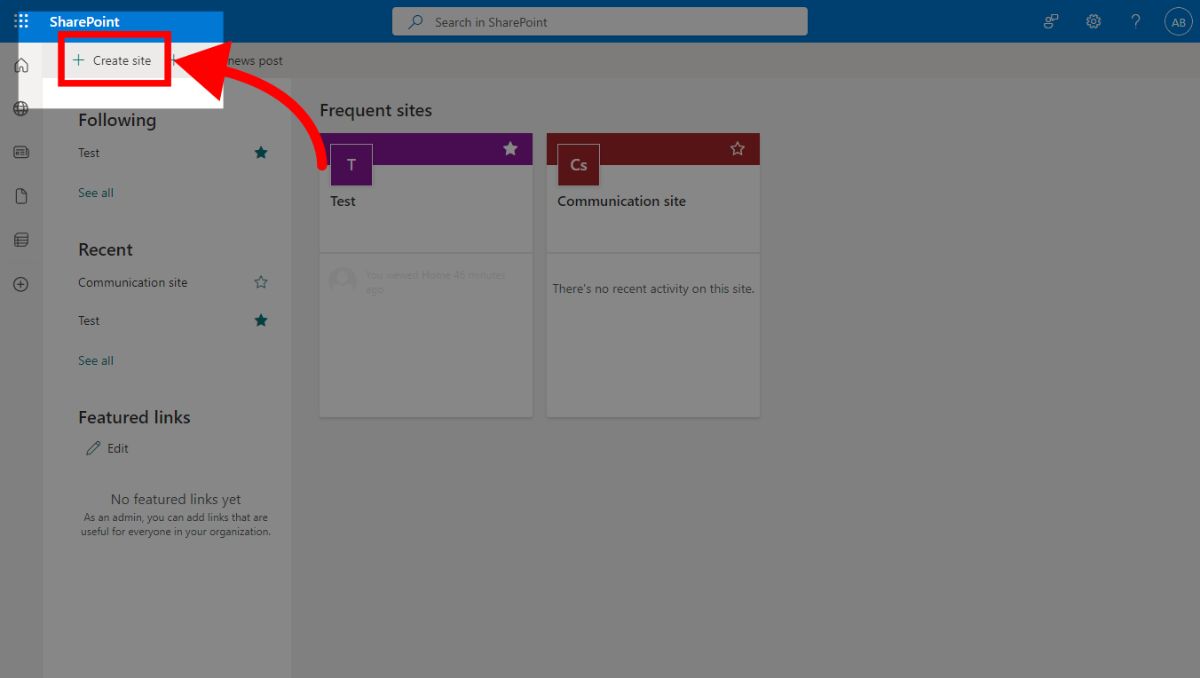
From there, you'll find yourself on a SharePoint dashboard where you can see all your sites and posts. To create a new site, click on the "Create site" option on header at the top of the page.
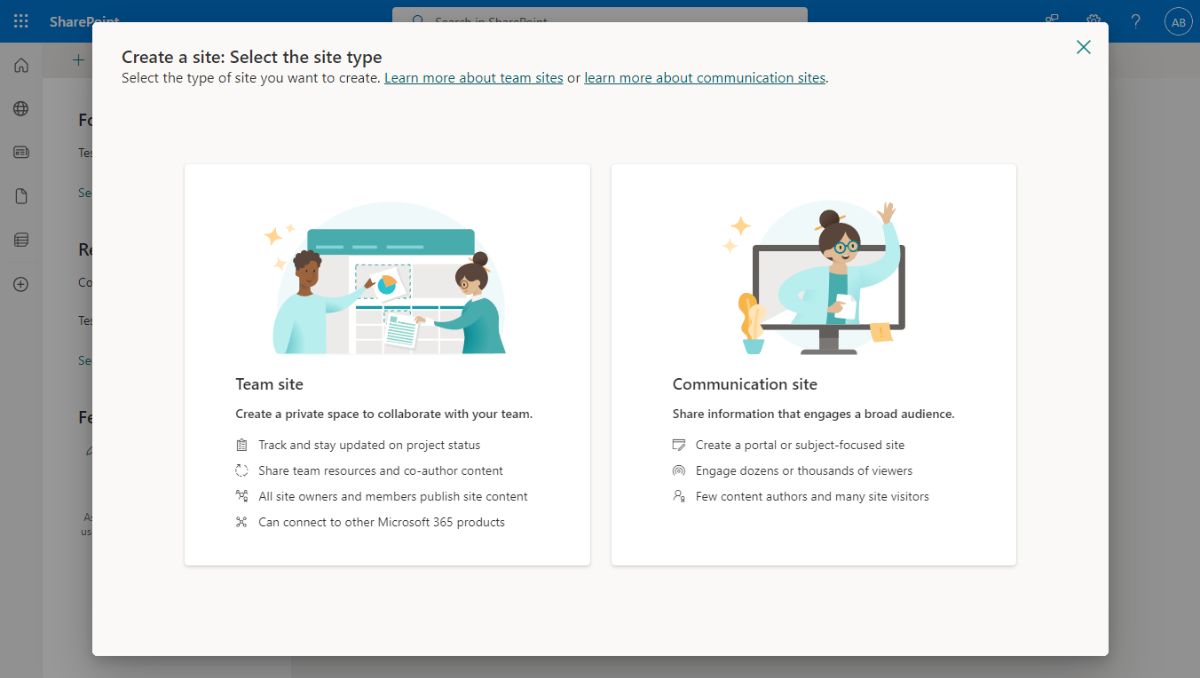
Choose a Site Type: Team Sites vs Communication Sites
There are two types of sites you can create with SharePoint:
- Team sites
- Best for sharing internal information within your business
- Ideal when you're collaborating on content with your employees
- Communication sites
- Best for sharing external information with your clients
- Ideal for when you're publishing content
The best type of site for SharePoint will depend on what you need SharePoint for. For example, if you're creating a portal where you can publish content for clients, a communication site would be best. If you're setting up a editable knowledge where you can collaborate with your employees, a team site would be ideal.
You can learn more about Team sites and Communication sites by checking out Microsoft's official guides (see links).
In this guide we will be setting up a Communication site, but the steps will be similar if you're using a Team site too.
Select a SharePoint Site Template
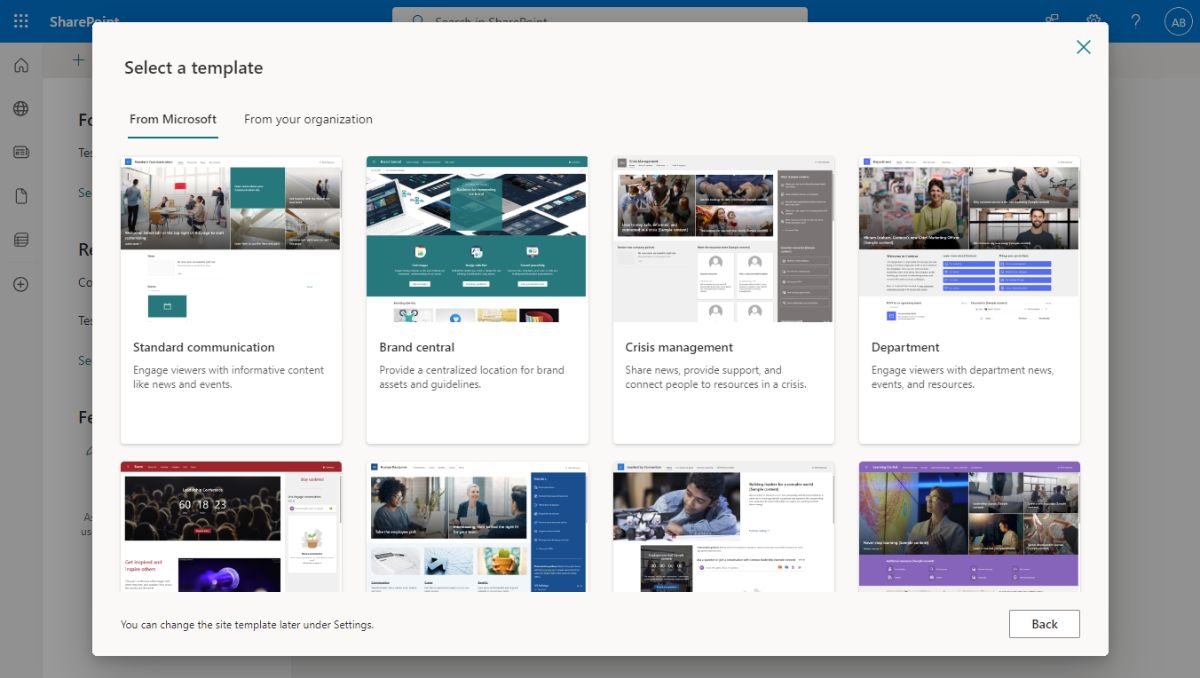
Microsoft provides several different site templates that will save you from needing to design your own site.
Browse through the templates and find one that works for your business. In this guide, I chose the "Standard communication" template.
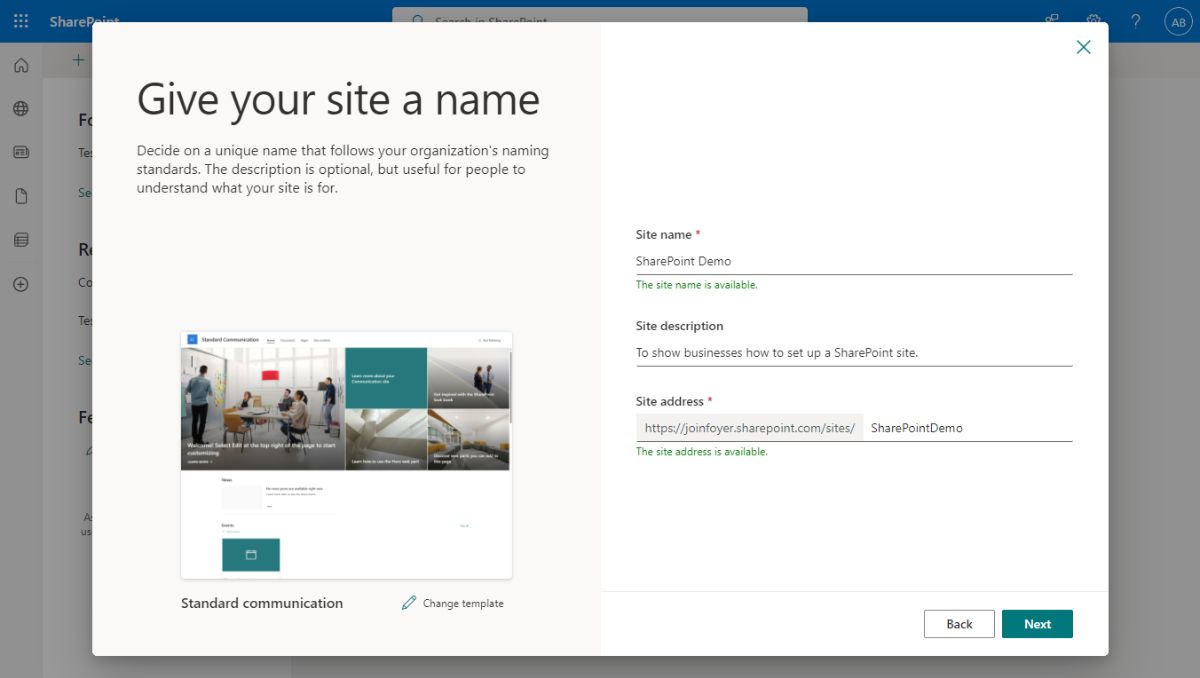
 After selecting your template, you just need to name your site. You can also customize the "Site address". The site address is the link your business will use when sharing this SharePoint site.
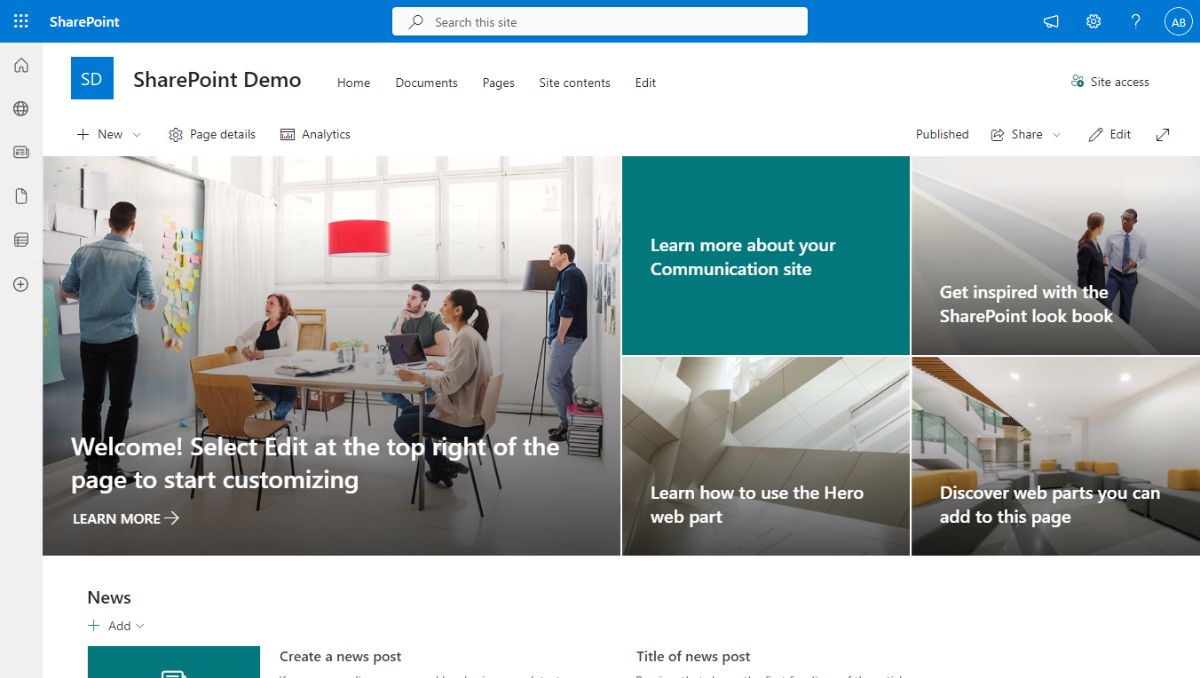
After clicking "Next", your SharePoint site will be created, and you're all ready to customize it, and share files.
See the screenshot below for an example of a fresh SharePoint site that was created from a template.
How to Customize a SharePoint Site
Now that you have a SharePoint template site created, you'll want to customize your site so it serves the purpose your business needs.
Many businesses find themselves setting up multiple SharePoint sites, which makes it important to know how to customize your template so you can make the best experience for your employees. Here are a few popular SharePoint sites that businesses set up:
- New Employee Onboarding Resources
- File Sharing Portal
- Internal Company News
- HR Benefits Information Site
I'll touch on how to customize a SharePoint template with "web parts", so you can make a great site for any of those use cases.
What is a "Web Part" in SharePoint?
A SharePoint site is made up of different pages, and on those pages, are "web parts".
But, what exactly is a "web part"? SharePoint Web Parts are the elements (like buttons, documents, lists, and links) that you can place on a SharePoint page.
SharePoint offers a wide range of web parts from just a regular link, to embedding YouTube videos, and even showing your org chart. They can be added to any page by going into "Edit" mode, and clicking the "+" plus sign while hovering over any section.
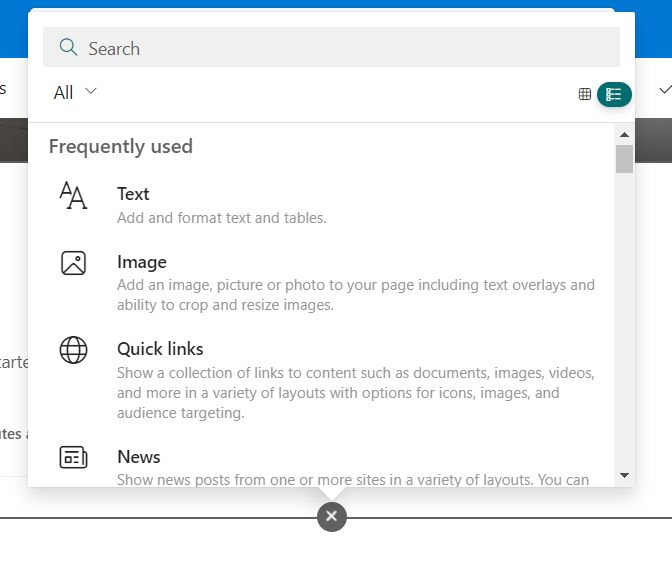
Let's revisit that list of common SharePoints, and I'll share a few web parts for each site that would be a great fit:
- New Employee Onboarding Resources
- Org Chart web part
- File Sharing Portal
- Document library web part
- Recent documents web part
- Highlighted content web part
- Internal Company News
- News web part
- Feed for Viva Connections web part
- HR Benefits Information Site
- Stream web part (for benefits video instructions)
- Group calendar web part (for important dates)
After adding a web part, there is a drawer to the right where you can customize every aspect of it.
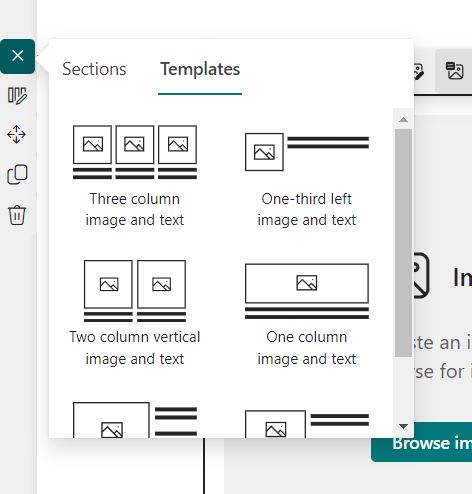
SharePoint lets you choose from a bunch of different layouts (called "sections" and "templates") that let easily organize your web parts. The options range from simple column layouts (e.g. 1 column, 2 columns, 3 columns) to the responsive card layouts provided by "templates".
Sections and templates are mainly for making your site look clean, which is important, but it is only cosmetic.
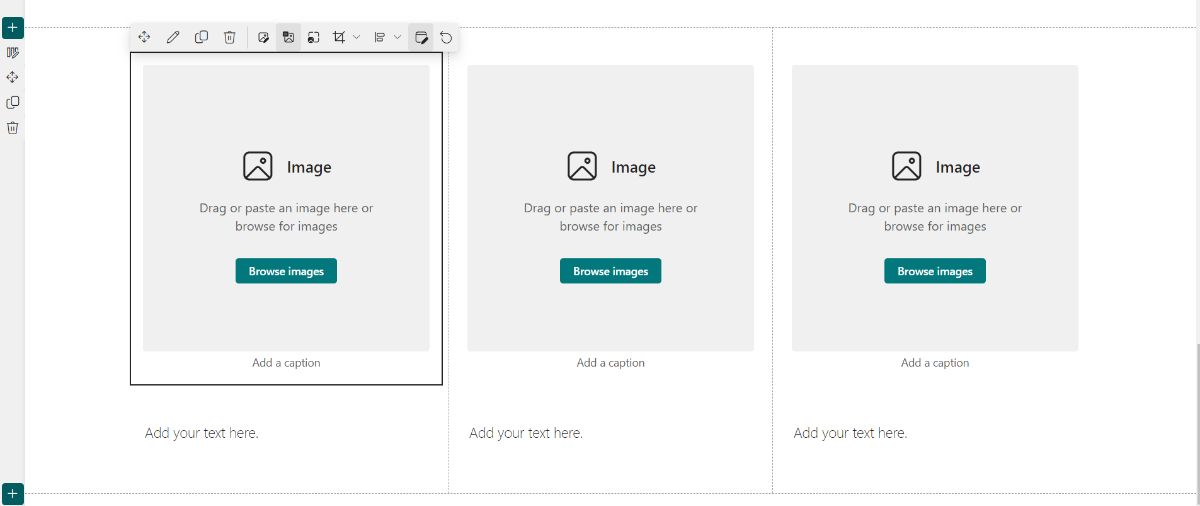
Below is an example of a "Three column image and text" template which would work great for blog posts or news posts.
How to Share a SharePoint Site
SharePoint lets you share a page with anyone inside of your organization. You can share by sending a link, or via email. You can even assign different permissions to certain users or groups (handy if you're looking to collaborate on your pages by adding other editors).
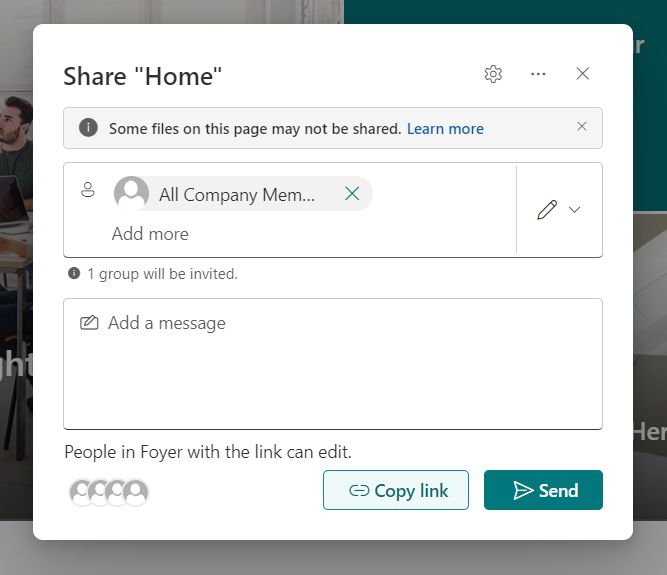
To get started, click on the "Share" button on the top of the page you want to share:
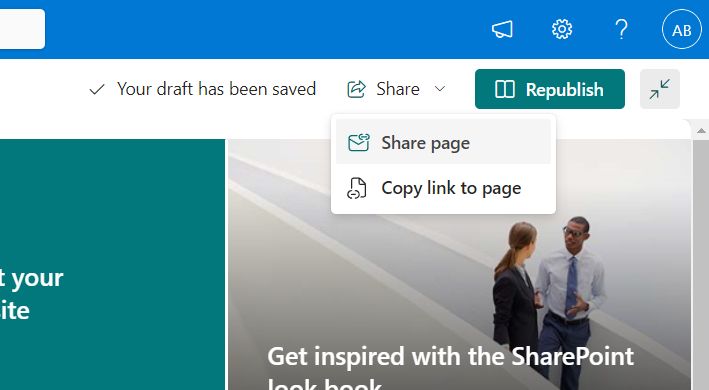
Then, a dialog will appear where you can enter any users, groups or emails to share the page with. If you want to assign special permissions to certain users or groups, you need to click on the settings button (the cog) on the top right of the dialog.
You can either send the users a link via clicking "Copy link" or by clicking "Send" to send them an email invitation.
How to Share a SharePoint Site With Anyone (External Users)
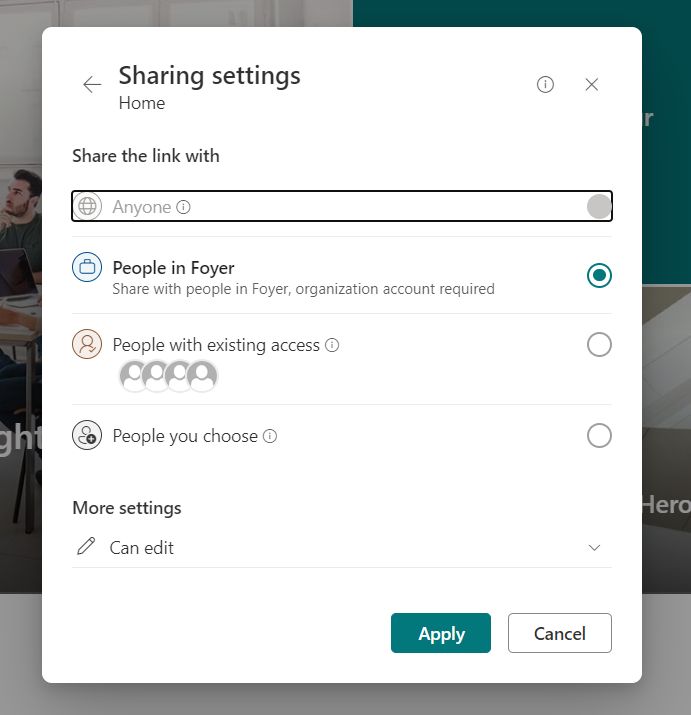
If you're wondering "Why is 'Share the link with Anyone' greyed out in SharePoint", that's because does not allow unauthenticated users to access any SharePoint site. While there is an option to "Share with Anyone" within a SharePoint site, the option is disabled ("greyed out").
Even if you follow Microsoft's guide on how to enable "Share with Anyone" the option to share a SharePoint page with anyone, remains disabled.
However, there are options to invite guest users to access any SharePoint site. For instructions, check out Microsoft's official guide on how to give guests access to any SharePoint site.
How to Share Files With SharePoint
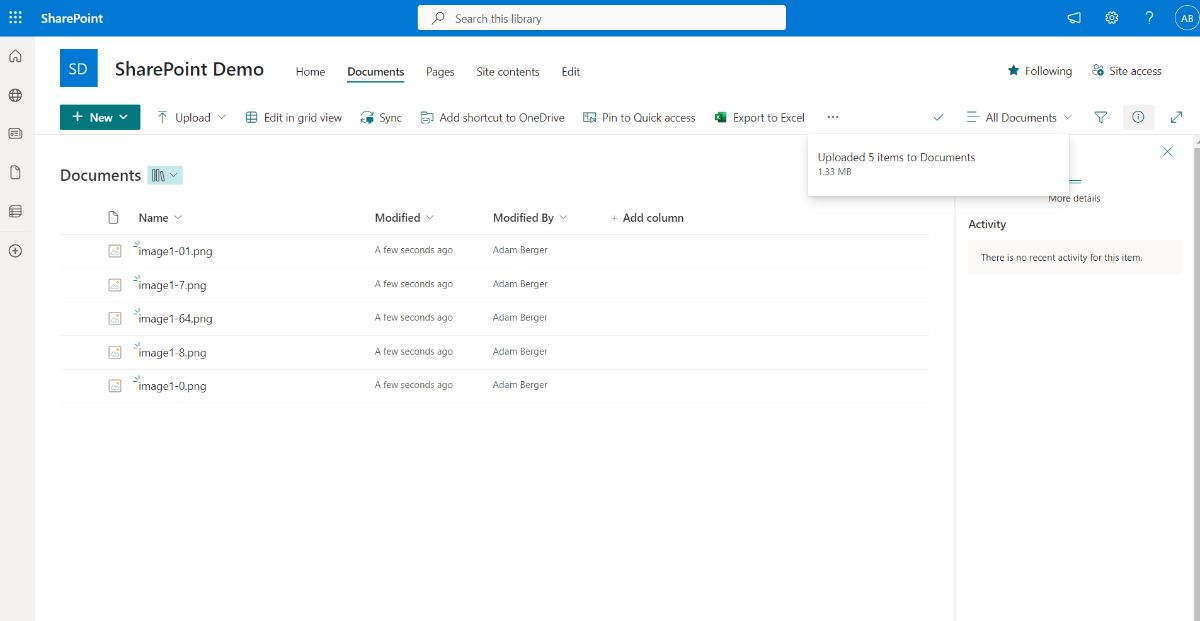
Every SharePoint site comes with a documents tab that you can use to share files with clients or internally in your company. You can upload any file or folder, and files are securely stored and accessible to anyone who can access the site.
You can even use the documents tab to share files with people outside of your organization. To do this, hover over the file or folder you want to share, click the three dots, and select the "Share" option.
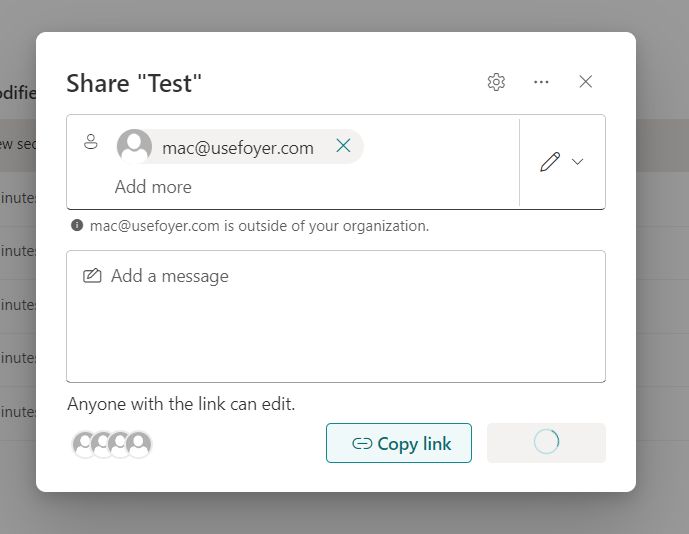
From there you can type and user, group or any email (even those outside of your organization). Click on the settings button on the top, to make sure that "Anyone" is selected under the "Share the link with" section (see the screenshot below).
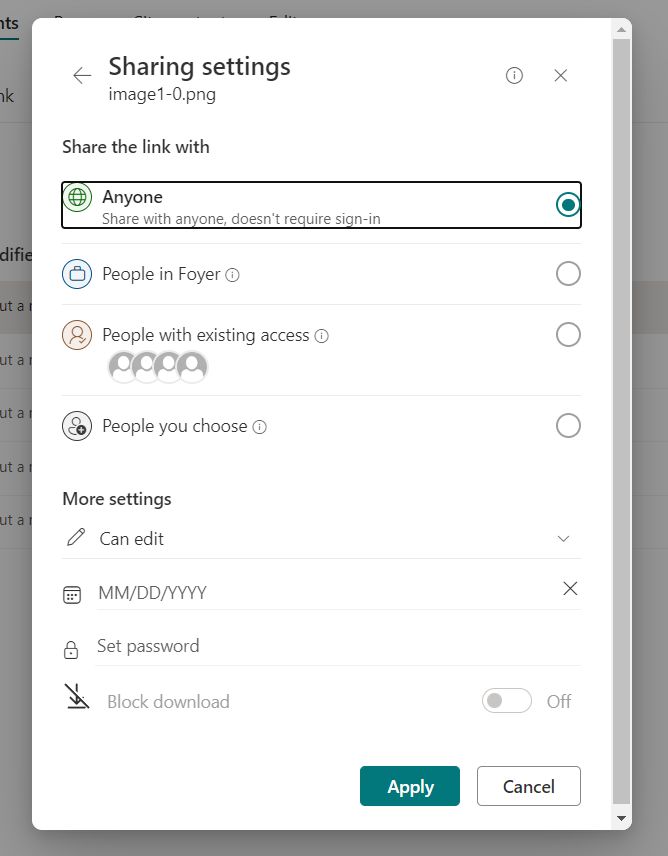
You should be careful when sharing with people outside of your organization, as SharePoint does not authenticate the users who have access to these files. This means that anyone with the link to the file or folder will be able to download and upload files.
This is dangerous, as if a shared link is accidentally forwarded or leaked, it opens up the door for cyber attack.
If you're looking for a more secure way to share files, you should really be using a dedicated client portal.
In the next section, I'll cover what a client portal is, and how you can use one alongside SharePoint.
How to Create a Client Portal With SharePoint
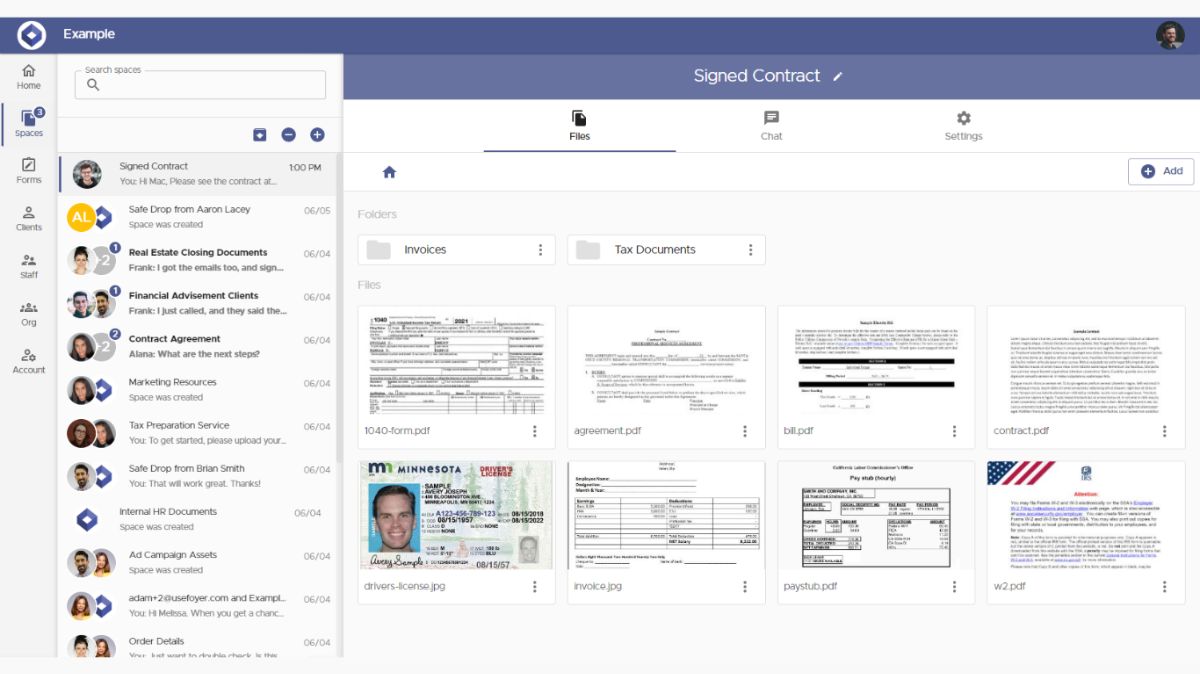
As we covered in the section above, it is not possible to share a SharePoint page with unauthenticated (anonymous) users. This means if you wanted a website where any client of yours can visit, and send you files or access information about your business, you need to use some other service.
I did a deep dive on this topic, and figure out a great way to create a SharePoint client portal with Microsoft Power Pages. If you're interested in that, you can check out my guide on how to create a SharePoint Client Portal using Microsoft Power Pages.
Otherwise, I strongly suggest using a dedicated client portal like Foyer. Foyer is low cost and includes every feature you'd need out of a client portal.
You can even try it out for free without a credit card. Onboarding to Foyer is quick (takes 1 minute) and their support will help you migrate any existing data you have.
Here's a list of some of Foyer's features:
- Secure file sharing with clients
- A secure messenger to send clients encrypted messages
- Email and desktop notifications for all portal activity
- Audit trails for every action (login, file download, file upload, etc...)
- Client multi-factor authentication (MFA/2FA) support
- Requesting e-signatures from clients
- Custom forms to collect specific client information
- Secure email via Microsoft Outlook
- An internal knowledge base builder to share internal business documents and trainings
- Desktop and mobile support
Using a Foyer client portal with SharePoint is a great solution, as SharePoint is ideal for creating content-rich internal sites, while Foyer is perfect for all your customer facing use cases like sharing files, signing files, sending messages, and more.
Wrapping Up Your Business's SharePoint Setup
I hope this guide made your experience setting up a SharePoint site as smooth as possible. Like I said earlier, most businesses find themselves making several SharePoint sites for different scenarios (e.g. HR, onboarding, company news, etc...), so you'll likely want to go through this process a few times to set your business up with every SharePoint page you'll need.
External facing websites and client portals are best handled with services other than SharePoint. But luckily, there are some great options. Creating a client portal with Foyer just takes 1 minute and should cover every situation you need when serving your clients.
Thanks for reading! If you have any feedback or questions please don't hesitate to send us a comment below.


