Create a SharePoint Client Portal with Microsoft Power Pages
Are you looking for a client portal for SharePoint, where clients can login, send you files, and download files securely as a Microsoft client portal? You're majorly in luck. Not just because you found the best guide on how to do this (wink), but because Microsoft released a new service in 2022 that lets you make your own client portal software called Power Pages.
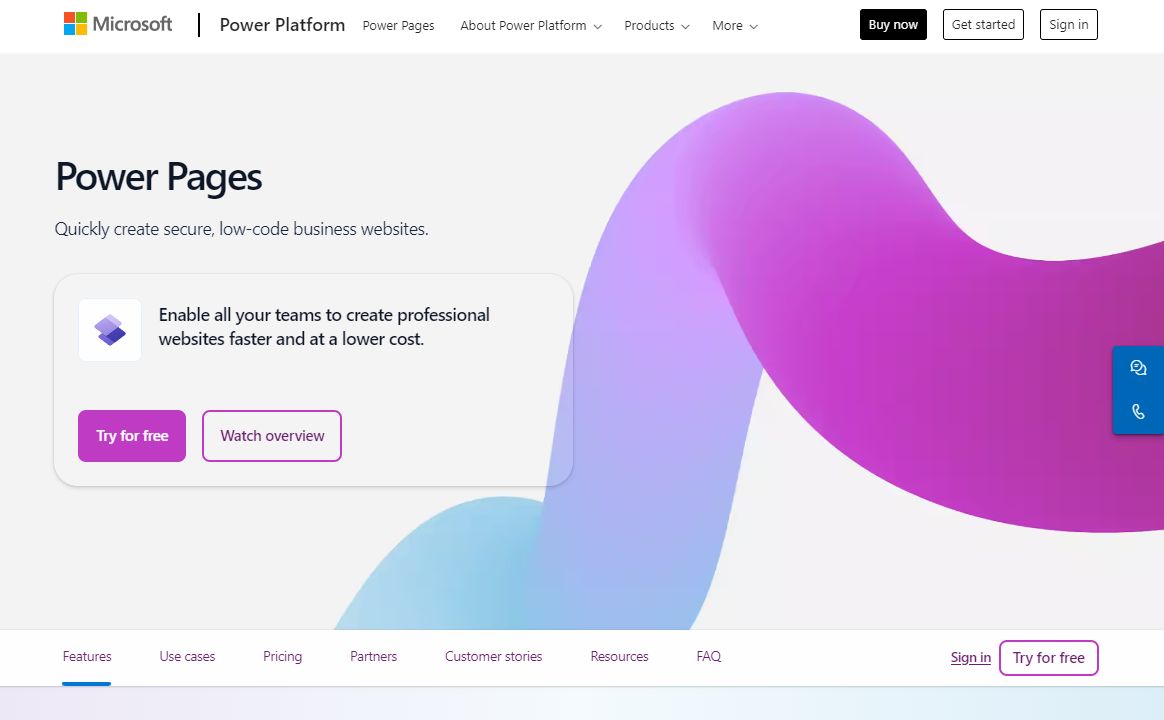
Power Pages is the new standard for creating public websites that integrate with SharePoint. It is the perfect solution for making a SharePoint customer portal.
In this guide, I'm going to show you how to:
- Create your first Power Pages Site
- Make a custom form where clients can send you files that go directly to any SharePoint site
- View all files submitted by clients from SharePoint
All of this can be done using Power Pages, and is completely no-code.
First, let me tell you a quick story of SharePoint's last 10 years. If you had a Office 365 Public Site in the past, you might remember this vividly!
The Tragic Tale of Office 365 Public Sites
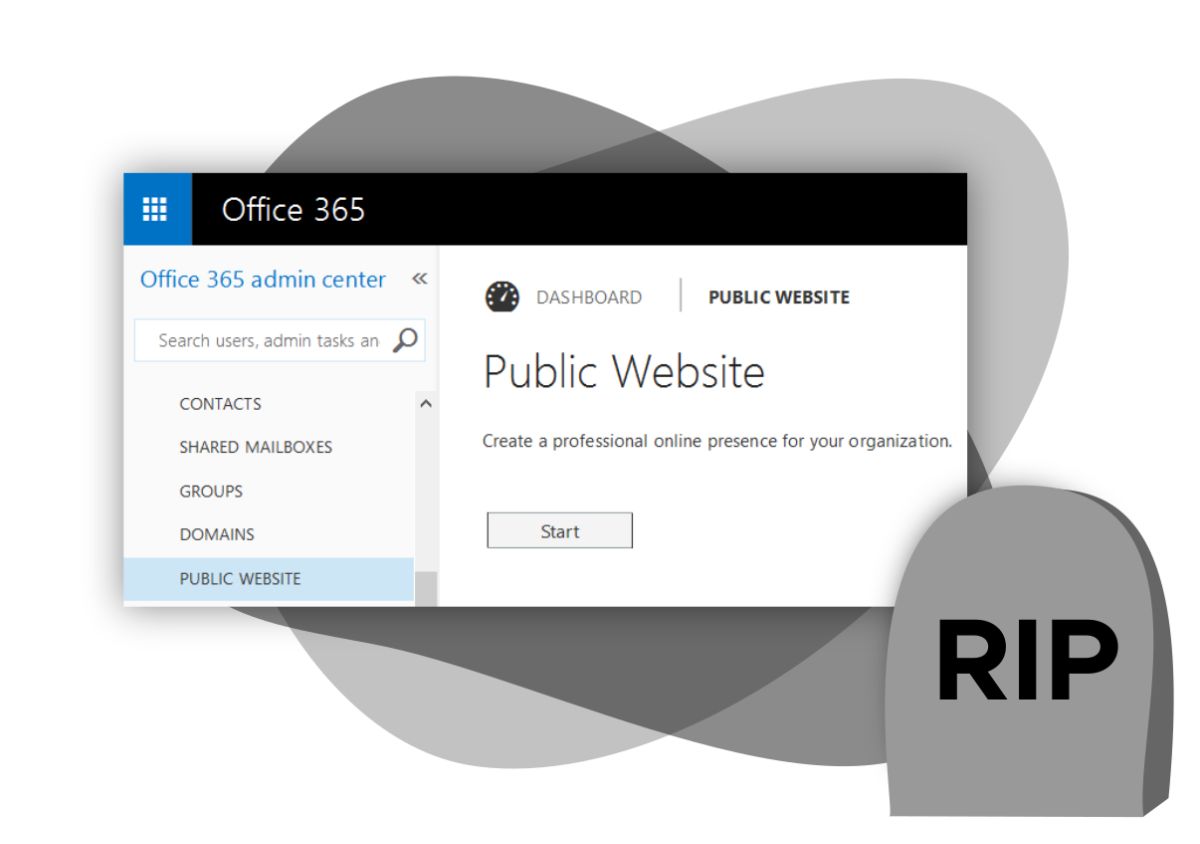
Ten years ago, in 2013, there was an easy way to create public websites with Office 365 through SharePoint called Office 365 Public Sites (or SharePoint Online Public Sites). But, it had a tragically short life. In 2015, people grew suspicious that Microsoft was going to terminate Public Sites. And, indeed, by 2017 Office 365 Public Sites was completely dead.
And the cause of death? Speculators point to lack of traction with customers, but there was no official statement on what killed Office 365 Public Sites.
By "death", I mean all external access to every site was revoked. Websites of both individuals and businesses were unusable and, therefore, abandoned. Everyone was left to find some other solution, but there was no other solution to make a public site with SharePoint.
The only consolation was that you could still share specific files and folders publicly, but it didn't fill the void left by the death of Office 365 Public Sites.
Many felt that all hope was lost, and it was...
The Redemption Arc: Microsoft Power Pages (a.k.a. PowerApp Portals, Dynamics 365 Portals)
That is, until Microsoft released Power Pages in 2022!
Power Pages is a service from Microsoft that lets you create public sites for any purpose. It is packed with features (e.g. custom styling, login, adding custom forms, etc...) and has all sorts of integrations with SharePoint, Dynamics 365, Office 365, and even Microsoft's AI assistant: Copilot.
By the way, I believe Power Pages was originally called "Power Apps portals" and "Dynamics 365 portals", but sometime in 2023 Microsoft changed the name to Power Pages. So, yes, Power Pages is the same as "PowerApp Portal" and "Dynamics 365 Portal". Power Pages is the new name.
Before We Start: Consider Using a Dedicated Client Portal
While you can make a SharePoint client portal using Power Pages, it is pretty complicated, and you're bound to run into issues that you'll have to debug yourself.
If you're looking for a more streamlined and flexible solution, we recommend a proper client portal service.
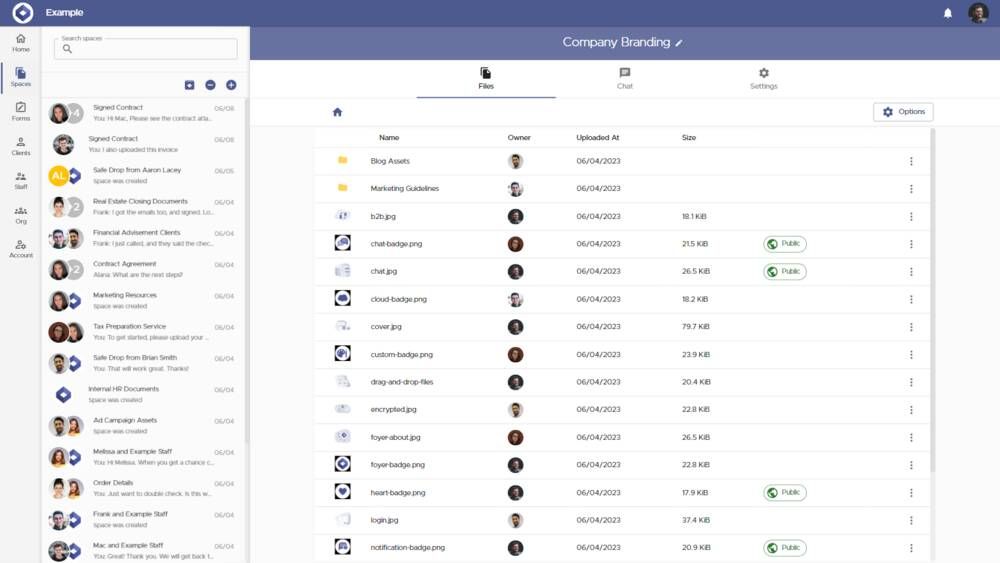
A client portal service like Foyer will give you more options like: client login, secure messaging, custom forms, internal knowledge bases, e-signatures, and more.
You can even integrate Foyer into your Power Pages site for clients to securely upload files to you. The interface is so much more modern than Power Pages, and works on both desktop and mobile.
Foyer has an onboarding wizard that makes it easy to create a client portal in just 1 minute. It is completely free for 14-days (with no credit card required at all).
Get started today and see how much better it is at sharing files than Power Pages.
Without further ado, let's get into how you can make your first Power Page.
How to Create a Power Page (Step-By-Step Guide)
It took me only 2 minutes from when I started to when I had a website made using Power Pages.
I'm not exaggerating! So you'll have your site running in no-time.
Here's a quick summary of the steps we'll cover to get your site up and running:
- Signing up for Power Pages
- Choosing a Power Page template website
- Adding your own logo and style of your new Power Page
When following this guide, make sure to use your business Microsoft account. A personal account won't work!
Signing Up for Power Pages (Requires Microsoft 365 Business Subscription)
To get started with Microsoft Power Pages, visit the Power Page landing page, and sign up for their free trial. You will need a Microsoft 365 business account to use Power Pages, but if you are using SharePoint already, that's probably what you already have.
Power Pages does not come with SharePoint, Power Pages costs extra, so visit Power Page's pricing page to be sure that the pricing is reasonable for you.
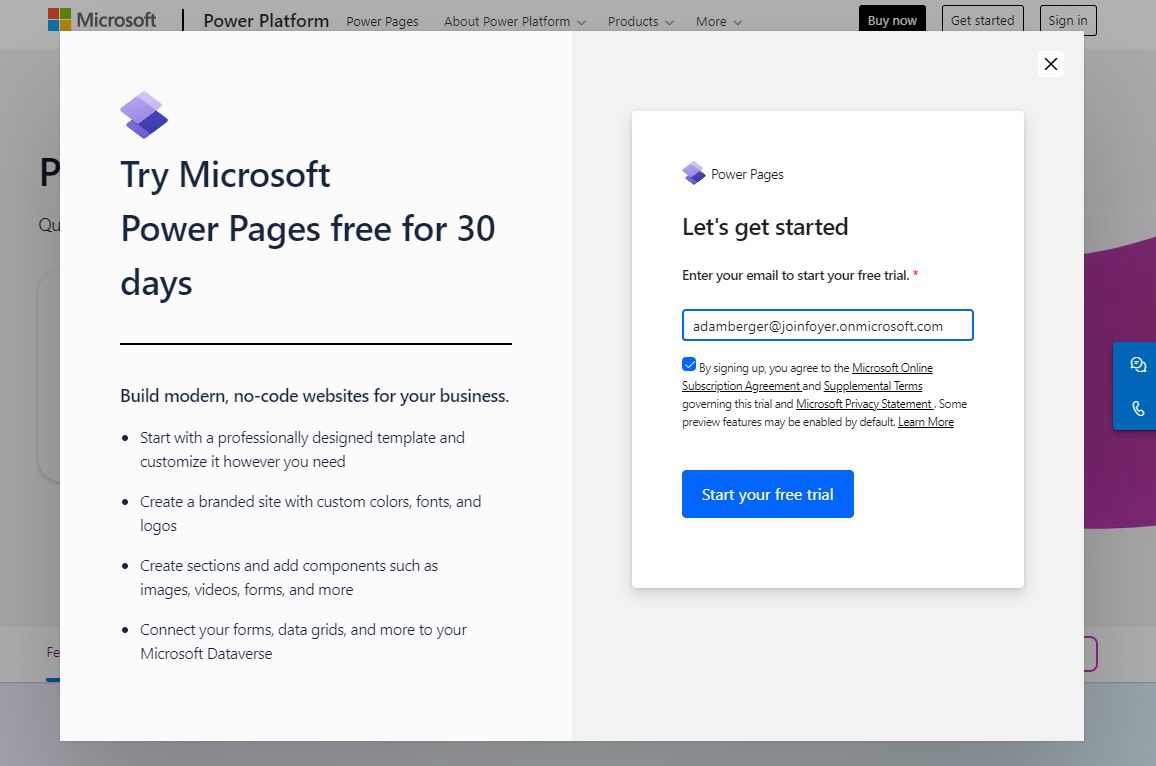
Just enter your email, and click "Start your free trial". Then a new dialog will appear that asks for your country and phone number. Enter the relevant information and submit.

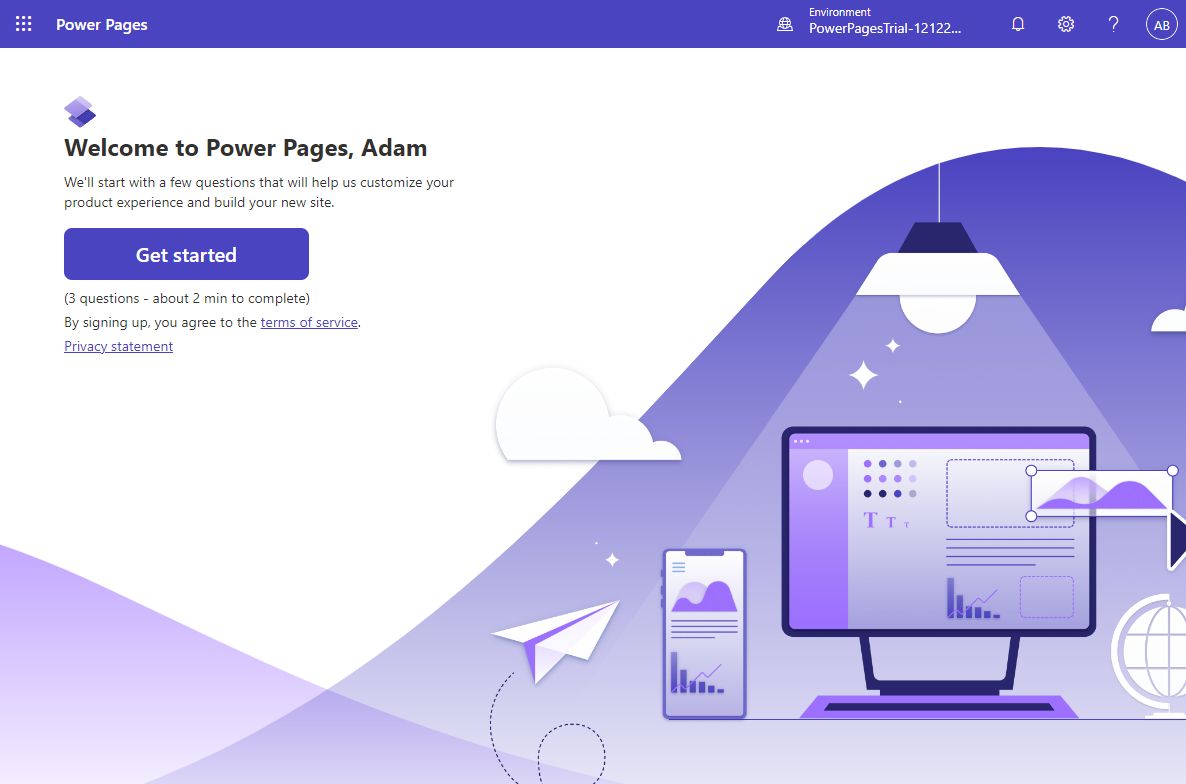
After creating your account, you'll land on the "Welcome" page. You'll want to click "Get Started" which is going to take us through a guided tour where we can select a template.
Make sure to select "No, I've never built one before" on the "Create a site" page. This will make the setup process much easier by letting us select a template right away. Power Page templates let you skip a bunch of the design work by copying from pre-made website designs.

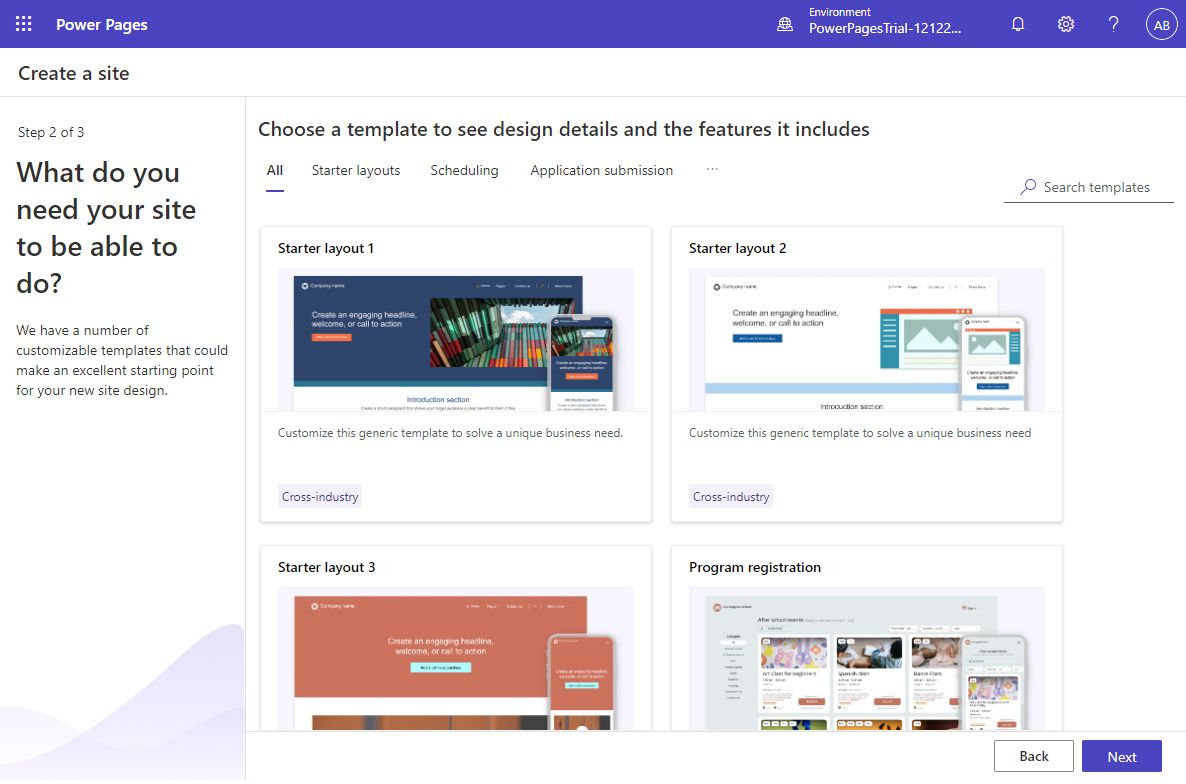
Using a Power Pages Website Template
Step 2 of the "Create a site" wizard lets us select a template. Templates are a great way to get started, and there are over website template designs to choose from (make sure to scroll down to check them out).
For this guide, I chose the "Starter layout 1" template. It is flexible design, and will work great as a client portal. But, if you want to be adventurous, go ahead and choose whichever you like.
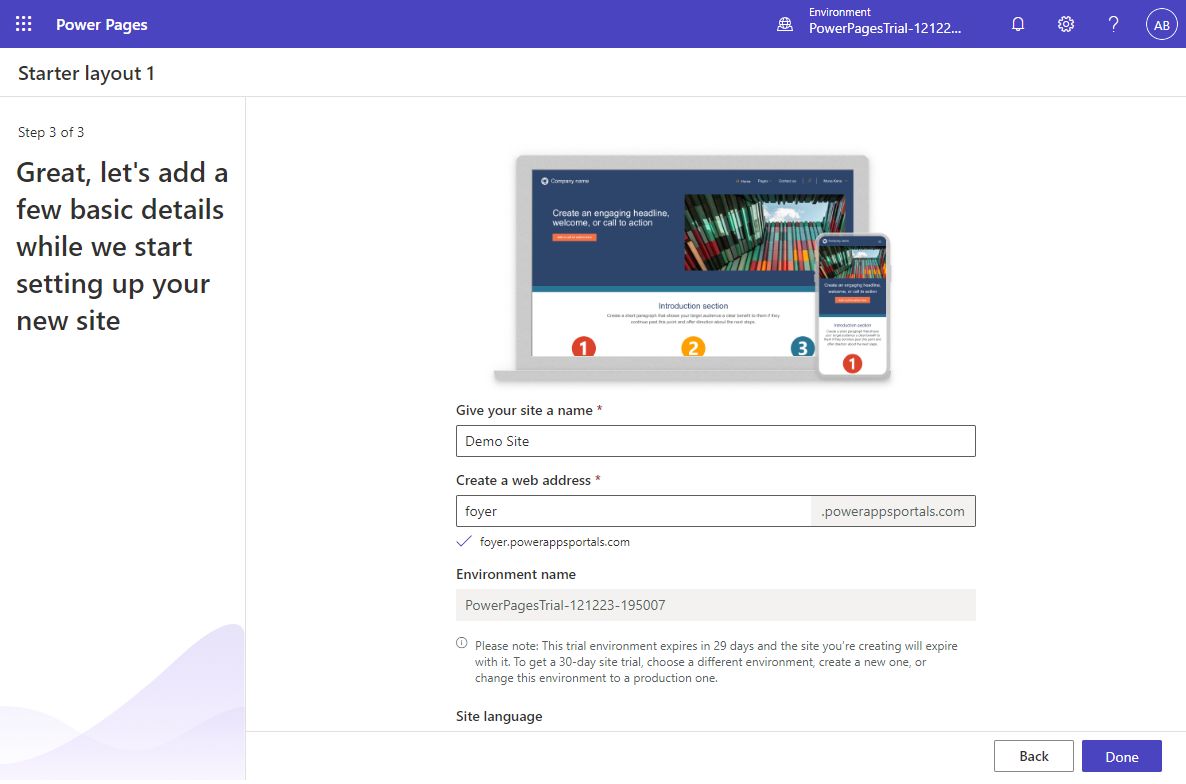
The last step of the wizard is to choose a site name and a web address.
The site name can just be the name of your business (you can always change it later).
The web address is how your clients will find and use your Power Pages website. So make sure to choose an address that is clearly related to your business name. For example, if your business is "Jimmy Jones Taxes", a good web address would be "jimmyjonestaxes". Then all clients of that business would go to "jimmyjonestaxes.powerappsportals.com" to access their client portal.
If you have a custom domain name, you can use a custom domain name instead. But, that can be configured later on.
Click "Done" and your Power Pages site will start being created.
Your site will take a little time to get created, but it is completely automatic. So go get some popcorn and soda, or maybe just water.
When I created my first Power Pages site, the automatic setup took around two minutes.
Once the automatic setup is complete, you'll be brought directly to your new Power Pages site in the page editor. An obnoxious guided tour dialog will block your vision of your site. Just click on the "x" to close it. Don't worry! It won't be the last obnoxious thing you'll encounter!
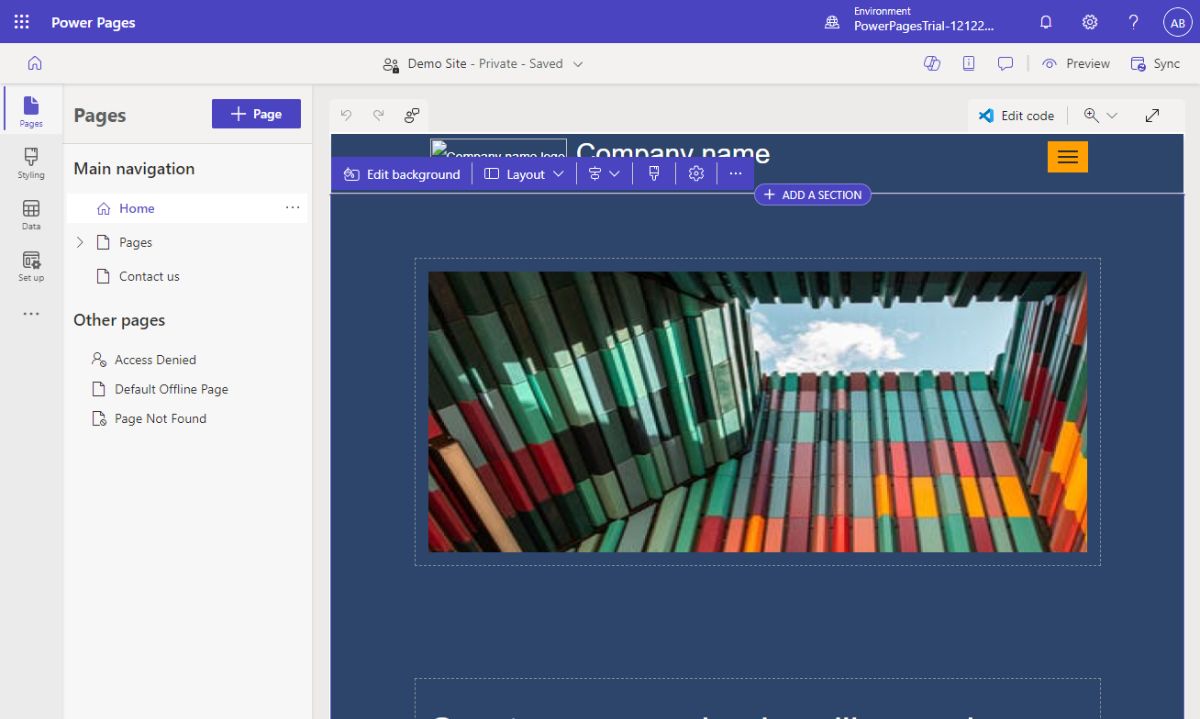
Great, now you can actually see your site in the site editor.
You might be surprised to learn that your site is actually already created, but can only be viewed privately within your organization.
You can visit it at "yourwebaddress.powerappsportals.com" (replacing "yourwebaddress" with whatever you entered in the last step of the wizard.
Add Your Own Logo and Brand Colors to Power Pages
For any Power Page Site, you'll want to update the brand colors and logo to match your business's brand. But, it is especially important when you're making a client portal, so your clients know they can trust your site.
How to Change Your Logo in Power Pages
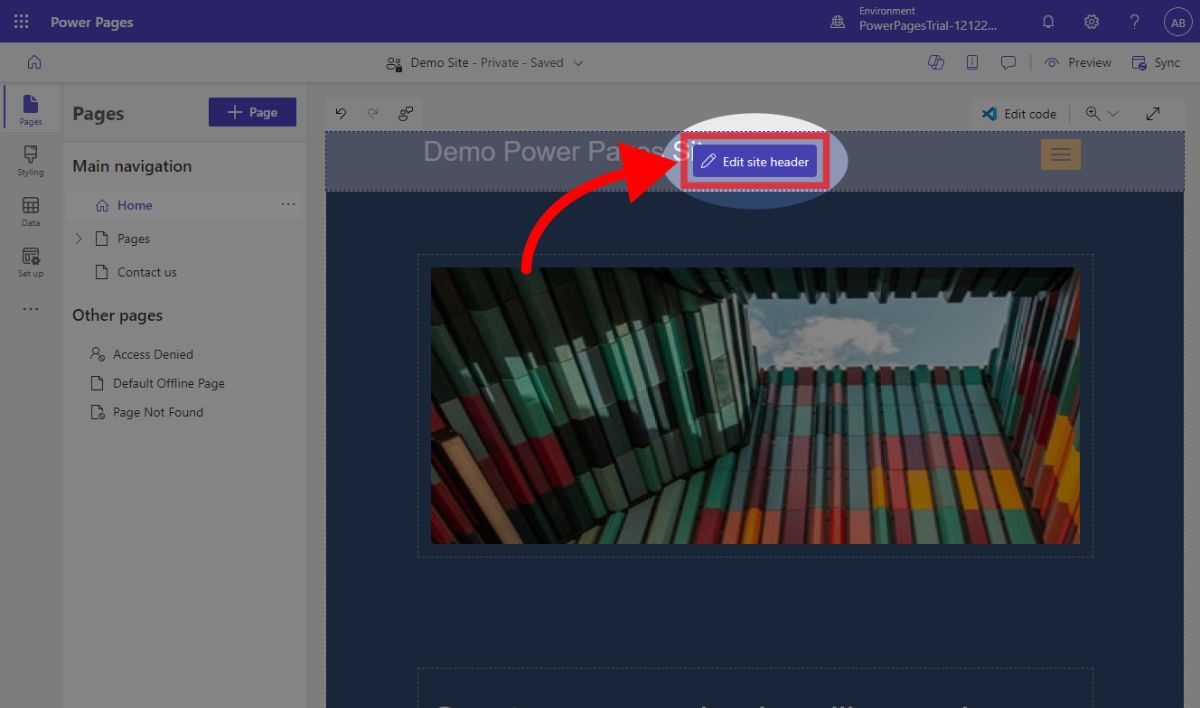
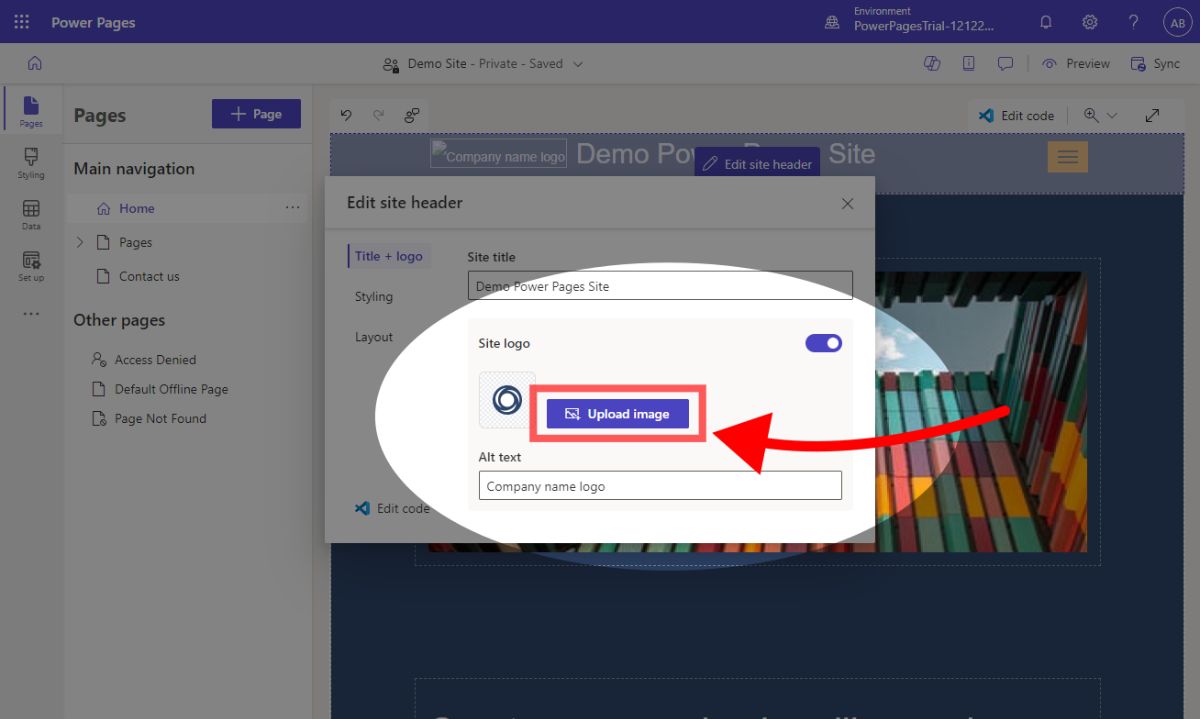
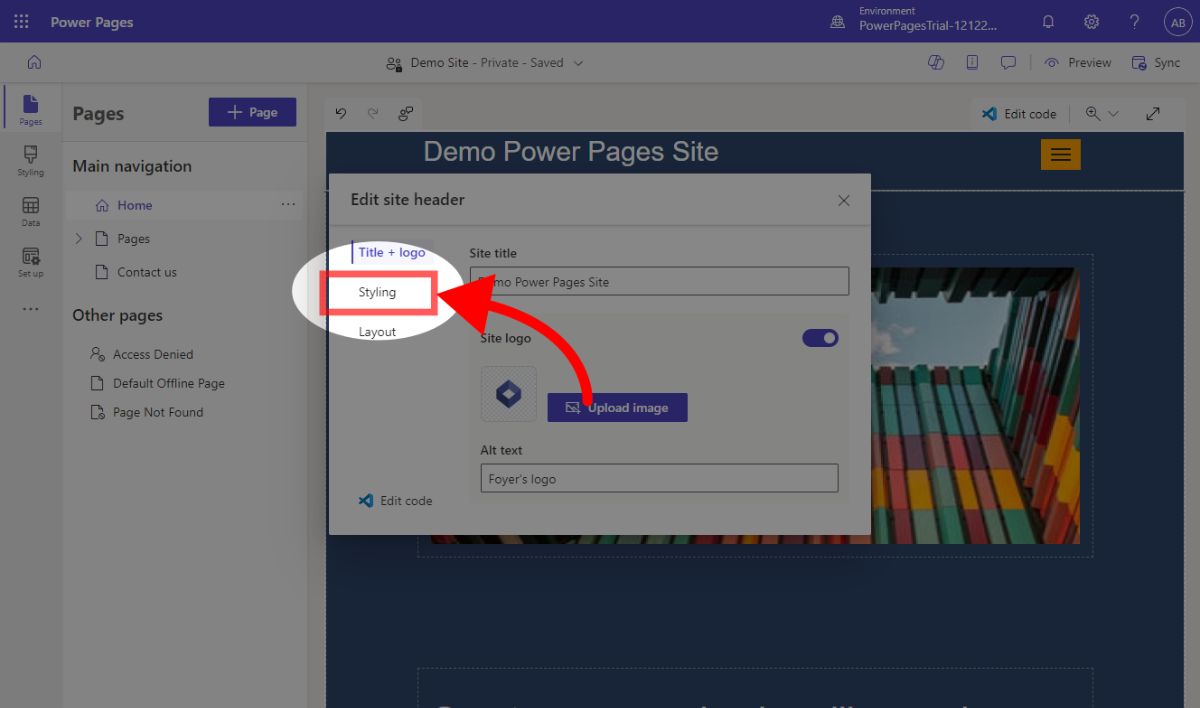
To change your logo in Power Pages, go to your Home page, and left click on the header.
Once the header is selected, you'll see a "Edit site header" button. Click it, and a dialog will appear.
Then, click "Upload image". To your surprise, you won't be able to upload your logo yet! You'll have to go through one more screen.
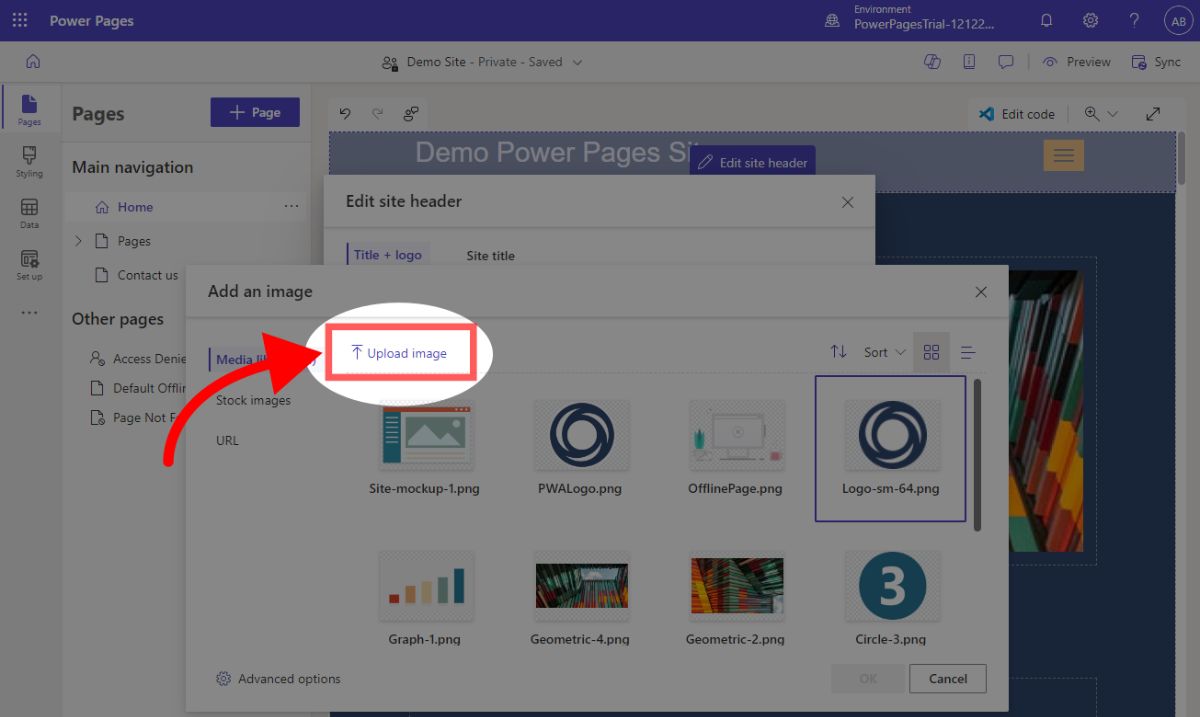
This dialog is where you can finally upload your image. Click the "Upload image" button on the top of the dialog.
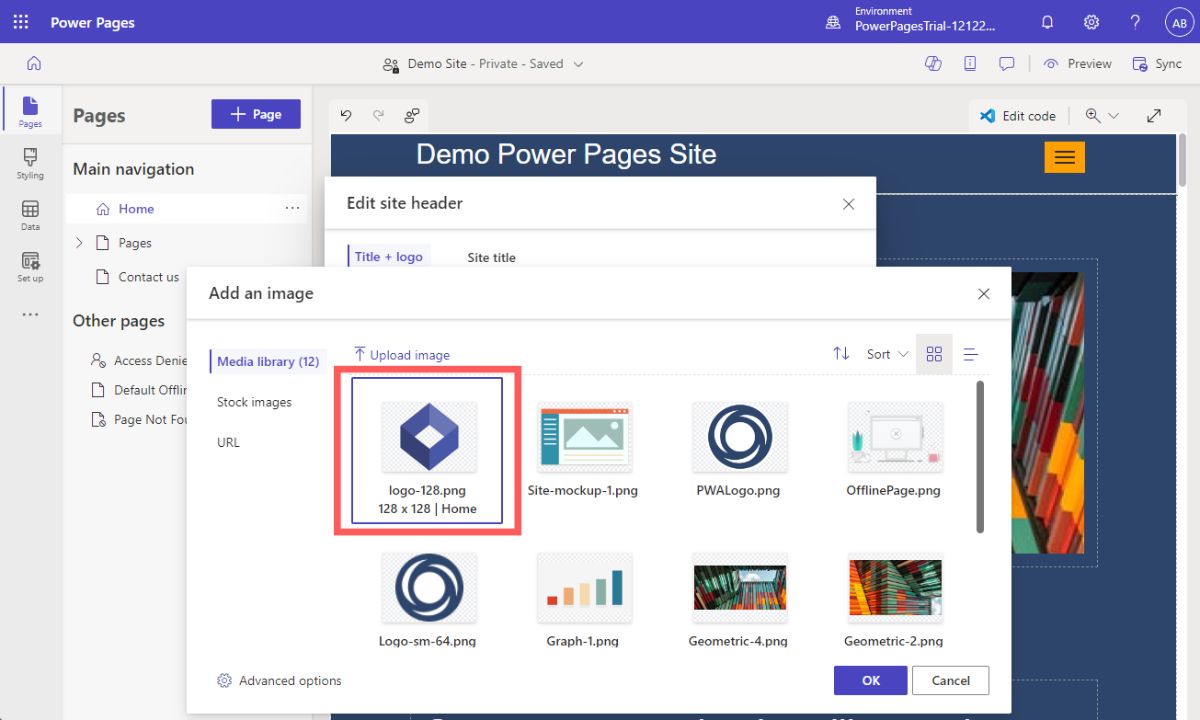
After the upload completes, you'll see your logo in the list of images. Click on your image, and the click "OK".
Before you're done updating your logo, you should add your company's name into the Alt text of your logo. Having alt text on all the images in your site is a good way to rank well on search engines.
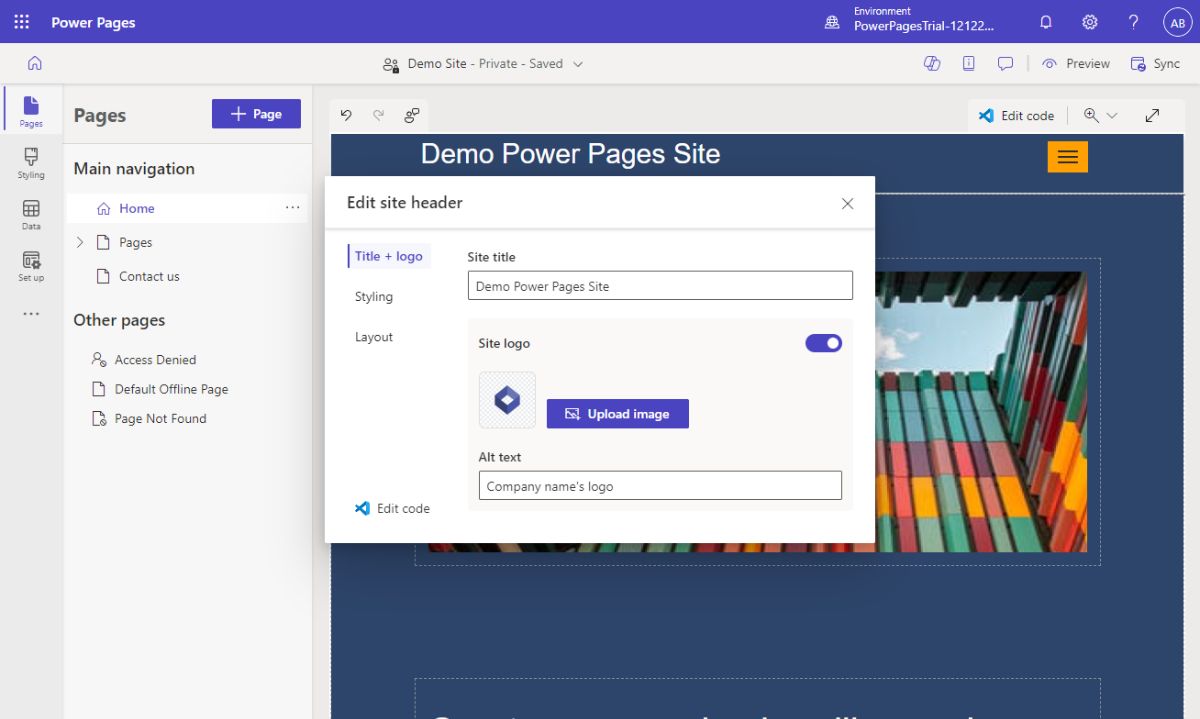 Your logo will now be applied as your site's logo in the header. This could take a minute to update in your published site, so be patient!
How to Change Your Brand Colors And Header Color In Power Pages
While the Power Pages template we used to start the site looks great, odds are it looks nothing like your business's branding. To fix this, we just have to change the "Brand Colors" and change the header color.
This is also important if you have a logo that clashes with the dark blue used in the template. That happened to me for my first site. See the screenshot below, how you can barely see the logo because of the header color:
So let's get started on how you can update your brand colors, and fix weird color issues like that.
Surprisingly, the option to update your brand colors can be found in the "Edit site header" option.
To find this option, you have to navigate to your Home page, then left click on your site's header. You'll see the "Edit site header" button appear.

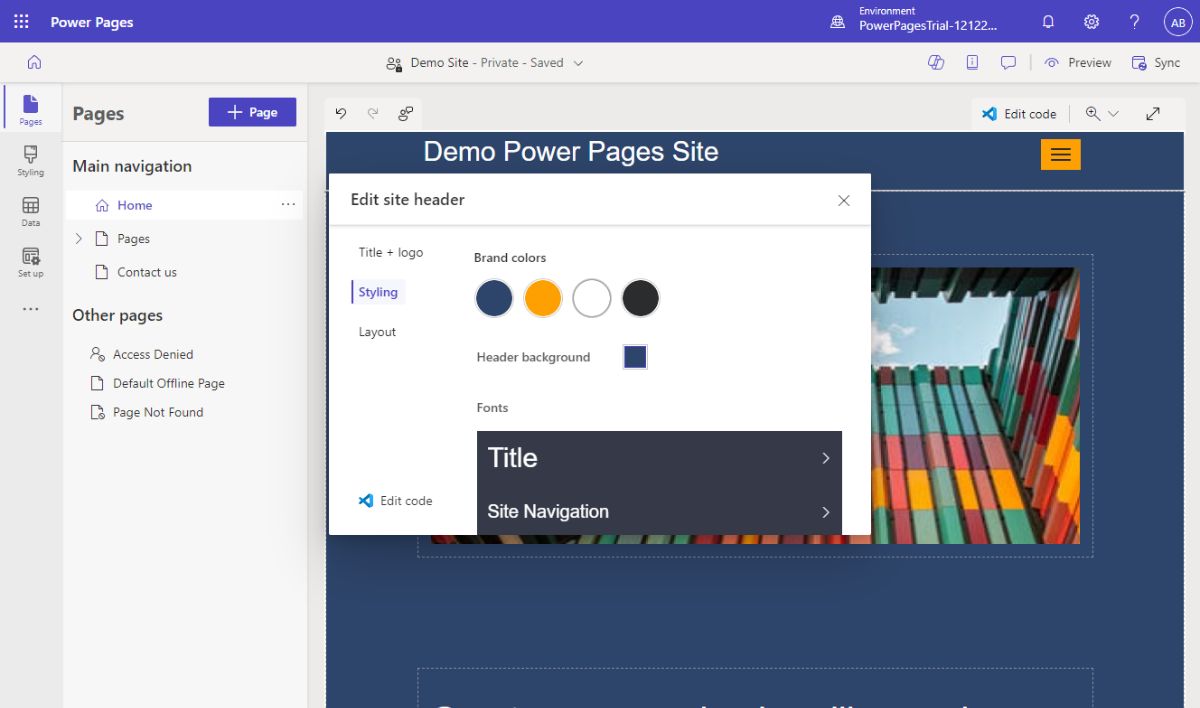
Just like when we updated the site logo (see the section above), we get the "Edit site header" dialog. But, this time you'll need to click on the "Styling" tab on the left.
Below you can see all the styling options you can customize in your Power Pages site.
Power Pages supports 4 different "Brand colors" that are used throughout your template. These are built-in to your template, and it is not very obvious sometimes where each brand color is used.
You'll want to update each of the brand colors to match your business's own branding. An easy way to do this, is just to change the first two colors, and leave the rest as white and black.
While updating your brand colors, you may notice some parts of your site will be hard to read. For example, if you change the first brand color to white, all of the text in your header will disappear (it isn't actually gone, it is just white text on a white background).
Power Pages has a bunch of work-arounds for cases like this. I used white for my first branding color (of the four), and it caused the "white-on-white" problem in the header. You could solve this in two ways:
- Either select a new Header background (below the "Brand colors" option). Note that you can only select brand colors as the header background.
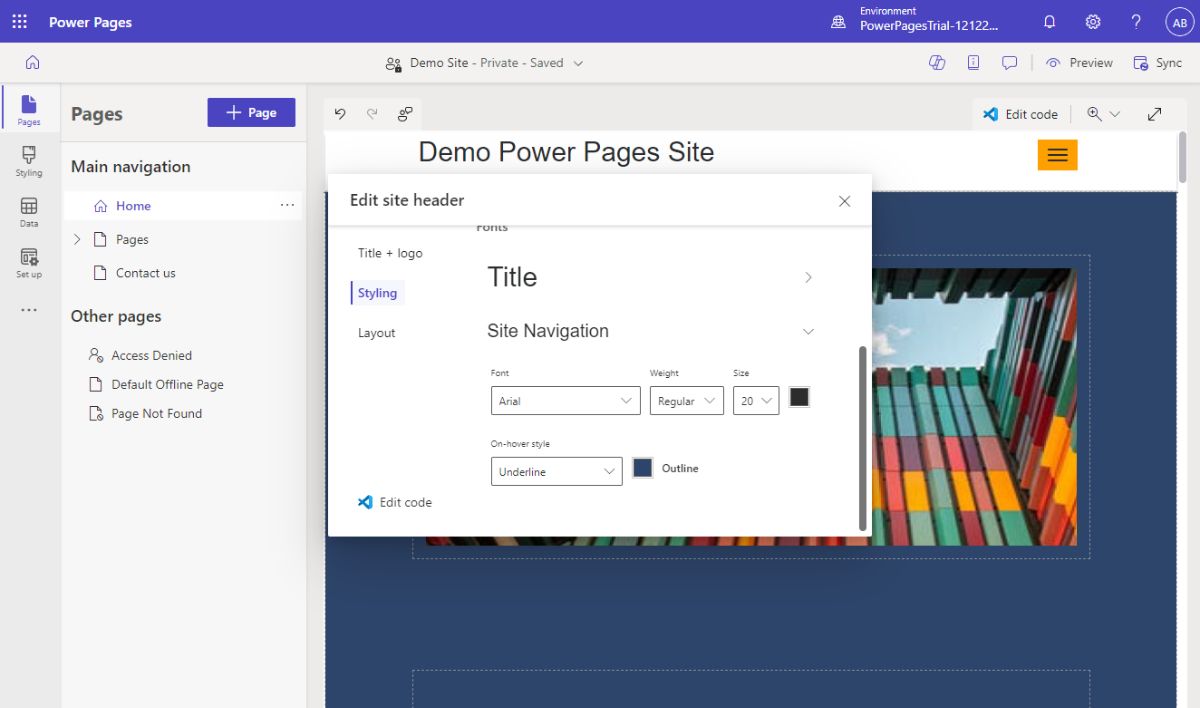
- Or you can update the "Title" font so it is visible against your header's background (this is what I ended up doing because I wanted a white header)
Power Pages lets you change not just the font, but also the font weight, font size, and color for both title text and all navigation text in the header (the text in the menu). You can also control if you want menu items to be underlined as you hover over them.
You'll want to make sure to adjust the font color so it is legible, because Power Pages won't warn you if you have something like black text on a black background.
After closing the "Edit site header" dialog, your site will be updated! Like usual you might have to wait a minute for the changes to propagate.
Check out the screenshot above for the site after we updated the header. It looks much closer to our brand, and all the text is legible. I'm satisfied!
Just one more thing before we start making a client file upload form with Power Pages. We need to learn how to make a new page in Power Pages!
How to Make a New Page in Microsoft Power Pages
To add a page in Power Pages, you'll want to make sure you're on the "Pages" tab on the left drawer.
You'll see a "+ Page" button above the "Main Navigation" title on the left of your screen.
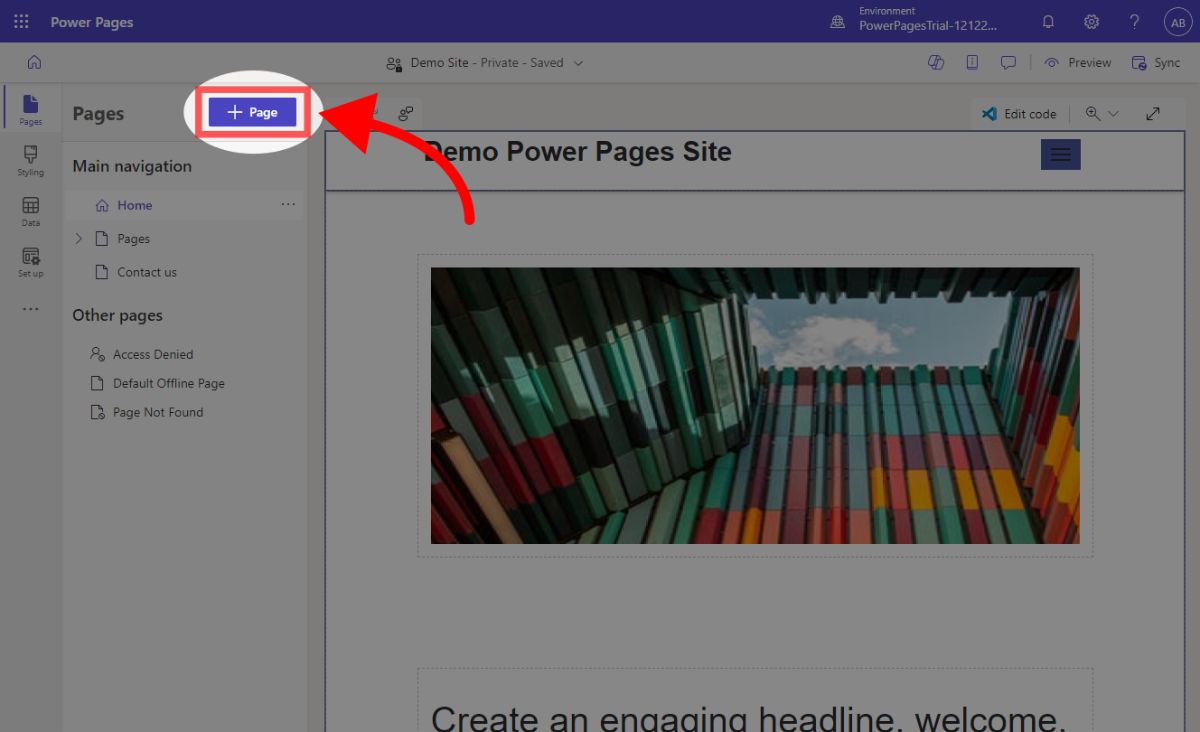
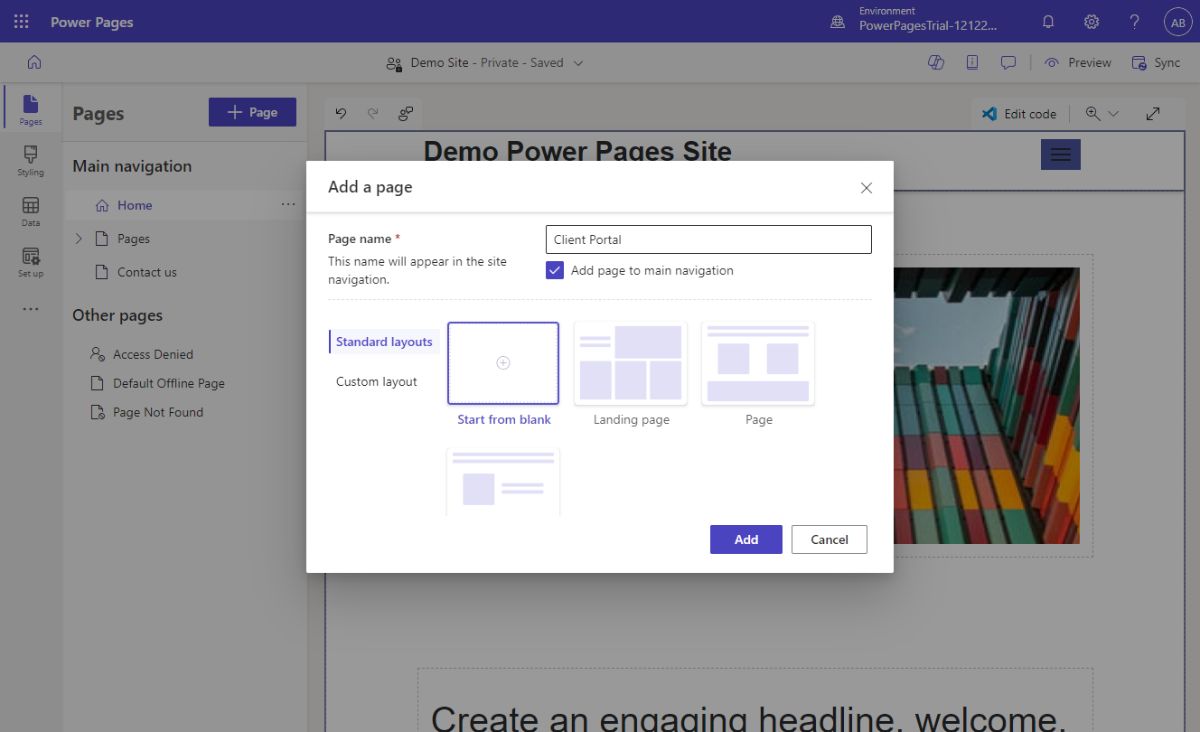
This will open the "Add a page" dialog where you can select a few default layouts.
Make sure to set the page name
Just a few notes about this:
- If you're going to make a lot of similar pages, you can create your own page templates called "Custom layouts". See the option on the left for more details. This is great if you need to make a bunch of blog pages that all have the same format.
- You can make unlisted or hidden pages by deselecting "Add page to main navigation". It will only be accessible via links.
We are going to create a blank page by selecting "Start from blank" and clicking "Add".
Here's what our new blank page looks like. We named the page "Client Portal". You can see on the left drawer under "Main navigation", our page is listed. If you wanted to edit settings about this page (e.g. remove it from the navigation bar), you can hover over the page's entry and click the three dots.
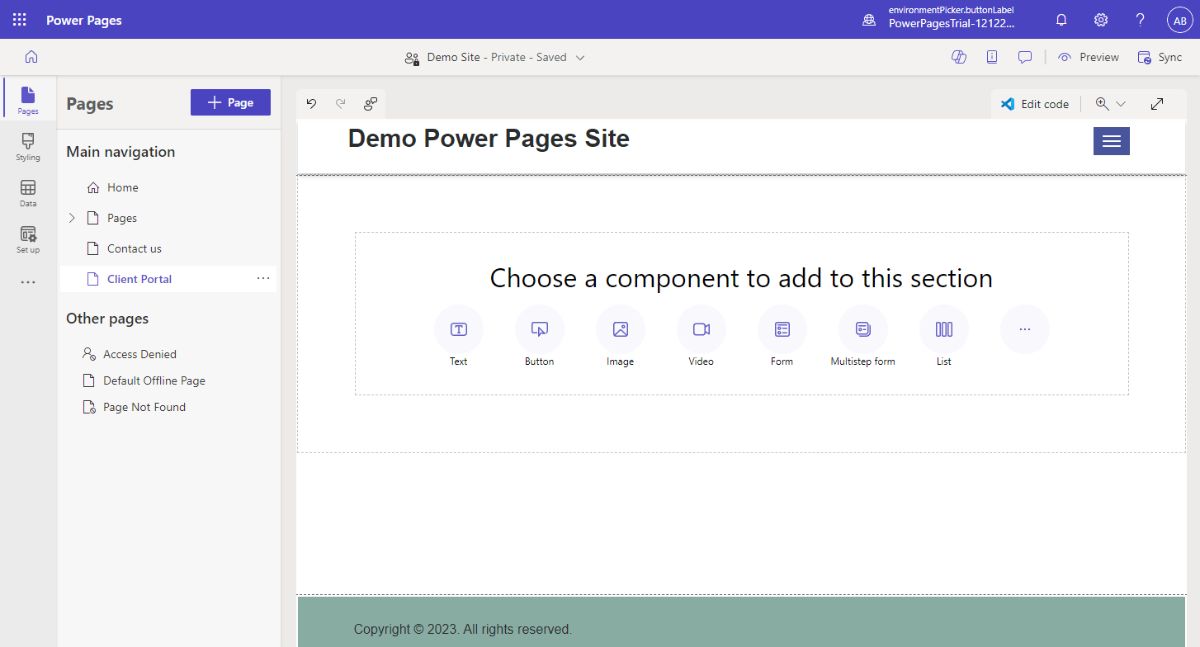
Right after making your page, Power Pages will prompt you to add to add a component to the page. Power Pages has a great suite of components you can use to accomplish just about any task you need.
Later in this guide, we will show you how to use the "Form" component to create a client file upload portal.
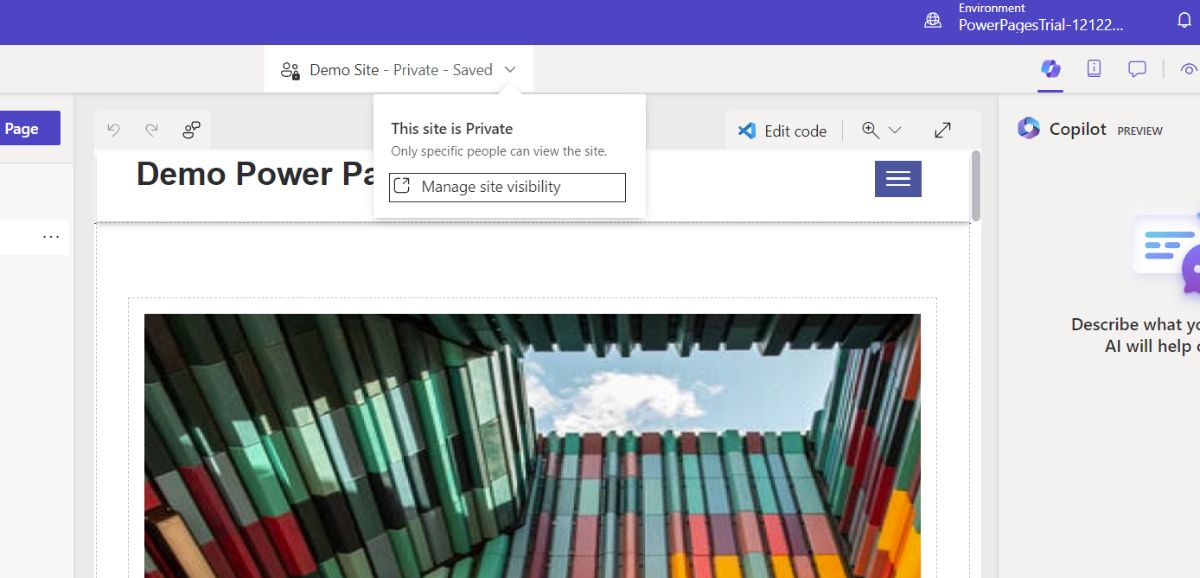
How to Make a Power Pages Site Public
Remember, that by default your site is only visible privately within your organization.
So when you're happy with the state of your site, you need to do one quick step to make it public.
Make your site public by clicking on your site's name in the tool bar on the top of the page, and clicking "Manage site visibility".
You'll be brought to the Site visibility page, where you'll see an option to set your site as either private or public.
Click on the Public checkbox to make your site public.
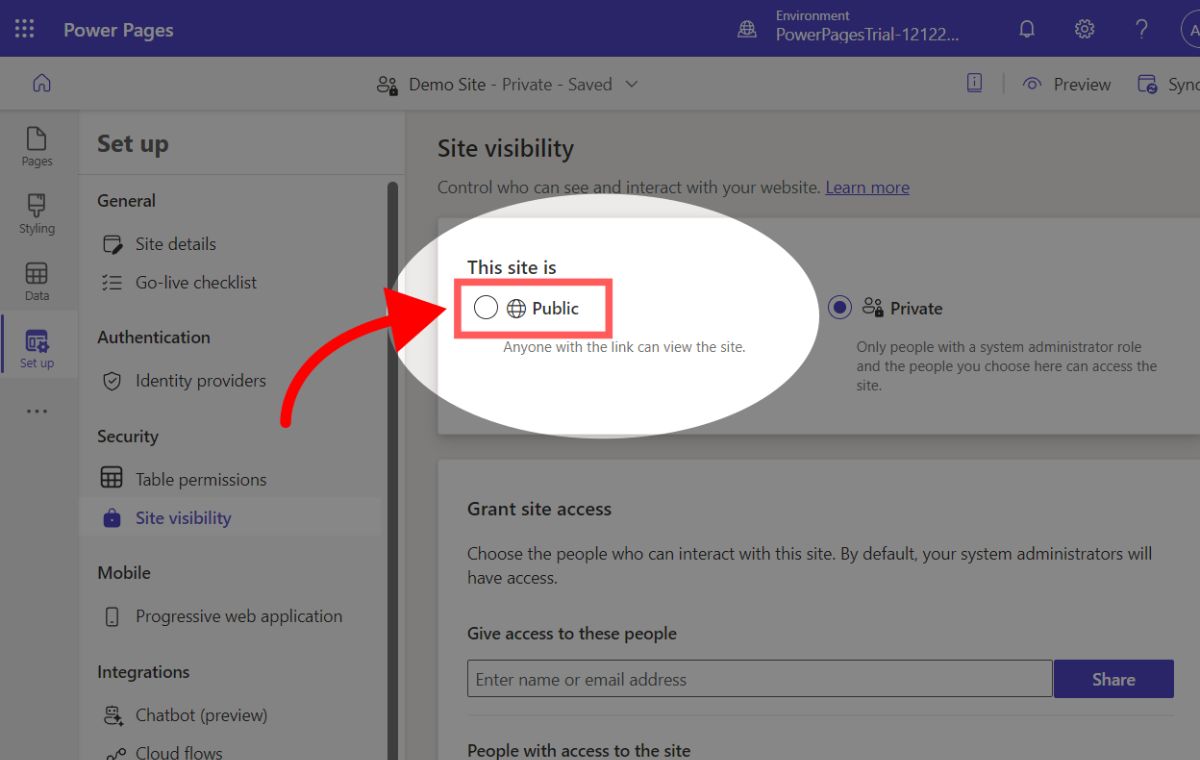
A dialog will popup confirming that your site will be public, and any changes you make will be reflected on the site. Click "Set to public"

That's it! Now anyone can visit your Power Pages web address and they can access your site.
Remember, your web address looks something like "yoursite.powerappsportals.com" (you can also access your site using the "Preview" button on the top menu).
How to Make a SharePoint Client Portal with Power Pages
Now that you have your first Power Page site created and customized, we can get into what this article is all about: making a SharePoint client portal using Power Pages.
First, let's define what exactly a "client portal" is. A client portal is a broad term for software used for interacting with customers for file sharing, collaboration, invoicing, and more. Most of the time client portals are customizable (which is called "white-labeling"), and support both mobile and desktop.
For our SharePoint client portal, we are going to make the most basic of client portals which is a client file drop-off.
This client file drop-off page will allow anyone to securely send your business files directly to any SharePoint site. It is a completely public and anyone, even without a Microsoft account, can use it to send you files.
We are going to mark all file uploads with some client information such as the email and client name so you'll know which files came from who (all files will automatically be organized in SharePoint into folders with the client's email).
I'm not exaggerating when I say this guide is one-of-a-kind. Currently in December 2023, there are no guides that go over how to do this from start to finish. Not even from Microsoft!
Even though Power Pages was released over a year ago, there are tons of glitches, and the documentation is sparse. So make sure you follow every step, otherwise you could easily get stuck.
Setting up a client portal with Power Pages took me days to figure out, but thanks to this guide, you don't have to spend days. Following along should only take around an hour on your first try.
Step 1: Make a New Dataset to Store Client Information
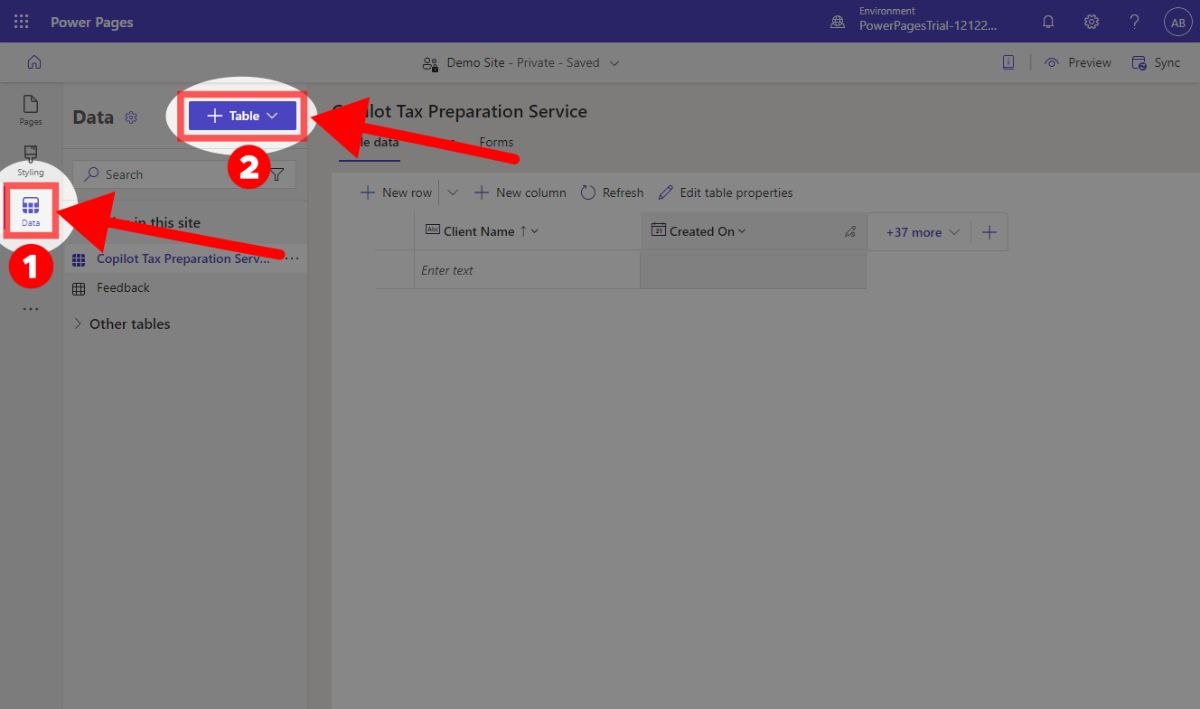
The first step is to create what's called a "dataset" that will describe what client info we want to collect. This could be the client's email, name, address, phone number, etc...
To get started, click on "Data" on the left drawer, then find the "+ Table" button on the top left.

A drawer will appear on the right side of the screen. You'll want to do the following:
- Set the Display name to "Client Portal Files" (or any name you'd like)
- Set the Description to "Files uploaded from your client portal" (or any description you'd like)
- Make sure to click "Enable attachments"
- Click on "Advanced options", and more options will be visible.
- See the next screenshot for which option to enable
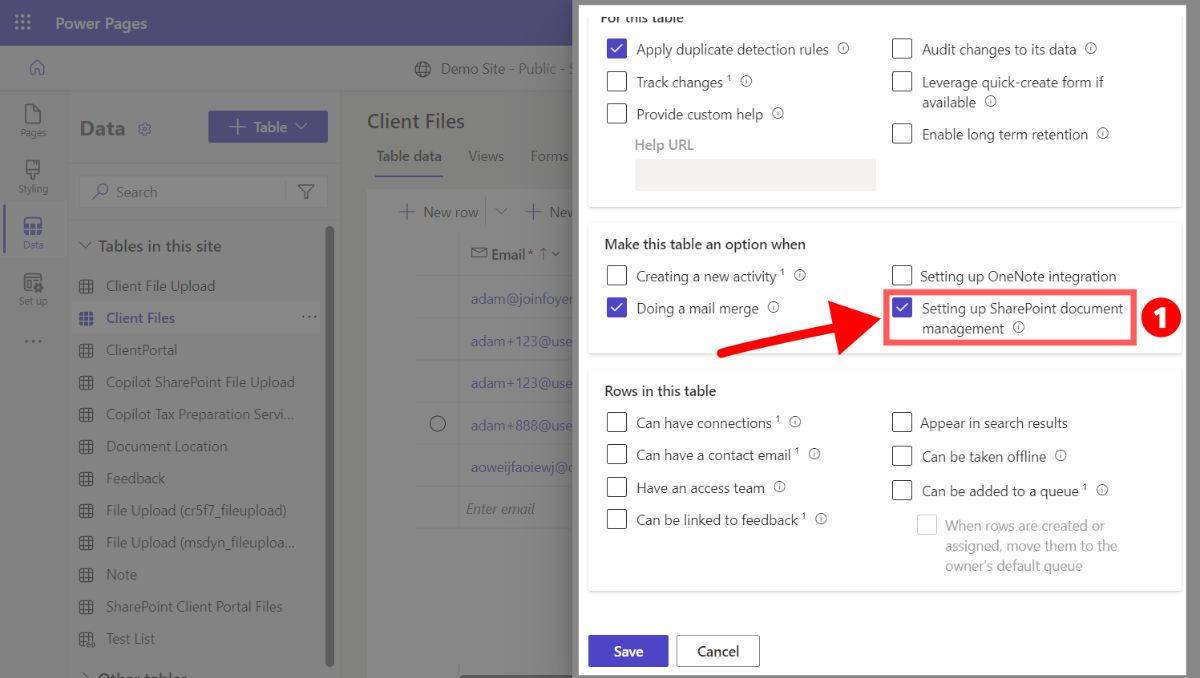
In those advanced options, make sure you enable "Setting up SharePoint document management".
Then before clicking save, scroll back up, and click on the "Primary column" tab.
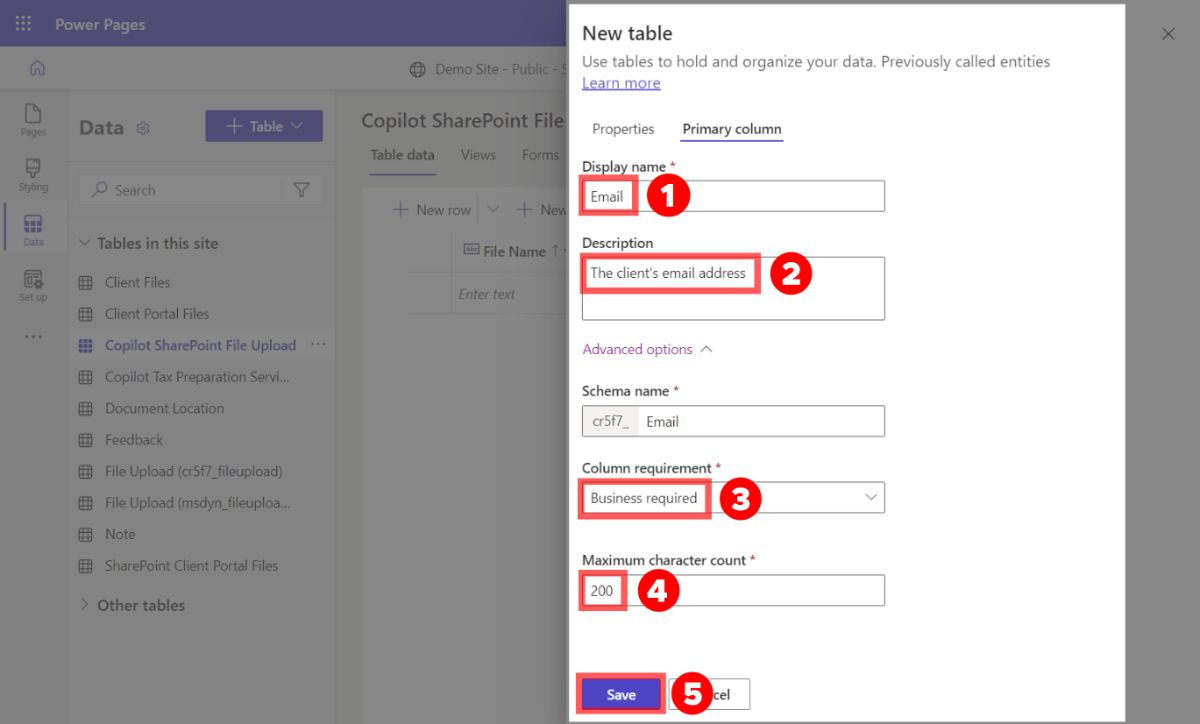
We are going to use this "Primary column" to store the email of our clients. This will be convenient, as later when SharePoint documents are made, we will configure it to place all documents in folders using the "Primary column".
So if we set the client's email as the "Primary column", all documents will be automatically organized by the client's email.
Here's what you need to do on the "Primary column" tab:
- Set the Display Name to "Email"
- Set the Description to "The client's email address"
- Open "Advanced options"
- Set "Column requirement" to "Business required"
- Increase the "Maximum character count" to at least 200
- Click "Save" on the bottom left
Your dataset is now created, and you'll be sent to the "Table data" viewer.
Next, you should add a new column for each field to this dataset that you'd like to collect when clients send you files. Here are a few example columns you could add:
- First Name/Last Name (or just Full Name)
- Phone Number
- Address
- File Description
For this guide, we are just going to add "Full Name" so we'll know the name of each client who sent us files.
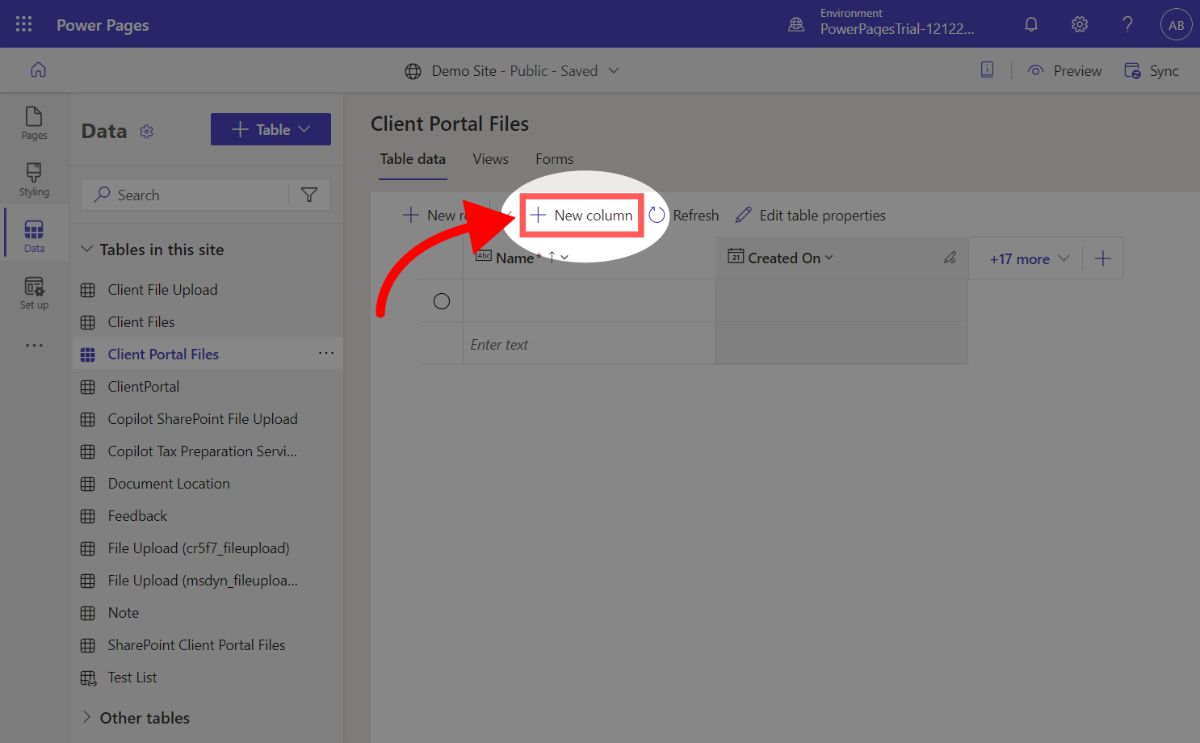
To add a column, click on the "New Column" button at the top of the page.

For each column you add, you'll see a drawer open on the right where you'll have to set a few options.
The options you need to set will vary depending on the type of data (e.g. single line text fields, phone number fields, multi-line text fields).
But, for our "Full Name" field you just need to set these 3 options:
- Set Display Name to "Full Name"
- Set Description to "The client's name"
- Set Required to "Business required"
Then click "Save" and you'll see this new column was added to your dataset.
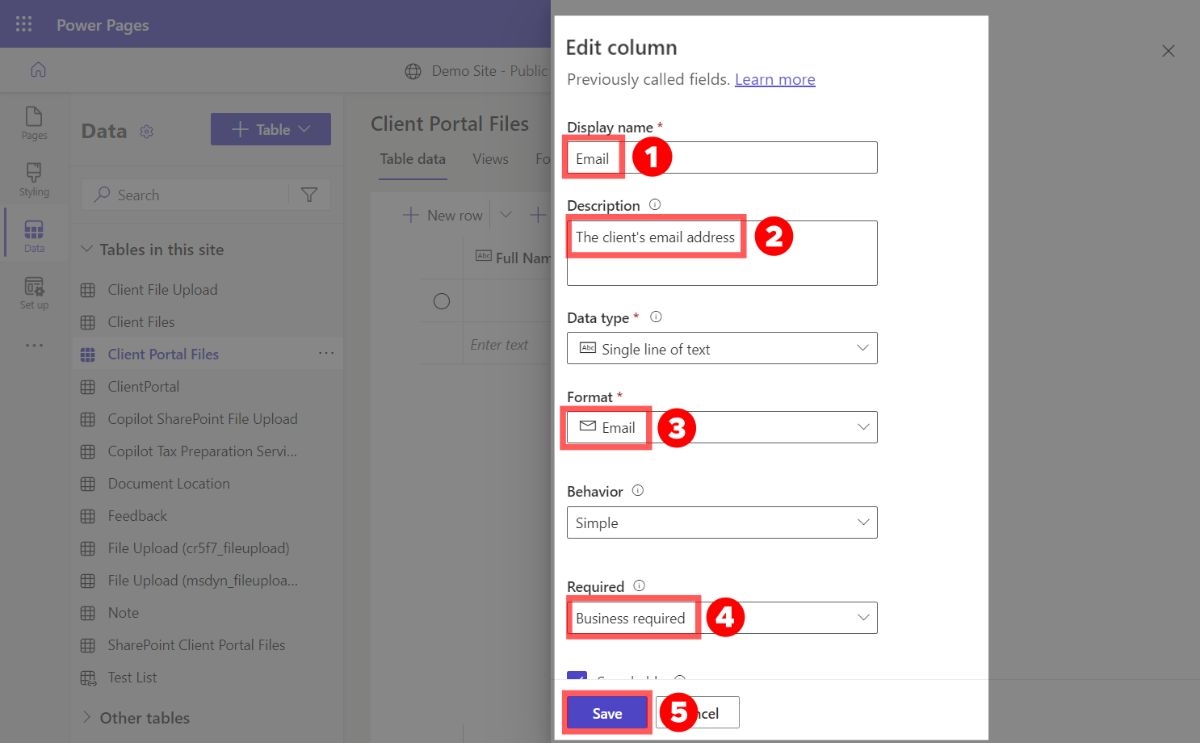
There's just one more thing we need to do with our dataset: update our email column (the "Primary column") to be required and to be validated as an email.
When we originally configured the "Primary column", Power Pages didn't allow us to set a few settings, so we have to go back and do it now.
To edit the "email" column, click on the column in the "Table data" viewer, and select "Edit column". Then change the following settings:
- Set the "Format" to "Email"
- This will make sure that all text entered for this column is an actual email
- Set "Required" to "Business required"
Step 2: Enable and Configure the SharePoint integration for Power Pages
Now, for a little detour, we need to go and enable the SharePoint integration. To my surprise, there were a total of 3 places you need to configure SharePoint settings. Here are the names of the various settings we will be enabling:
- Server-based SharePoint Integration (found in Document Management Settings)
- Document Management Settings for our "Client Portal Files" dataset (found in Document Management Settings)
- SharePoint Integration (found in the Power Platform admin center)
We will start by enabling the "Server-based SharePoint Integration". To get to that setting, you'll have to go to the Power Platform admin center, and select the "Environment" you use for Power Pages.
You can either go there with this link: https://admin.powerplatform.microsoft.com/environments
Or, in Power Pages you find the "Set up" tab on the left, and there is an option to go to the admin center on the bottom of the page. Then click "Environments" on the left.
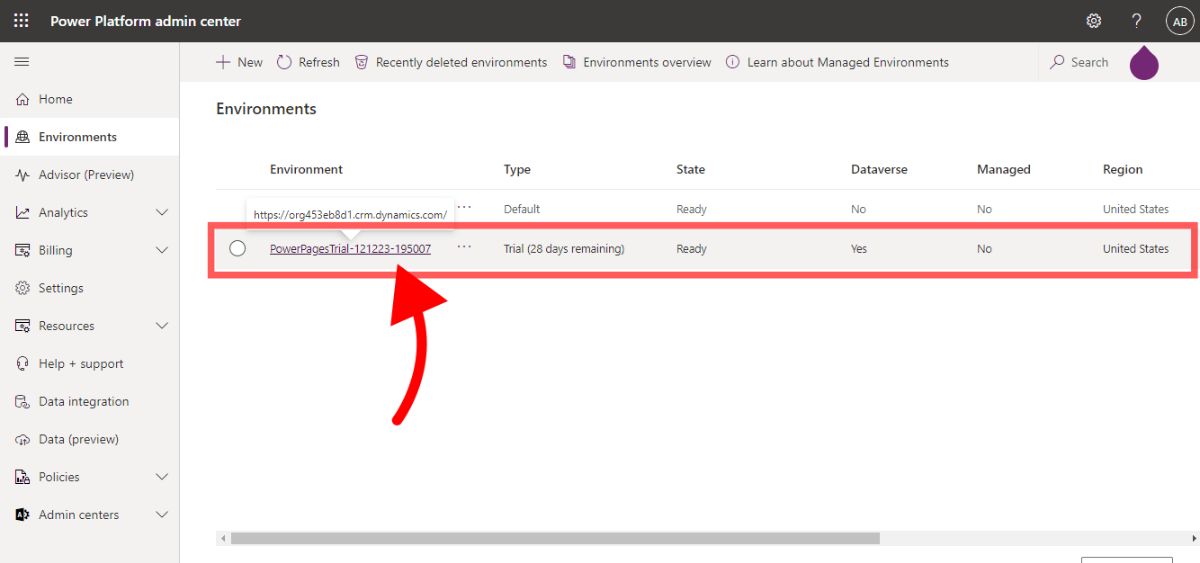
Be sure to select the right "Environment" you are using for Power Pages. If you're using the trial, it will be called PowerPagesTrial.
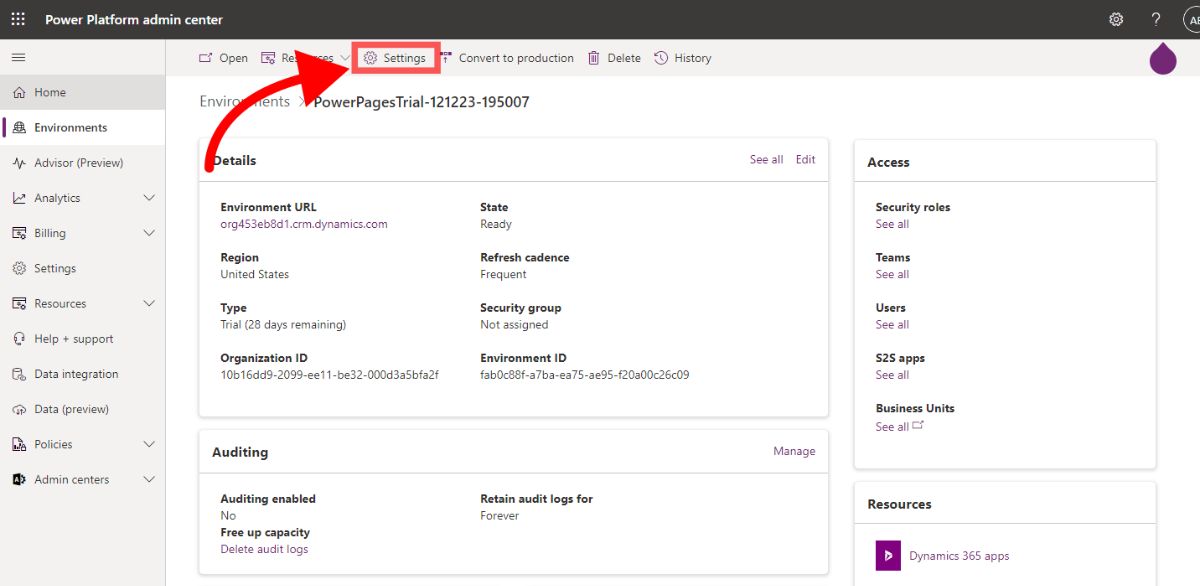
After clicking on the environment, click on the "Settings" button on the top of the page.

Expand the "Integration" option, and click the "Document management settings" link.
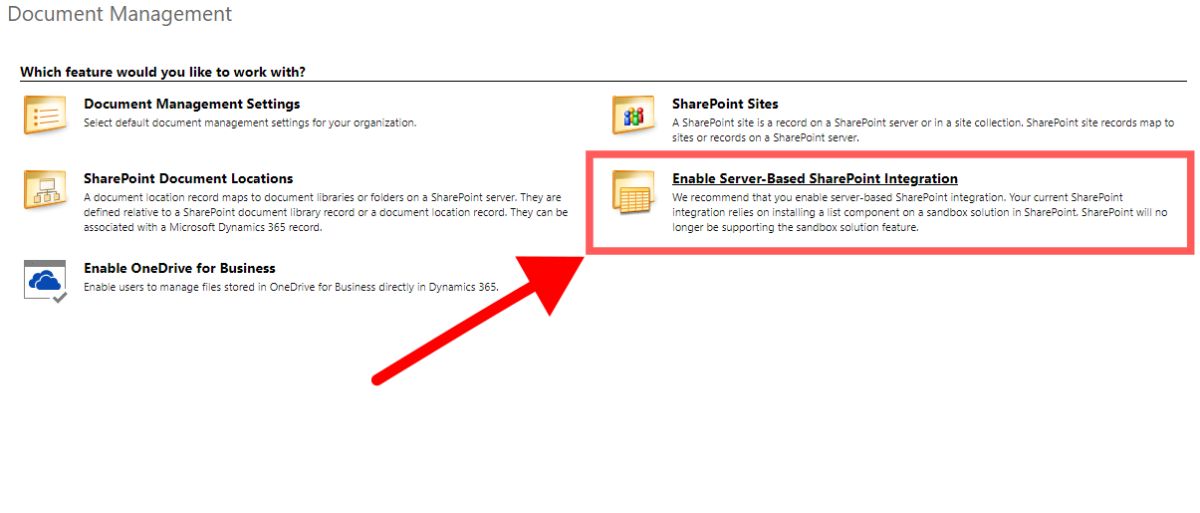
You'll find yourself in a user interface that looks like it came straight from 2005. We are deep in the bowels of SharePoint, tread lightly!
Select "Enable Server-Based SharePoint Integration"
This setup only has to be done once per environment, and it's pretty painless. But you'll get another flashback, in the form of a popup window that comes up to enable the integration:

There are 4 steps you'll need to go through in this dialog, so I made a diagram that shows you what to do for each screen. Follow the instructions below:
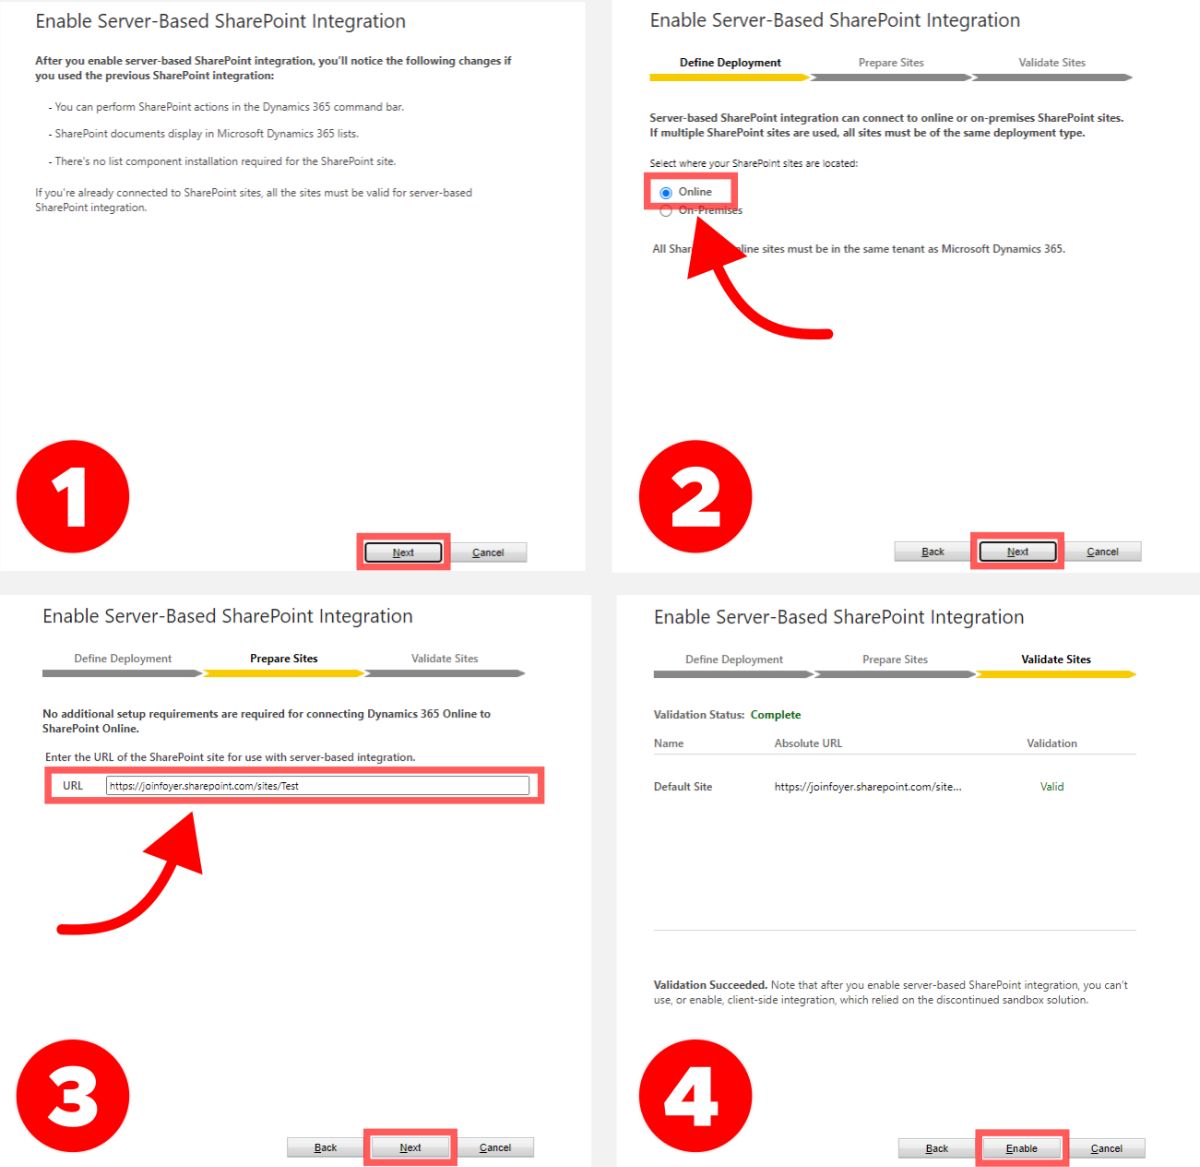
To summarize:
- Make sure you choose "Online" for "where your SharePoint sites are located"
- Make sure you enter the SharePoint site you want documents to be uploaded to in Step #3
- Don't forget to click "Enable" on the last step, or the changes won't be applied
Great! That's one of the SharePoint integrations enabled, but we still have two more to go.
The next step is to enable our Power Pages dataset "Client Portal Files" in Document Management Settings.
Back in the window you had "Document Management" opened, click on "Document Management Settings".

Just like the last setting, you'll get a popup window. I made another diagram showing exactly what you need to do there:
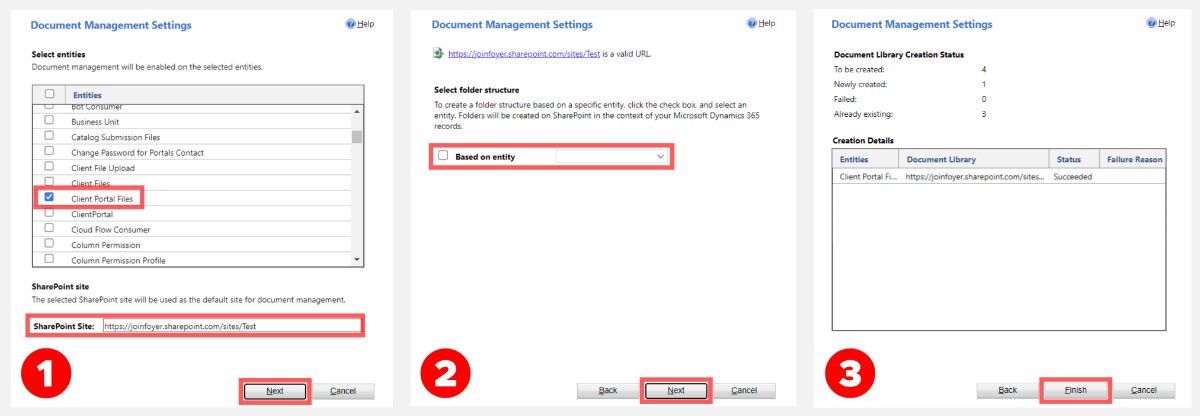
To summarize:
- Make sure to select "Client Portal Files" from the "Select entities" selector in step #1.
- Make sure to enter your SharePoint site in step #1.
- For this guide we will leave "Select folder structure" -> "Based on entity" disabled. A few options are "Account" or "Contact"
- If you want the SharePoint directly to be based off of a user account or contact, you can set this option
- On step #3, you should confirm that you see "Client Portal Files" in the "Creation Details" table, and see that the status is "Succeeded"
If you ever add another dataset in the future, you'll have to do this step again. But, won't need to repeat any of the other SharePoint integration steps.
If you're familiar with SharePoint, you'll know that in a site's "Documents" tab there is a selector to choose between different entities. The step we did here adds a new entry to your site's list called "Client Portal Files". We will show that near the end of the guide.
That completes the second SharePoint integration setting we needed to enable. Now, its time for the last SharePoint integration to enable, which is just a checkbox in the Power Platform admin center. This one is really quick.
If you don't still have that open, you can get there within Power Pages by selecting "Set up" on the left drawer, then "Site details", then on the bottom under "Admin actions" click "Open admin center". See below for details:
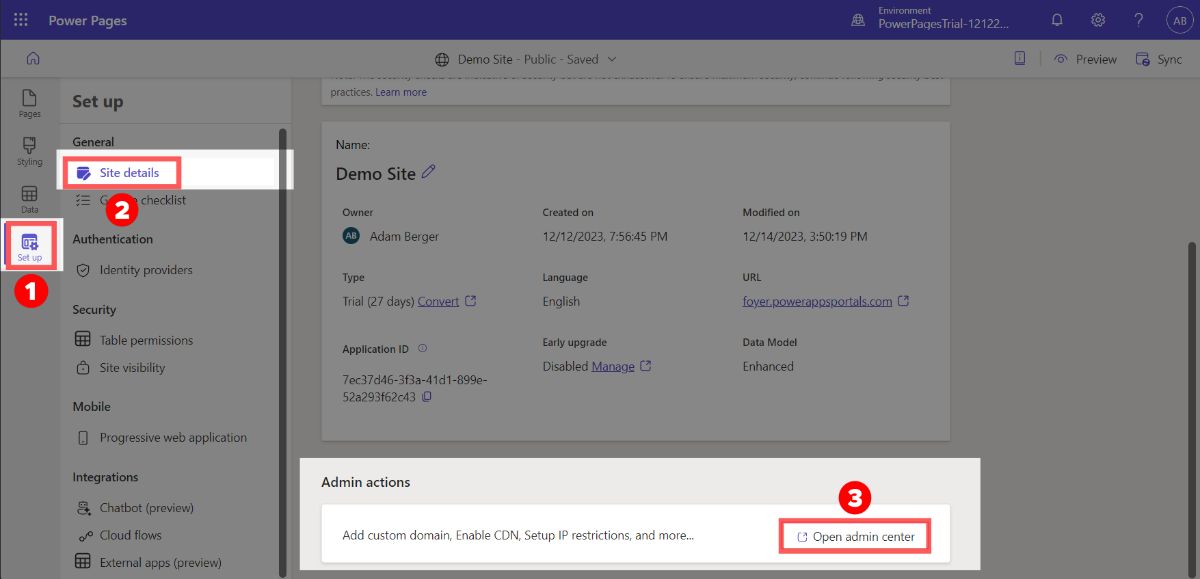
This will take you to the admin center. If you scroll down in the admin center, you'll find a "Services" section. Enable the row called "SharePoint Integration".
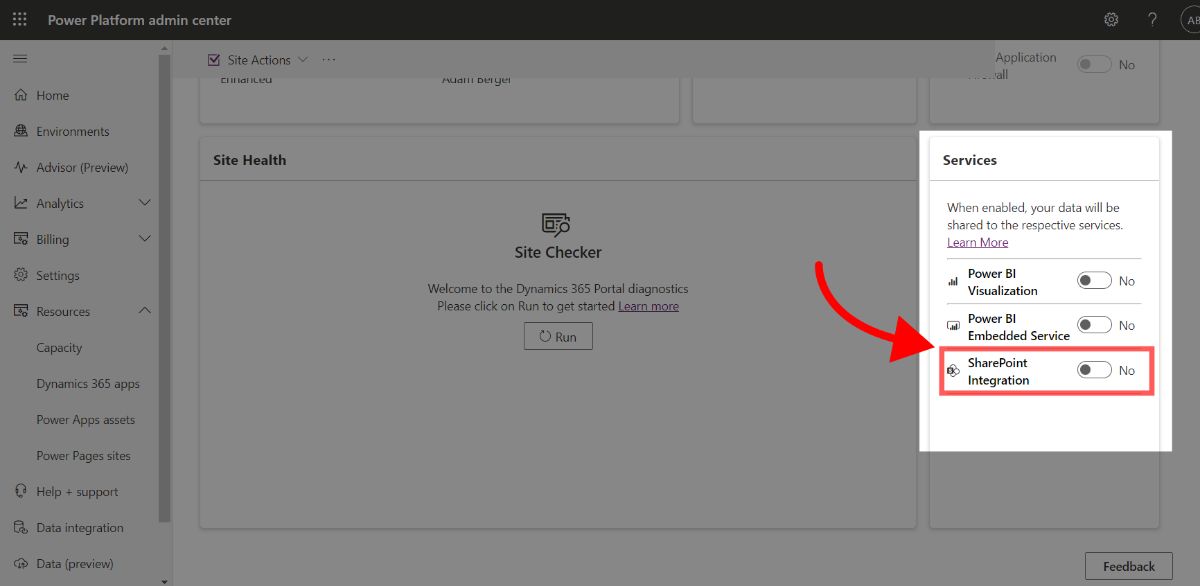
You'll be redirected to a page that asks for approval that your Power Page site can access SharePoint resources. Click "Accept", and you'll be redirected back to the admin center. You should see that the SharePoint Integration row will say "Yes" instead of "No".
That's it! The SharePoint integration is completely enabled. What a headache, right? Now we just have to make our form, and add it to our Power Page site.
Step 3: Create Forms in Power Pages For Client Data and File Upload
Now that we have a dataset, and our SharePoint integration is enabled, we can setup our forms.
Yes, that's right, "forms" plural.
This is because, currently, the only way to upload files in Power Pages, is to use a "multi-step" form. And the only way to configure a "multi-step" form in Power Pages is to create two forms: one for client information (e.g. Full Name, Email) and one for documents.
I went through days of trouble, to figure this out, because it is not documented anywhere. If you try to use a single form, you'll get bizarre errors.
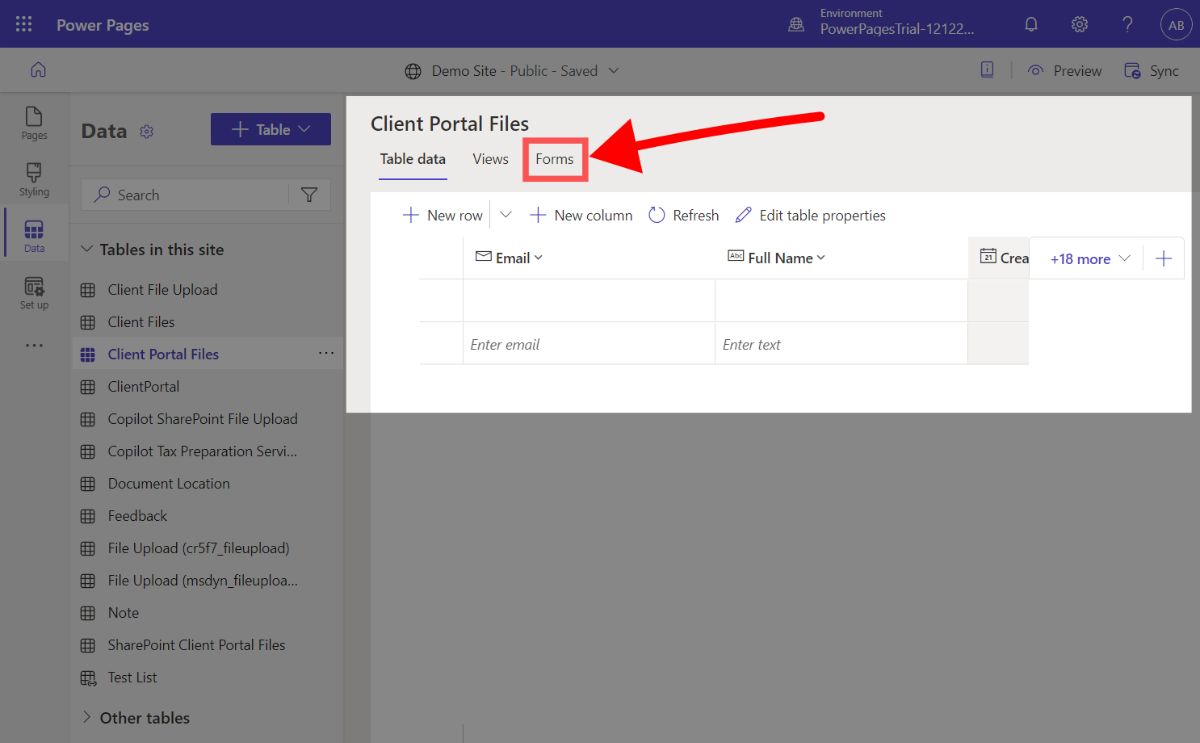
You'll have to navigate back to the "Data" tab, and find the dataset we have been using (called "Client Portal Files"). Then, at the top of the page, click the "Forms" tab.

You'll see a massive button called "New form" where you can do just that. Click it!
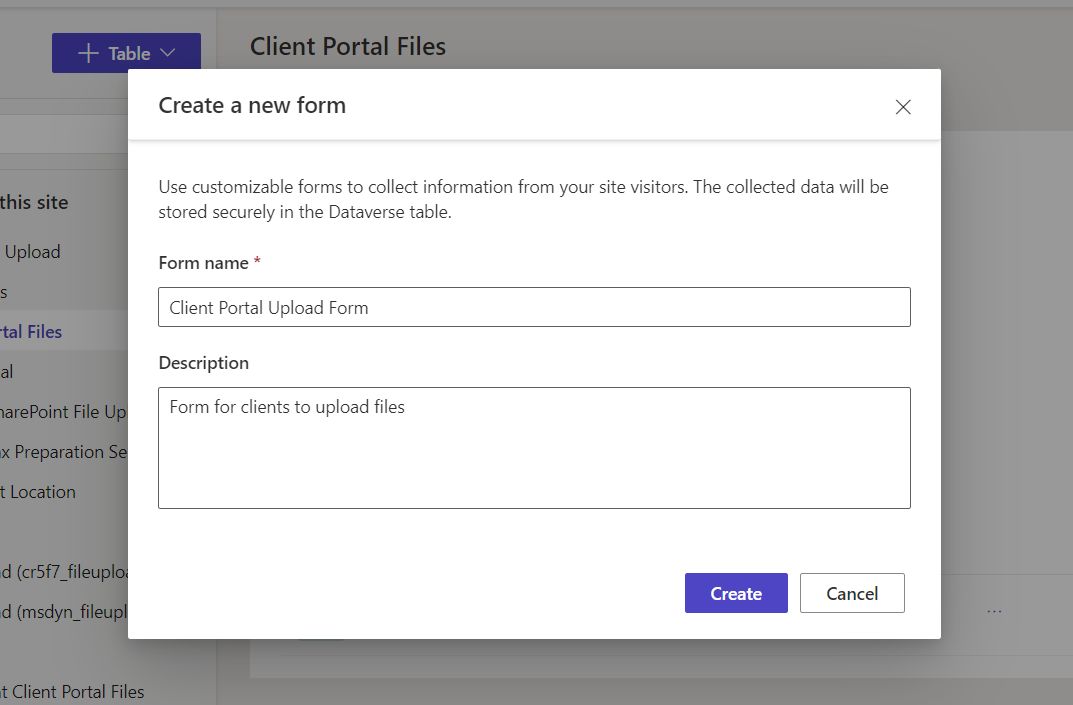
A dialog will show up where you can set the form name and description. I set:
- Form name to "Client Portal Upload Form (Information)"
- Description to "Form to collect client information"
To be precise, this form will actually be for the client's information, and not for directly uploading files.
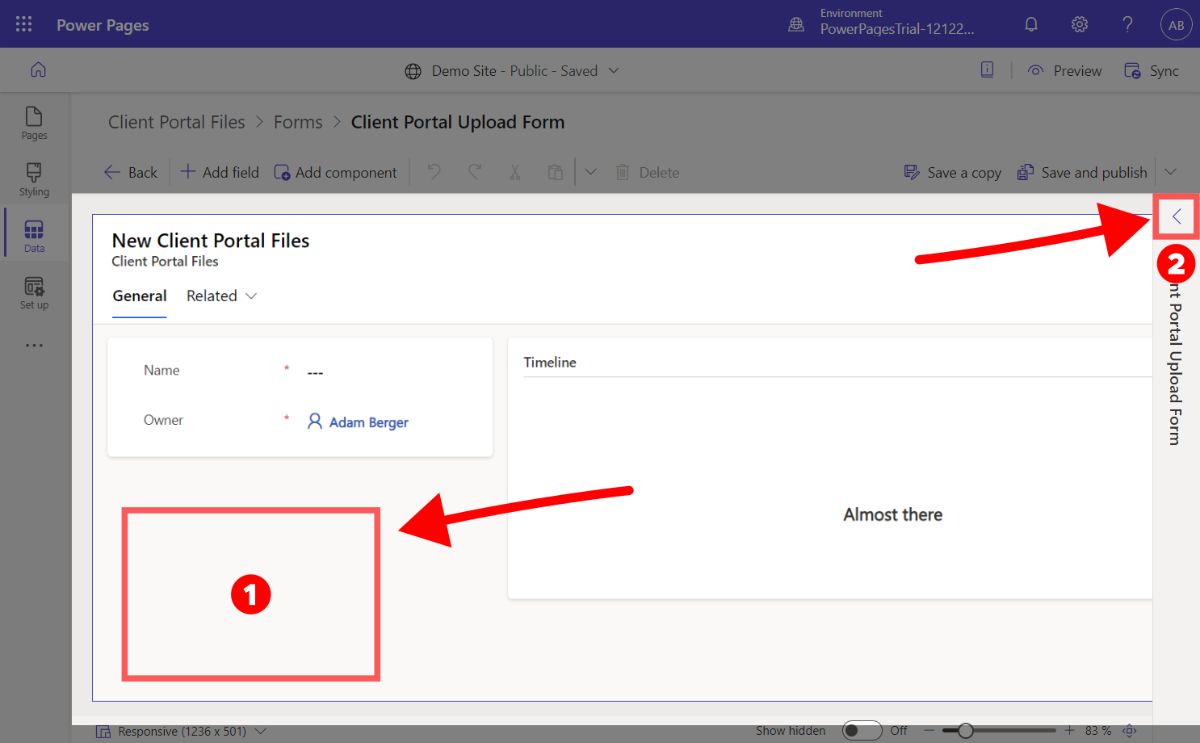
All forms start with two columns, and a "timeline". This is annoying, because all we want are the fields and not all the bloat.
So, lets turn this into a single column form. To do that, click in the empty space shown in the screenshot above, then expand the drawer on the right.
A drawer will appear on the right. Where you can set:
- Name to "general"
- Layout to "1 column"
You'll see the "timeline" has disappeared and only the form's fields are visible. Great!
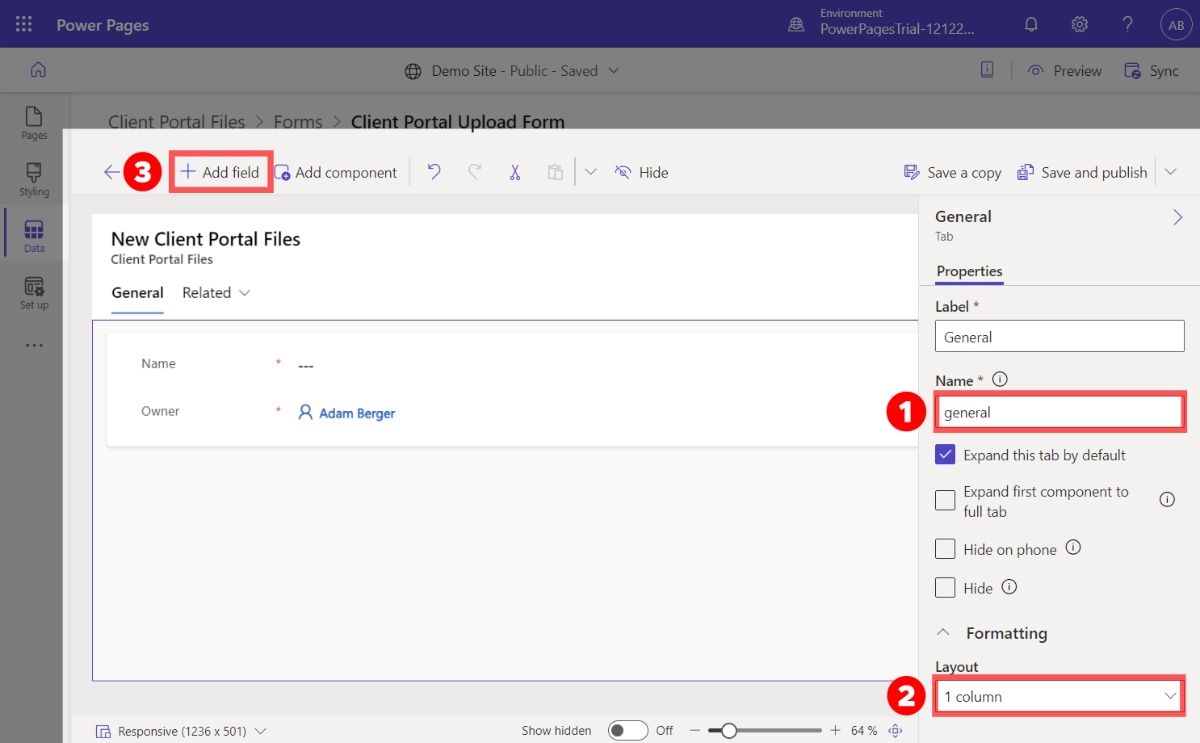
Next, we can add any additional fields you'll like to be included in the form. Click "Add field" on the top left, and you'll see a list of all the columns from our "Client Portal Files" dataset.
For this guide, I'm just adding the "Full Name". The "Email" field should have been included by default, but if it wasn't, you can add it here.
Finally, lets clean up the form by hiding any fields we aren't using.
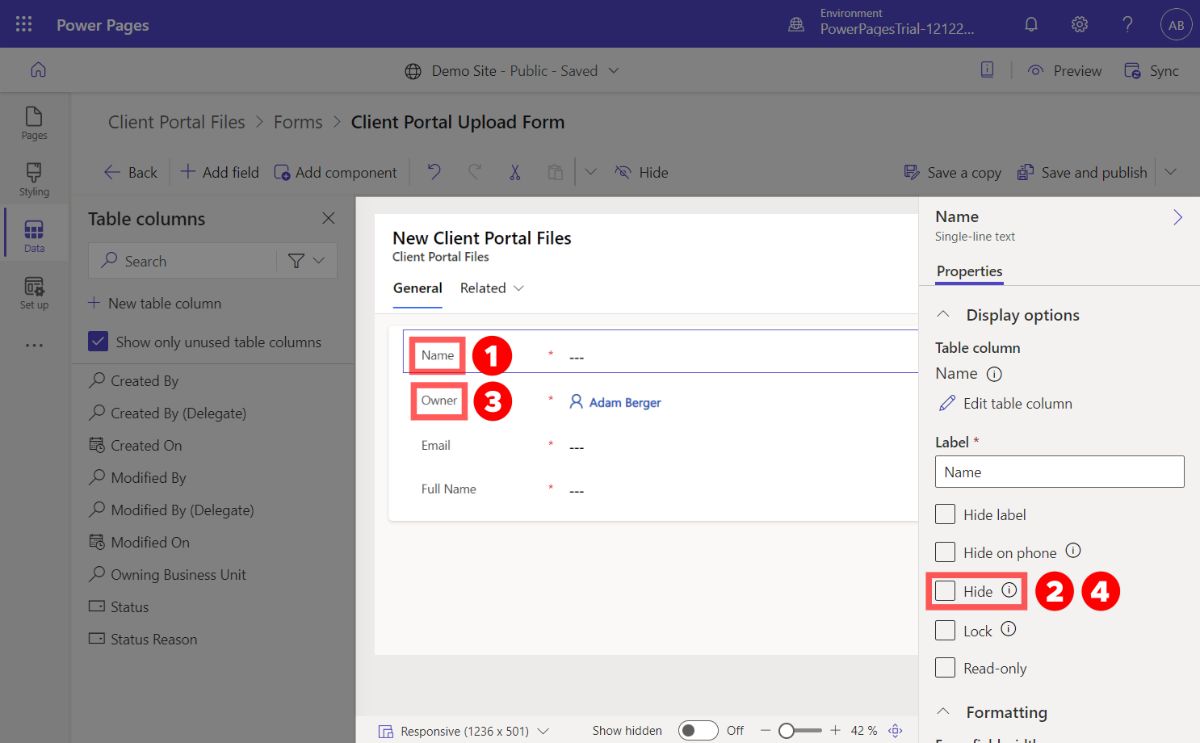
In my case, I had two fields I wanted to hide: Name and Owner. Just click on each field you want to hide, and select the "Hide" option in the right drawer.
That completes our "Client Portal Upload Form (Information)" form! Make sure to click "Save and publish" on the top to make sure you don't lose any of these changes.
Now we will make the last form, which will be used for sending documents to SharePoint.
Go back to the "Forms" tab and click "New form" again.
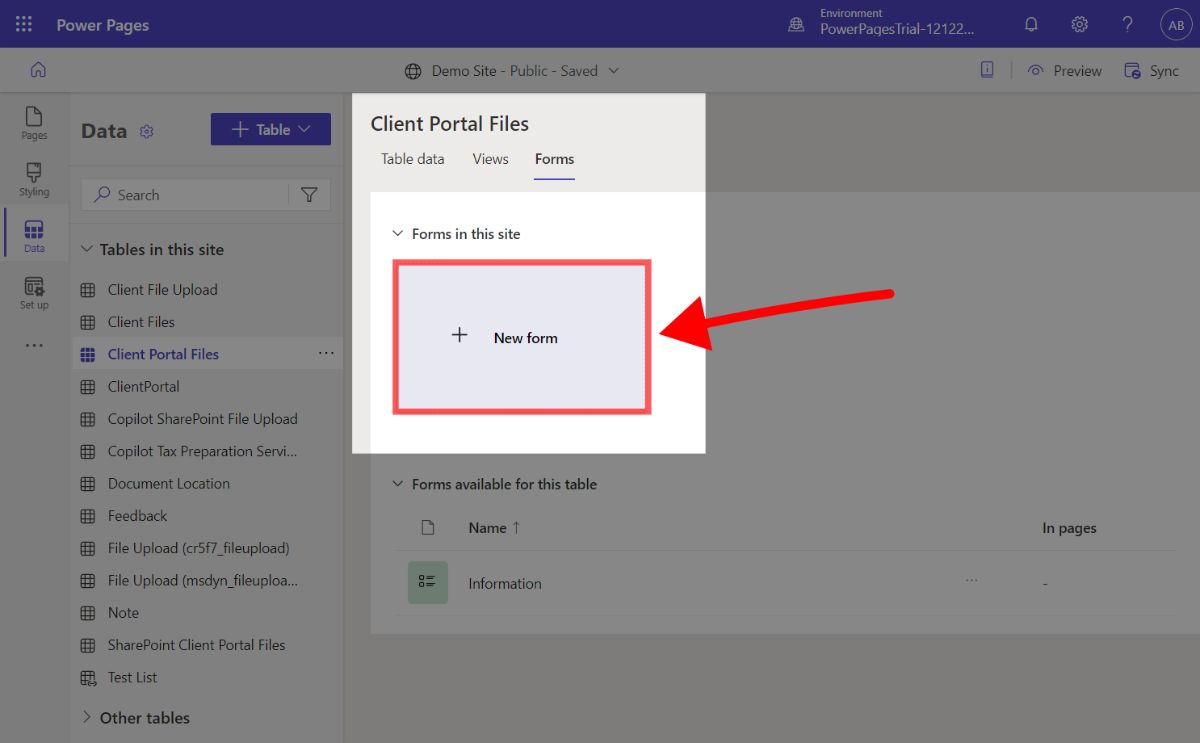
A dialog will show up where you can set the form name and description. I set:
- Form name to "Client Portal Upload Form (Documents)"
- Description to "Form to send client documents to SharePoint"
In the form editor, we are going to make a single column form that has a subgrid component that allows the client to upload directly to SharePoint.
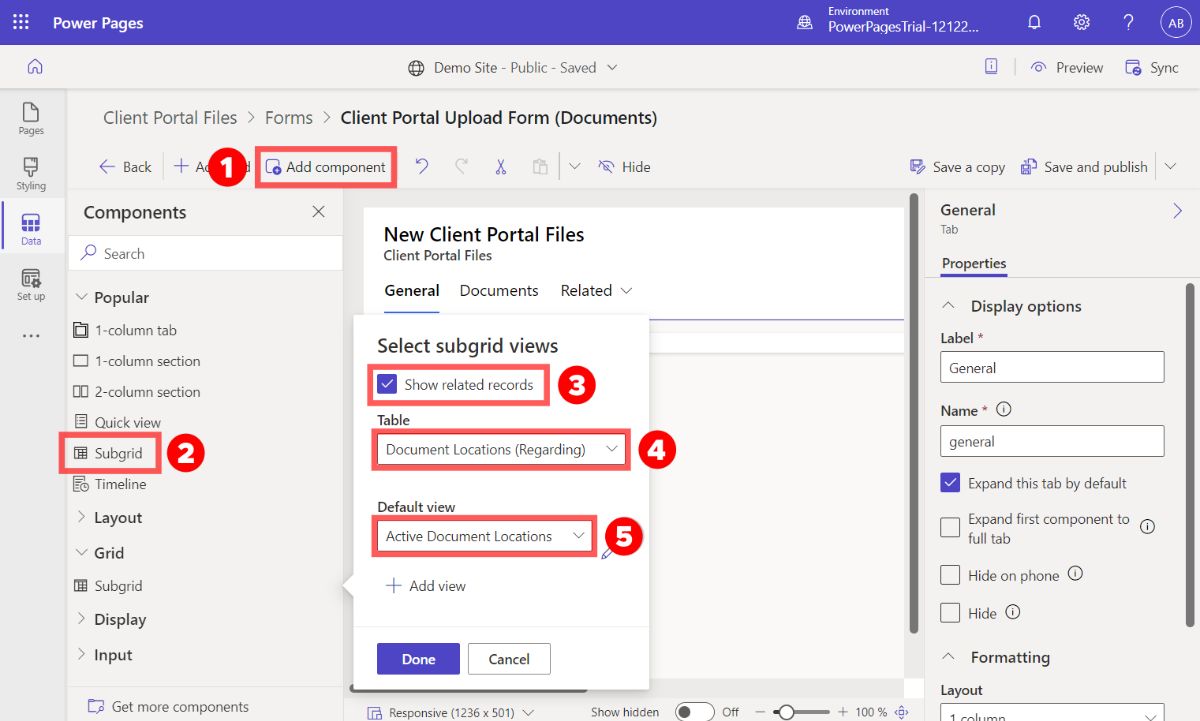
To summarize the screenshot:
- Click "Add Component" on the top of the screen
- Click "Subgrid"
- Enable "Show related records"
- Select the table "Document Locations (Regarding)"
- select "Default view" of "Active Document Locations"
You'll see a data table was added to the form.
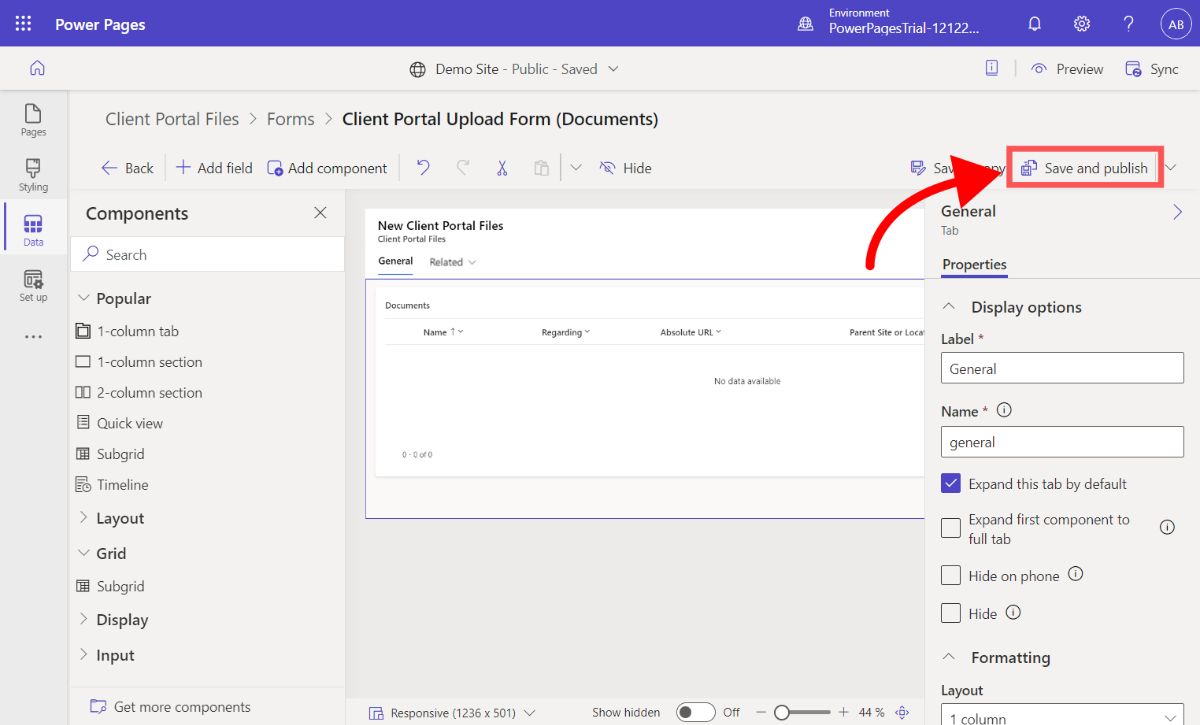
You can update the name and labels of the subgrid by clicking on it, and using the right drawer.
When you are done, click "Save and publish" on the top right.
At last! All our forms are created. Now all we need to do is make a new page on our site, and these forms to that page.
Step 4: Make a Client Portal Page and Add a Multi-Step Form Component
Now we can make a new page in Power Pages that will act as the client file-drop off. Earlier in the guide we covered how to add a new page, but if you need a reminder, you can go to the "Pages" tab, then click "+ Page" and name your page "Client Portal".
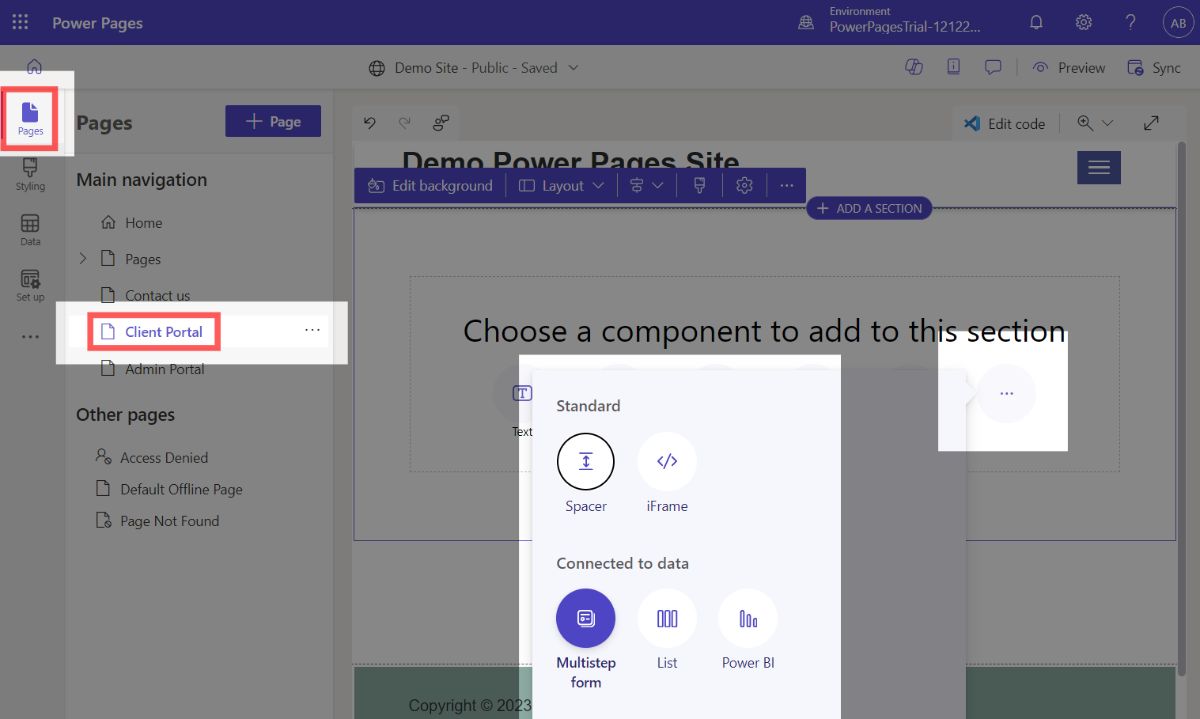
Then, we need to add a "Multistep form" to the page. You'll have to click the three dots to see the hidden components, then click "Multistep form".
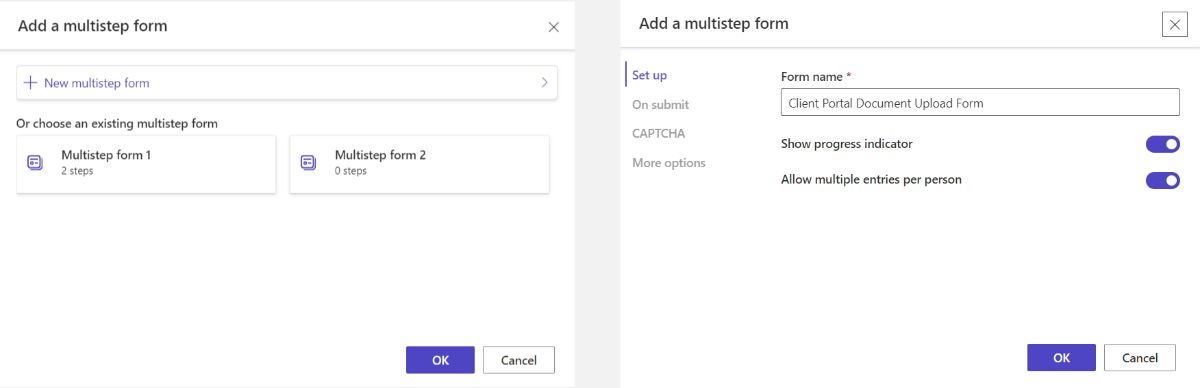
In the dialog that appears, click "New multistep form", then name your form "Client Portal Document Upload Form".
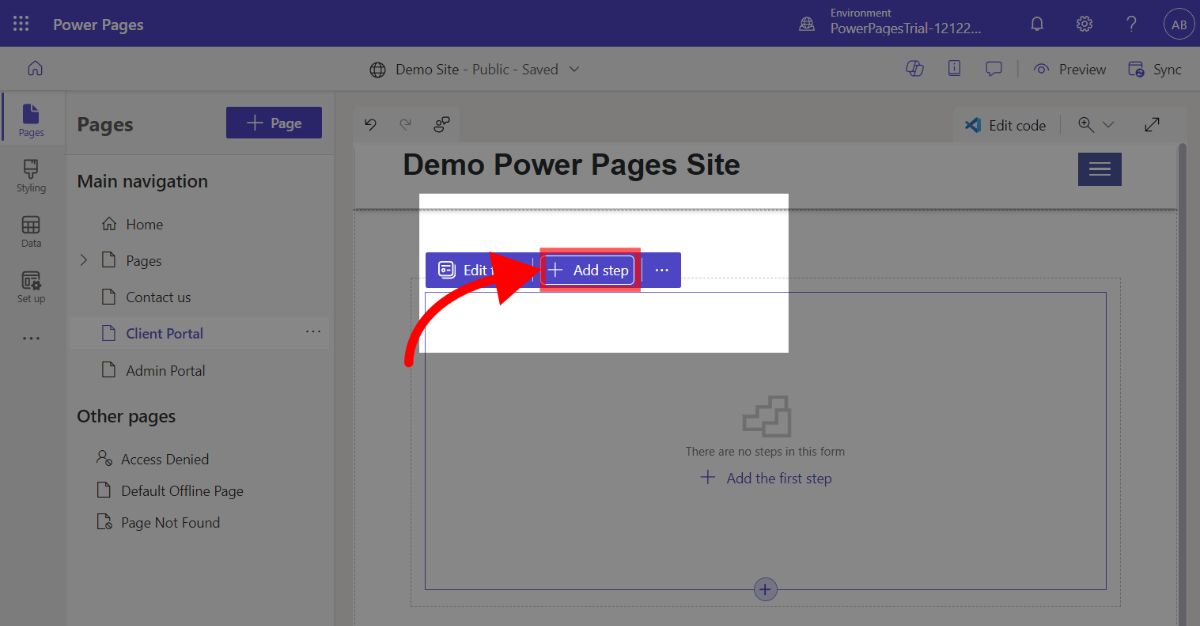
The form will appear on the page. Click anywhere on the form, and select "Add Step" (you'll be doing this two times).
In the screenshots below I show both steps you should configure this way:
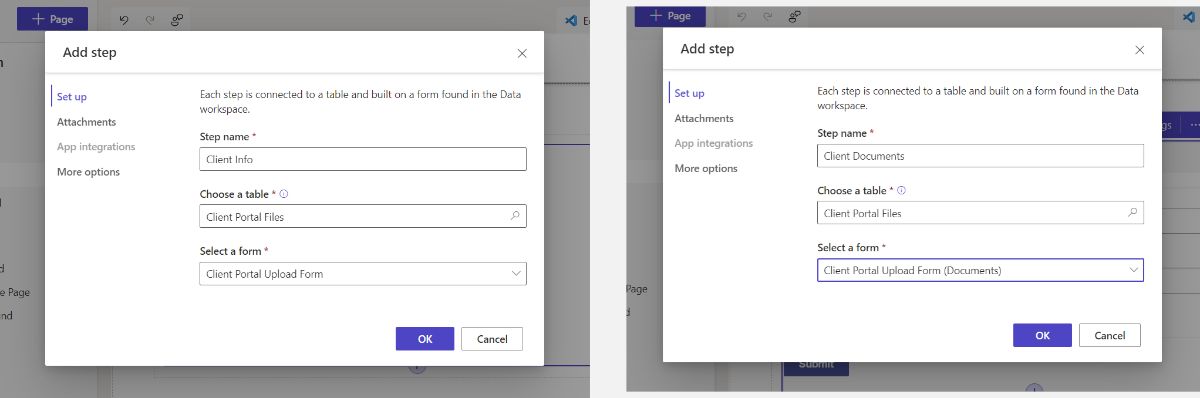
Choose "Client Portal Files" for both of them. The first step should be the "Client Portal Upload Form (Information)" and the second should use the "Client Portal Upload Form (Documents)" form.
The last step, before we can test out our client portal, is to configure the multistep form's permissions. To get that option, click on the multistep form, then click the three dots in the popup menu, and select "Permissions".
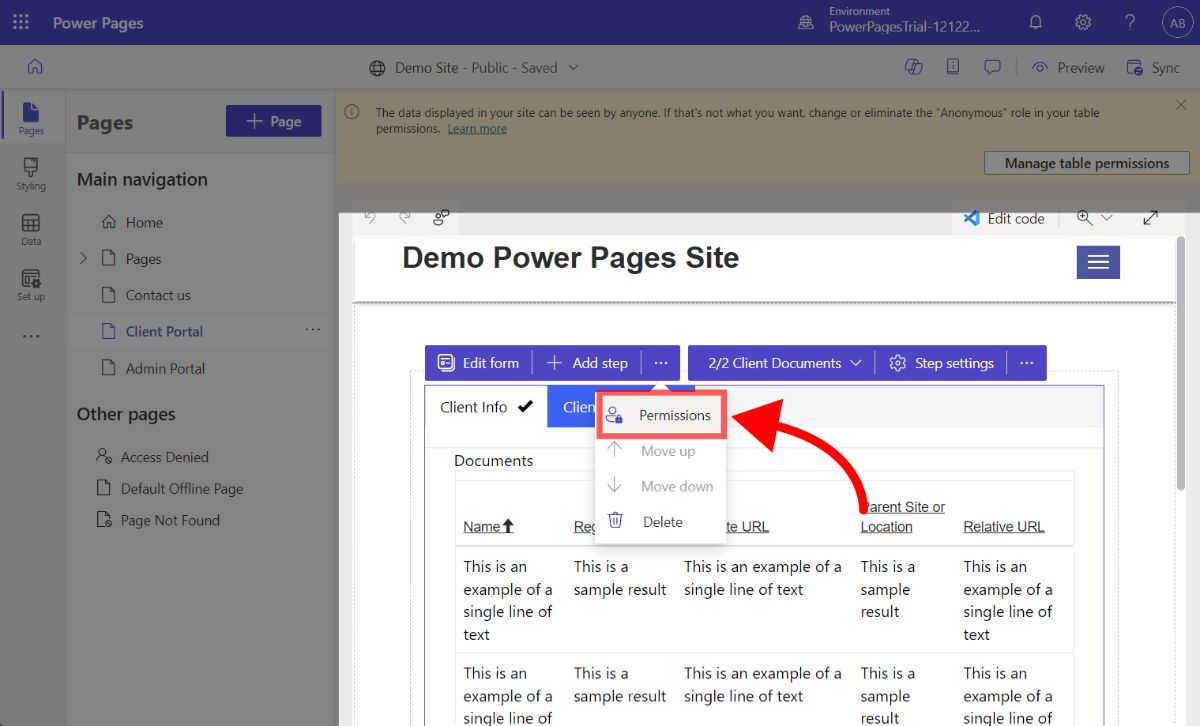
Follow these next two steps very closely, because missing just one part, could cause you a lot of confusion later on.
We are going to be configuring two permissions: one "basic" permission and one "child" permission. The screenshot below shows two different screens that you'll see in the "Table permissions" drawer.
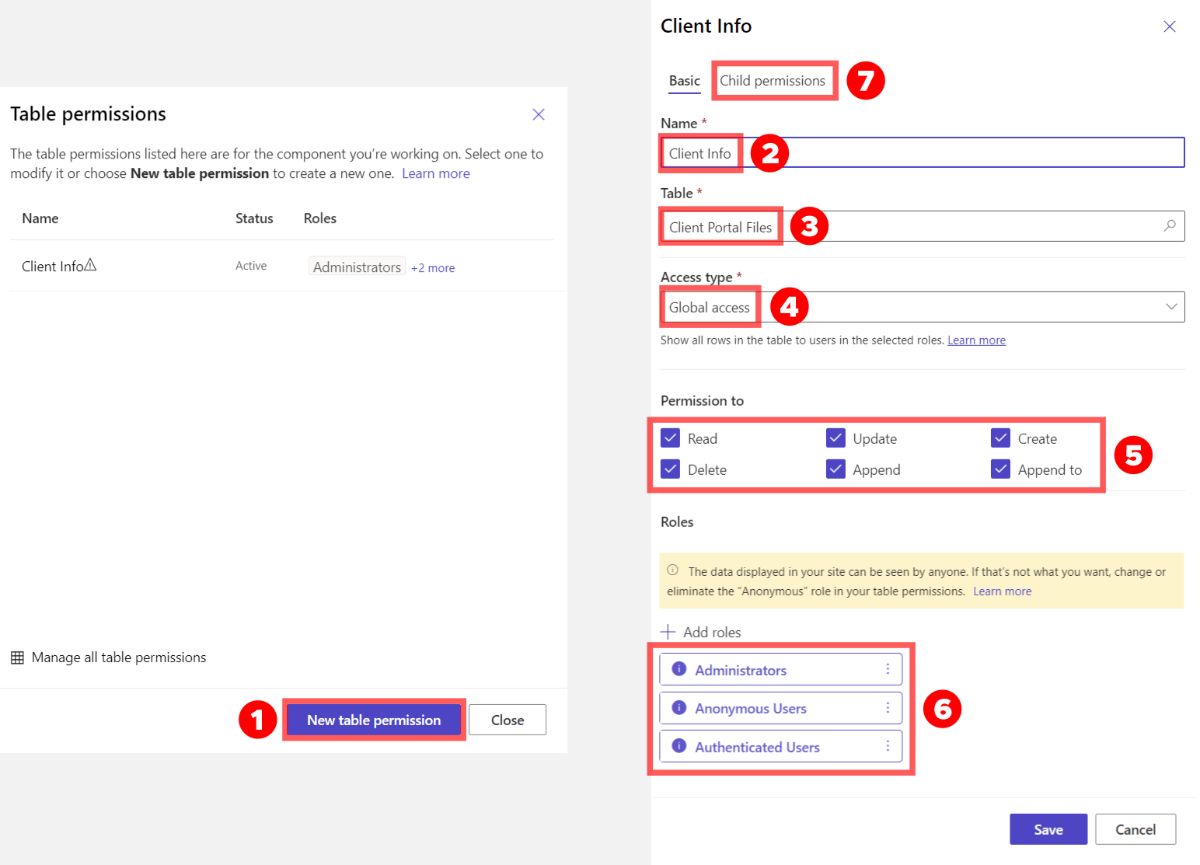
The first screen you'll see is on the left. All you do is click "New table permission". Then follow the steps seen on the next screen in order:
- Set the Name to "Client Info"
- Set the Table to "Client Portal Files"
- Set Access Type to "Global Access"
- This means our permissions will apply in any context (not just when it applies to certain accounts or contacts)
- Select all of the permissions
- Selecting all permissions is the only way I could get this to work -- proceed with caution as Microsoft doesn't make it clear if this creates any risk for data leak or loss
- I assume if you only have an interface for creating and not for viewing or deleting, then this won't be an issue, but I cannot confirm
- Make sure to add all 3 roles: Administrators, Anonymous Users, and Authenticated Users
- Lastly, click on the "Child permissions" tab
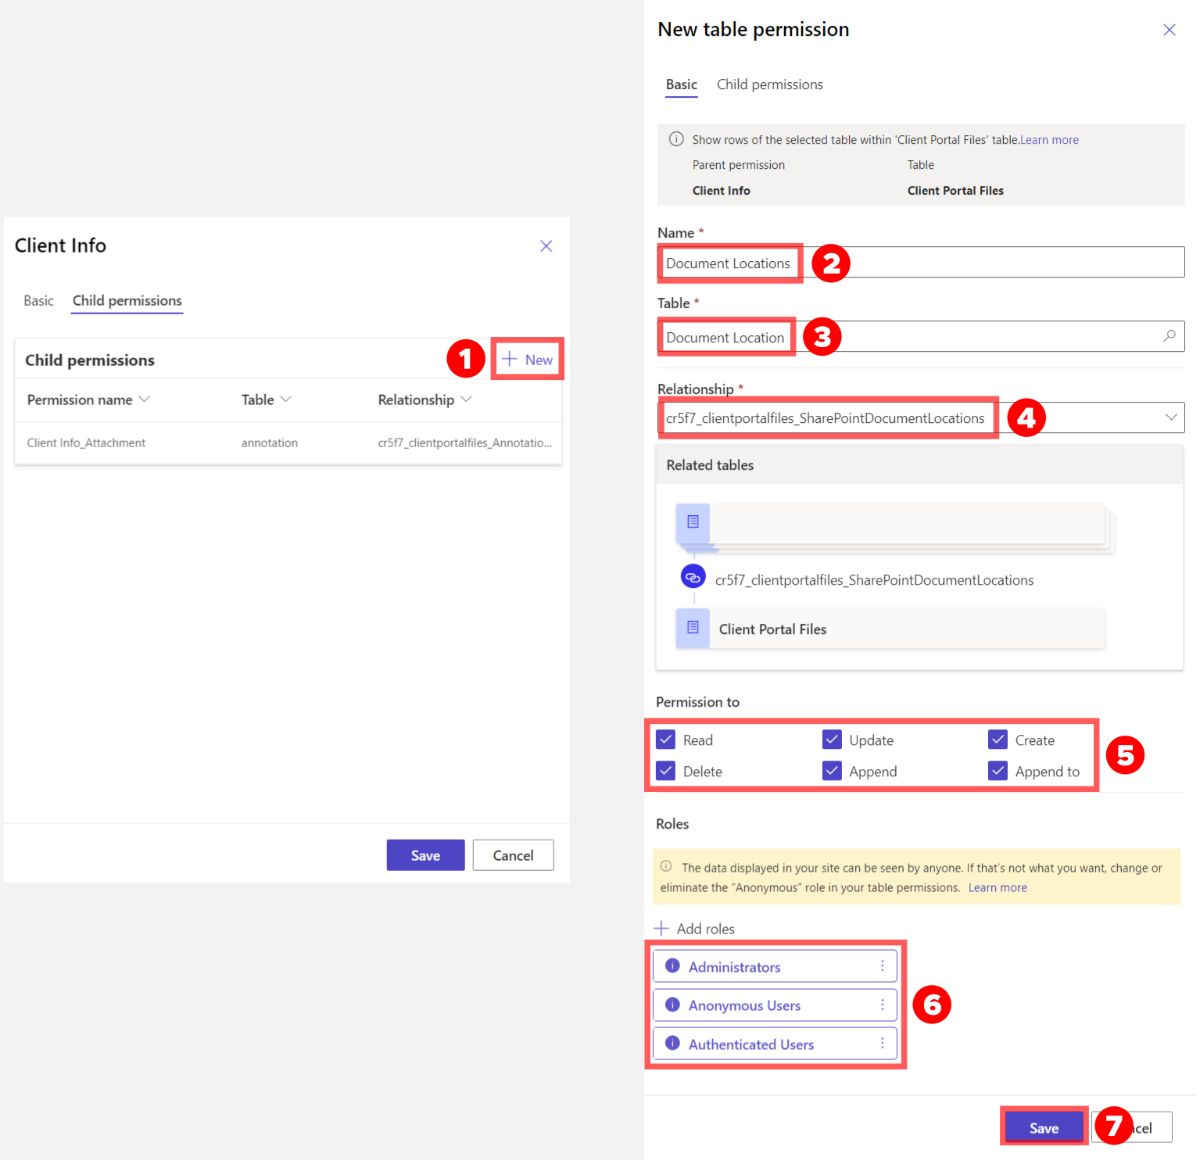
Once on the "Child permissions" tab, you'll see a table of Child permissions (see the screenshot below on the left side). Follow these steps to configure the child permission:
- Click "New" to add a new child permission
- Set the name to "Document Locations"
- Set the Table to "Document Location"
- Set the relationship to the option with "SharePointDocumentLocations" in the name
- Select all of the permissions
- Selecting all permissions is the only way I could get this to work -- proceed with caution as Microsoft doesn't make it clear if this creates any risk for data leak or loss
- I assume if you only have an interface for creating and not for viewing or deleting, then this won't be an issue, but I cannot confirm
At long last! We are done! Your SharePoint client portal is now online and ready to receive files from clients. Let's test it out and see how it works.
How to Use Your SharePoint Customer Portal
To use your new SharePoint client portal, you just need to share a link to your Client Portal page your clients. You can do this via email, or link to it on your Power Pages site (e.g. via the page navigation).
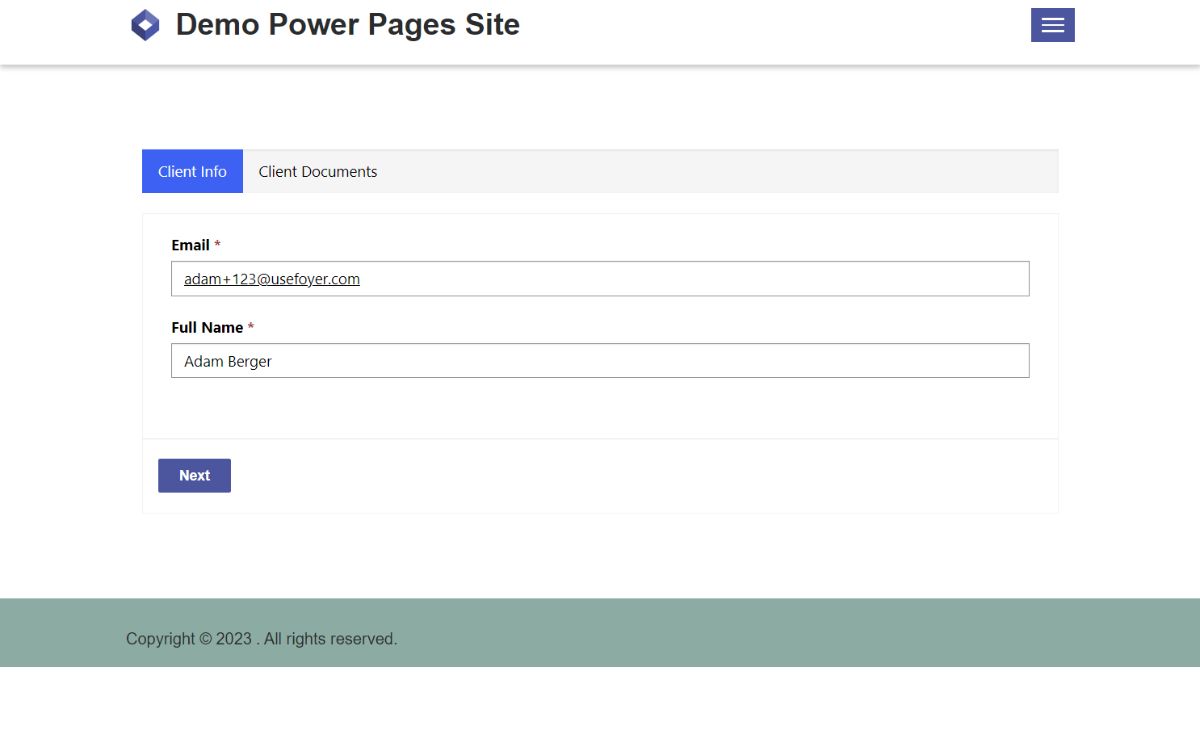
SharePoint Client Portal: How to Upload Files as a Client
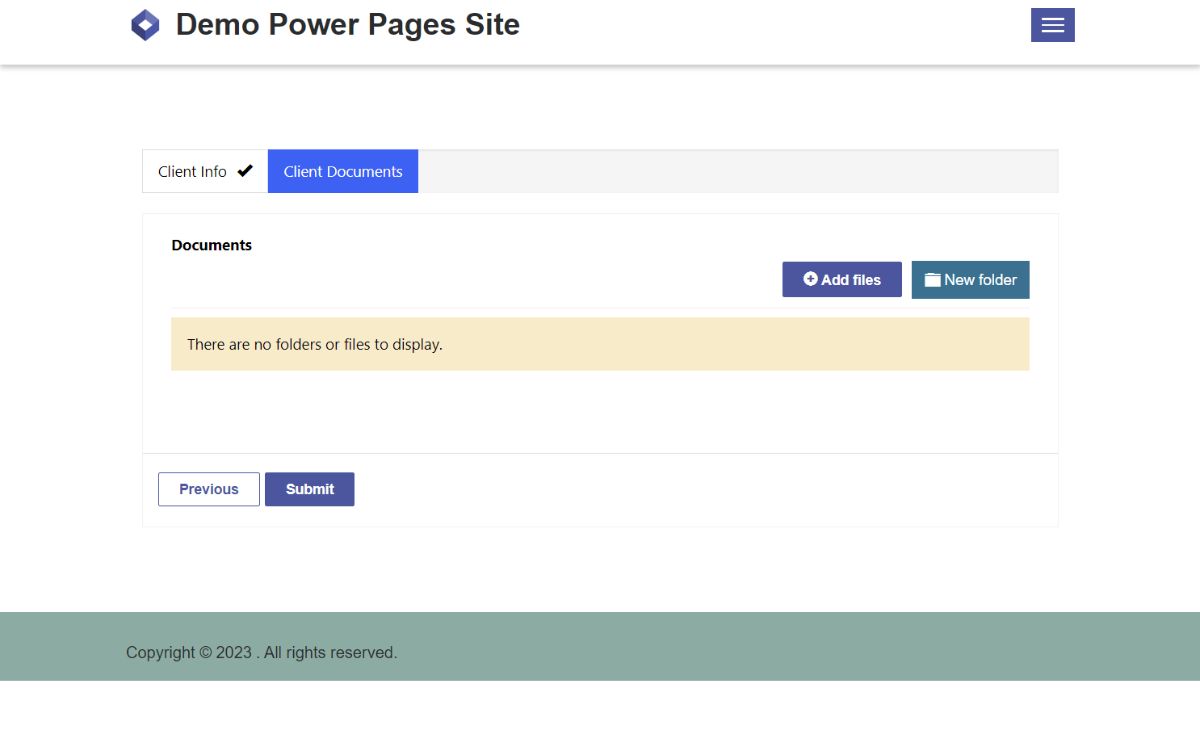
In the screenshot below you can see the multistep form that we configured earlier in this guide. First, the client provides basic details about themselves (e.g. email, name), then the second step is to upload files.
At first, the "Client Documents" grid will be empty, because every new form submission will start in a new SharePoint folder. The client just needs to click "Add files" to upload any number of files.
Clicking "Add files" brings up a dialog where the client can choose one or more files to upload.
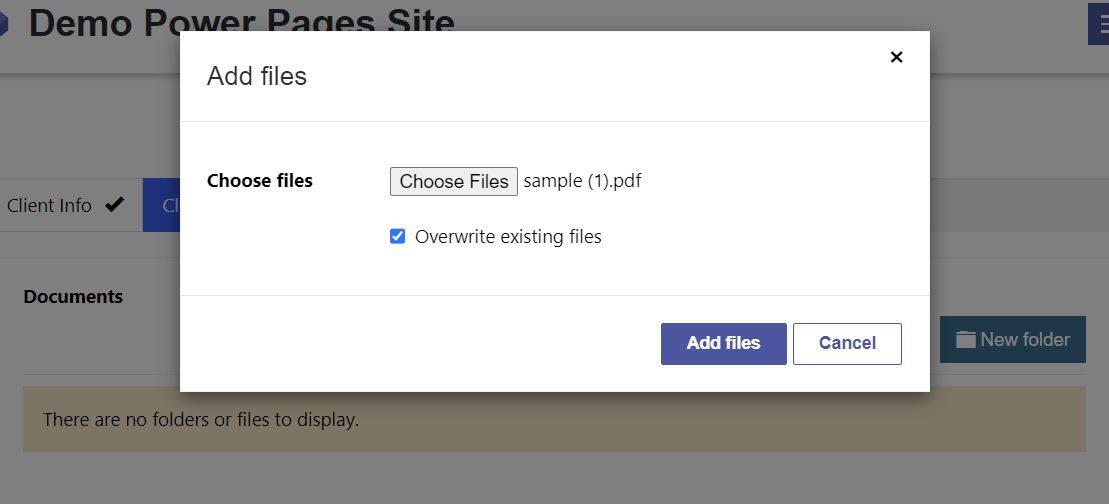
In the screenshot below you can see what the files look like before the client submits.
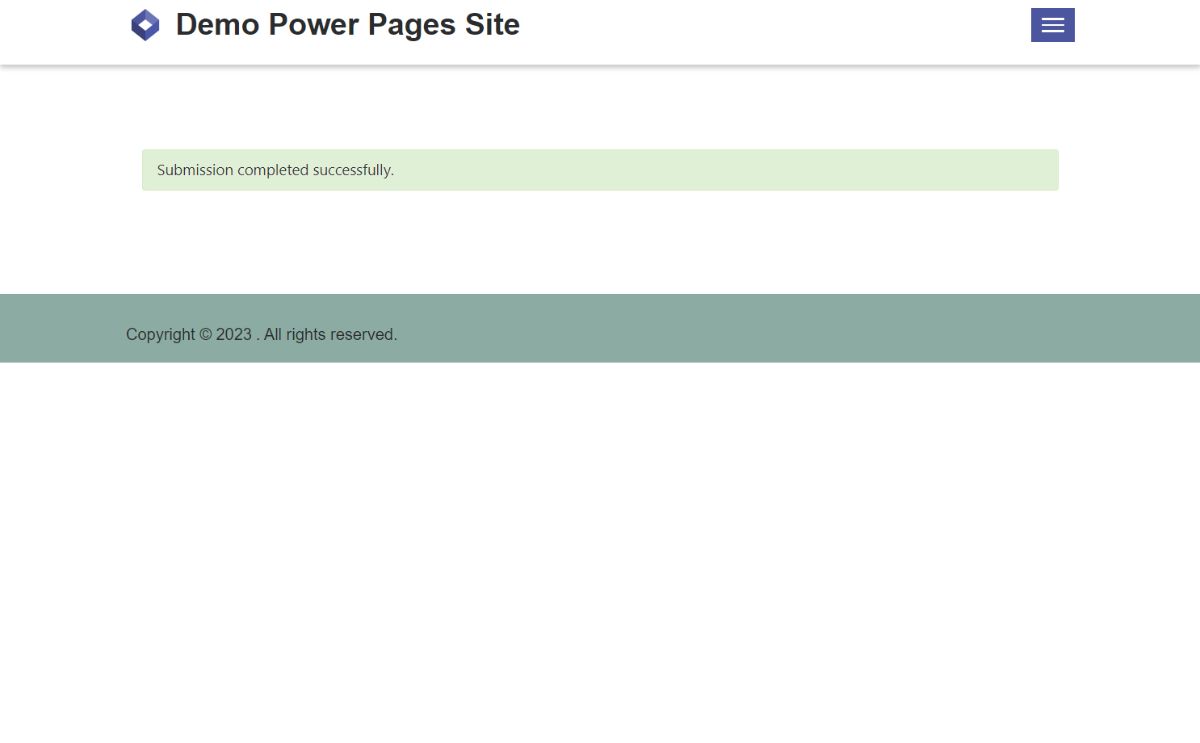
After the client submits they are brought to a screen that confirms their files have been received. This behavior is actually customizable within Power Pages, but we didn't change it. You can redirect to any link including pages within your Power Page site.
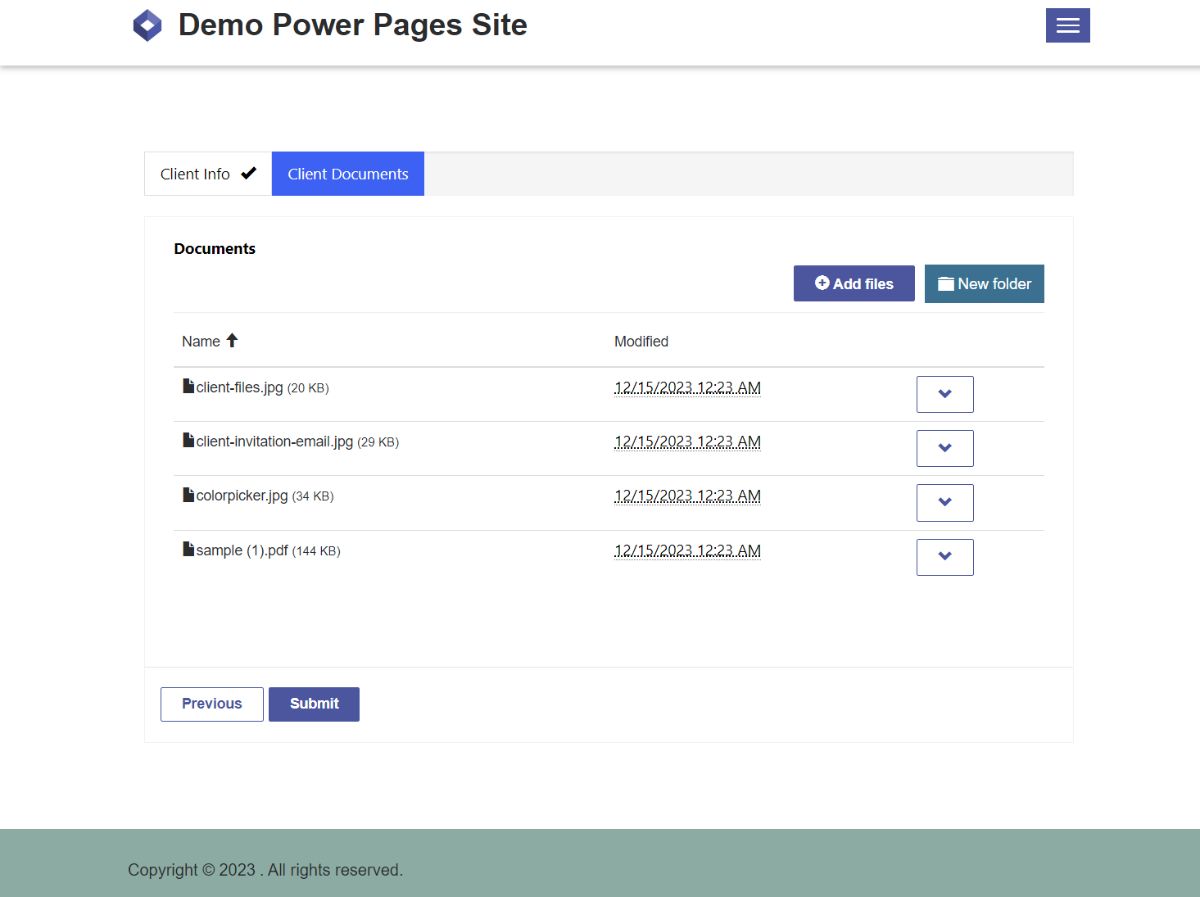
Behind the scenes, all the files that the client uploaded went straight to your SharePoint site, in a brand new folder that is tagged with the client's email address.
SharePoint Client Portal: How to View Uploaded files as an Administrator or Staff
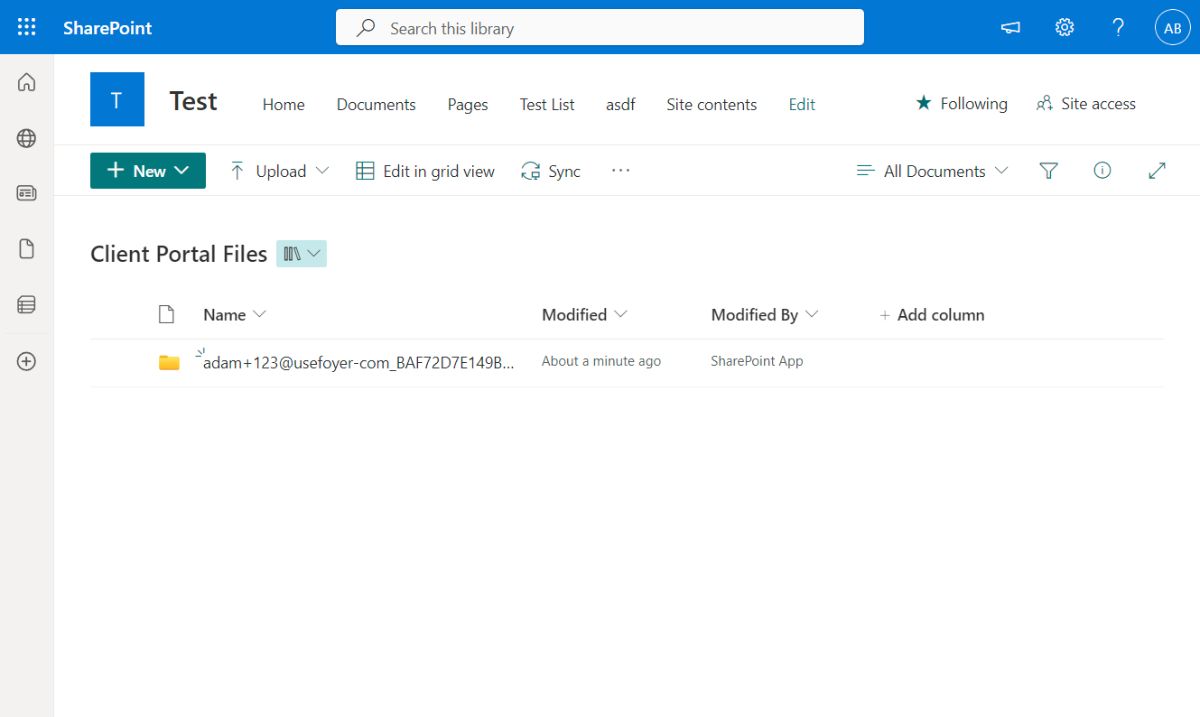
To view all customer submitted files, just log-in to your Microsoft work/business account as you usually would. Then, navigate to the SharePoint site you used throughout this guide.
On the top of the page, you'll see a "Documents" button. You may already be familiar with this page, but you may not have realized there's a drop down to the right of "Documents" where you can choose between different entities.
Click the dropdown to the right of "Documents" and select the new "Client Portal Files" option.

You'll see a folder for each time a client has sent you a file. The folder will have the email's name, and a bunch of letters and numbers after it.
Click into any folder to see the files that the client uploaded to you.
As you can see in the screenshot below, you have access to every file the user sent, along with their email, so you know who to follow up with.
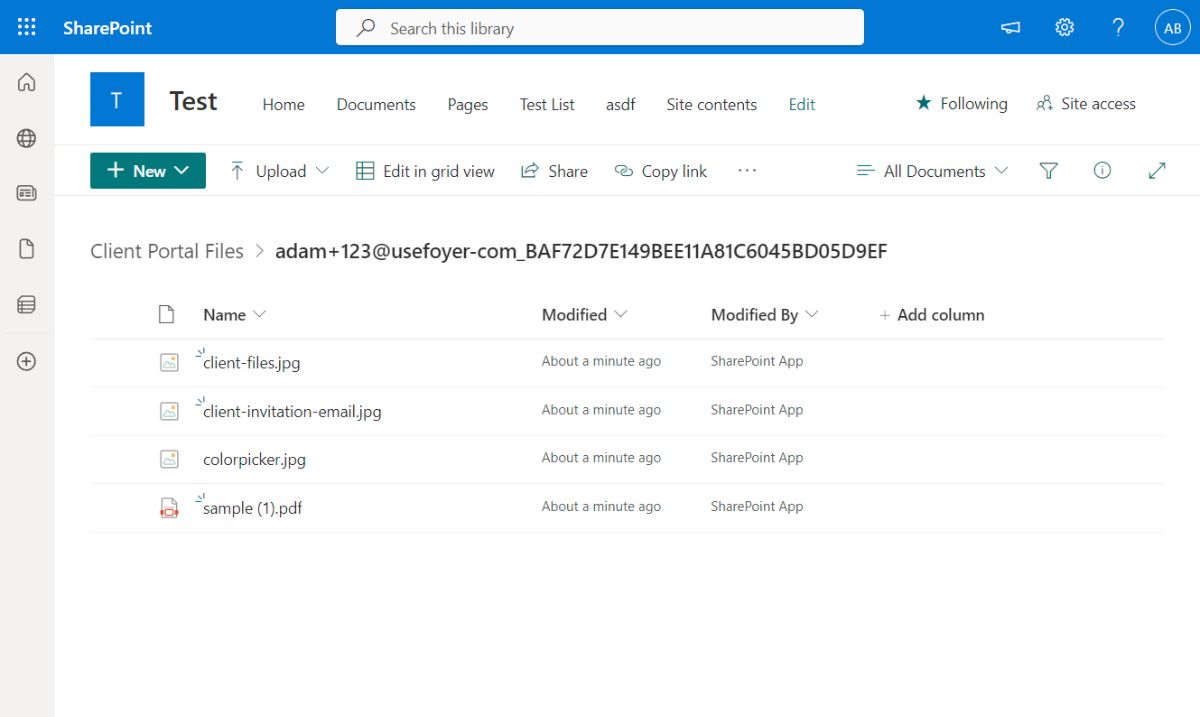
Great! But, what if you want to see the other client information about this upload? You have access to this information, but its not in the easiest spot.
If you want to get the full name that was used for this upload, you should write the first few numbers and letters that come after the email. In the screenshot above it was "BAF72".
Then, open up Power Pages, and navigate to the Client Portal Files dataset, and locate a record with the "Client Portal Files" column that starts those same numbers and letters (in my case "BAF72"). Check out the screenshot below where I show this exact record:
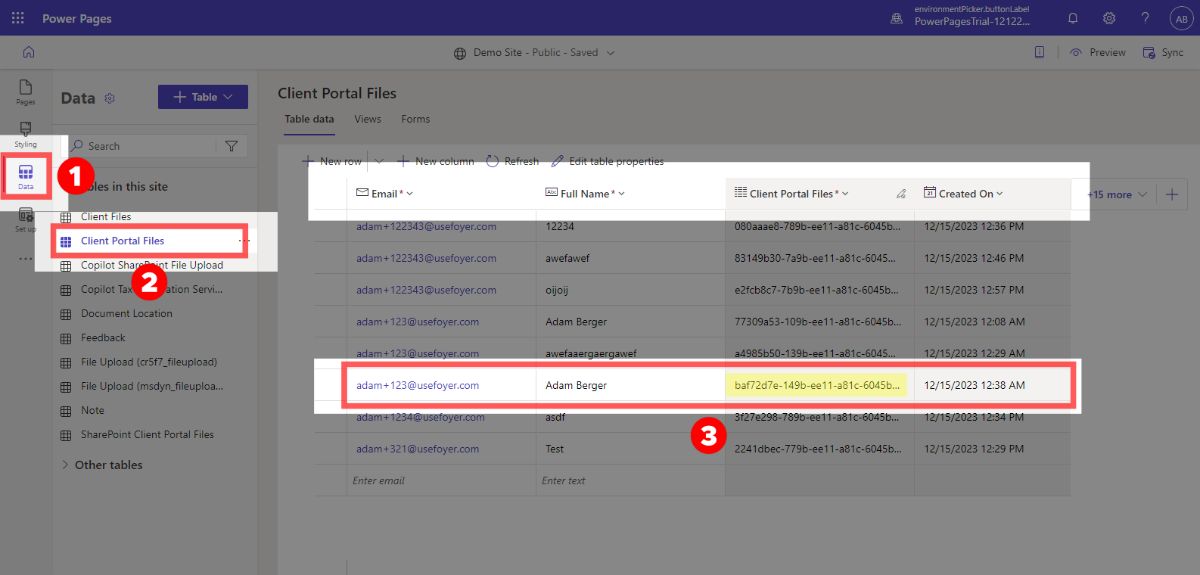
Notice the highlighted numbers and letters match the name we found in SharePoint. That means its the same record. So there you can grab any info about the client you need.
What's Next? How Can You Improve this Power Pages SharePoint Client Portal?
There are a lot more client portal features that I couldn't cover in this article.
If you're looking for a better client experience I would suggest implementing these features with Power Pages next:
- Make an administrator or staff dashboard where you can view the SharePoint files and client information in one place
- It is annoying to have to go to the dataset viewer to get client information, it would be great if it was in one spot
- Require clients create accounts before submitting files
- This could cut down on any spam you might receive
- Enable email notifications for SharePoint so you get notified when clients upload files
Need More Features? A Dedicated Client Portal Could Be The Best Solution

Odds are, you'll want a lot more features like e-signatures, secure real time messaging, client accounts with 2FA support, secure email, and more.
For that, I strongly suggest you use a dedicated client portal.
And honestly, after going through all of this in Power Pages, I know that it is so much easier to share files securely with your clients using a product that is designed for secure file sharing.
With Foyer, you can spend just $38 per month and get all of this:
- 100GB of Storage
- A client portal for securely sharing files that works on desktop and mobile
- A secure messenger to send clients encrypted messages
- Email and desktop notifications for all portal activity
- Audit trails for every action (login, file download, file upload, etc...)
- Multi-factor authentication (MFA/2FA) support
- An integration with DocuSign that lets you quickly collecting file signatures from clients
- Custom forms similar to Power Page's Forms, but can be used without any Microsoft account
- An internal knowledge base builder to share internal business documents and trainings
You can even integrate Foyer into your Power Pages site for clients to securely upload files to you. The interface is so much more modern than Power Pages, and works on both desktop and mobile. If you’re comparing tools, check out our review of the best client portal software available.
Foyer has an onboarding wizard that makes it easy to create a client portal in just 1 minute. It is completely free for 14-days (with no credit card required at all).
Get started today and see how much better it is at sharing files than Power Pages.
Thanks for reading this guide, and if you have any questions at all, just send a comment below!
Frequently Asked Questions about SharePoint Client Portals
Here are a few questions that get asked a lot about SharePoint. With the changes that came with Microsoft introducing Power Pages in 2022, most of the information you'll find currently on Google is out-of-date. The first FAQ is a great example:
Can you Make a SharePoint Client Portal?
Yes, you can! Thanks to Microsoft Power Pages (released in 2022), you can easily create a public website where anyone can upload files directly to SharePoint. It is completely public, and requires no client login process or Microsoft account.
Can you Make a SharePoint Site Public?
SharePoint lets you make a page "public". But "public" actually means "anyone in your organization".
If you want to make a SharePoint page public for anyone, with no login required, you'll have to use Microsoft Power Pages. Power Pages is extremely versatile and has integrations with SharePoint.