How to Create a Microsoft Power BI Customer Portal [Step by Step]
![How to Create a Microsoft Power BI Customer Portal [Step by Step]](https://foyercus.blob.core.windows.net/287a2408185e68c371c/blog/681/c/e4f52a49-1fa3-4aaf-9ba9-b27d03c4e722.jpg)
If you're looking for a way to give your clients real-time access to business insights through Power BI dashboards, creating a Power BI customer portal is the best choice.
While you can share Power BI dashboards via a link, you'll get a much more seamless experience by creating a customer portal for Power BI.
As a bonus, by embedding Power BI dashboards in a secure, user-friendly client portal, you can offer your clients a seamless way to access their data while also providing extra features such as document sharing, messaging, and e-signatures.
For this tutorial, we're going to go over how you can use the client portal service, Foyer, to embed any Power BI dashboard to create a Power BI customer portal.
Let’s dive into what a Power BI customer portal is, why you’d want to create one, and go step by step on how you can achieve this with Foyer.
What is a Power BI Customer Portal?
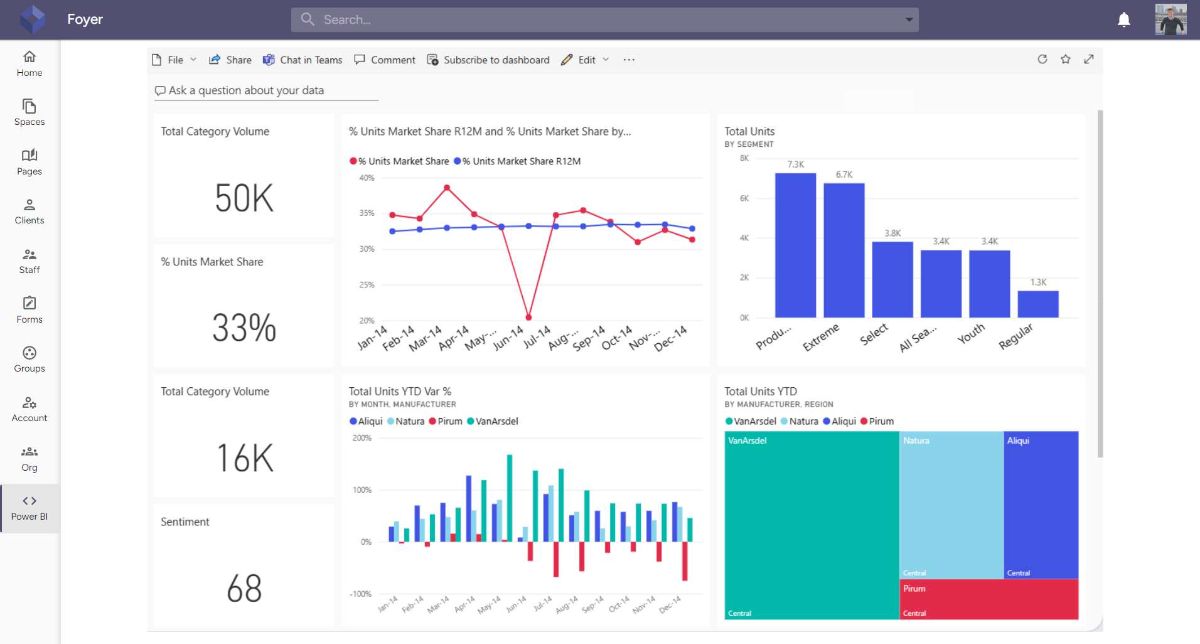
As you know, Power BI is a powerful tool from Microsoft that allows businesses to turn data into visually interactive insights.
Whether your data comes from Excel, cloud services, or on-premises databases, Power BI connects to various data sources and helps you create dashboards and reports that provide valuable, real-time insights.
With Power BI, businesses can track performance, monitor key metrics, and share data insights across teams. It’s commonly used to visualize everything from sales data to financial performance, making it easier to identify trends and make informed decisions.
But what exactly is a Microsoft Power BI customer portal?
A Power BI customer portal is a password protected site where your customers can access Power BI dashboards conveniently and securely.
This makes Power BI more accessible and versatile. Instead of keeping your data internal, you can embed Power BI dashboards into a customer portal and give your clients access to the insights that matter most to them in a password protected, easy to find place.
Whether it's tracking their sales performance, monitoring project progress, or reviewing financial reports, a Power BI customer portal allows your clients to see real-time data specific to their business.
The key benefit of using Power BI in a customer portal is that it provides an interactive, visual way for your clients to engage with their data, allowing them to filter reports, drill down into details, and make decisions based on the most up-to-date information.
This ease of access not only improves client satisfaction but also strengthens your business relationships by providing direct access to data they care about.
How to Create a Power BI Customer Portal with Foyer
Embedding Power BI dashboards into a customer portal is a powerful way to offer clients real-time insights and data analysis.
With Foyer, you can easily create a Power BI customer portal that lets clients securely log in and view their personalized Power BI dashboards.
Let’s walk through the steps of embedding Power BI into Foyer and setting up a client portal.
Step 1: Onboard to Foyer
The first step to creating a Power BI customer portal is getting set up with Foyer.
To get started, you can click here to onboard.
Onboarding takes just a minute, and once your organization is registered, you’ll have access to all the customizable client portal features Foyer offers, including the ability to embed apps like Power BI.
- Sign up for Foyer and create your organization. (There's a free 14-day trial with no commitment)
- Once set up, navigate to your dashboard where you can begin adding apps and features to your portal.
Step 2: Add Power BI to Your Client Portal
Foyer makes it simple to embed Power BI dashboards directly into your portal. To get started, go to the Orgs page and select "Foyer Apps." This is where you’ll add the Power BI app and embed your dashboards for clients to access.
- Go to the Orgs page and click Foyer Apps.
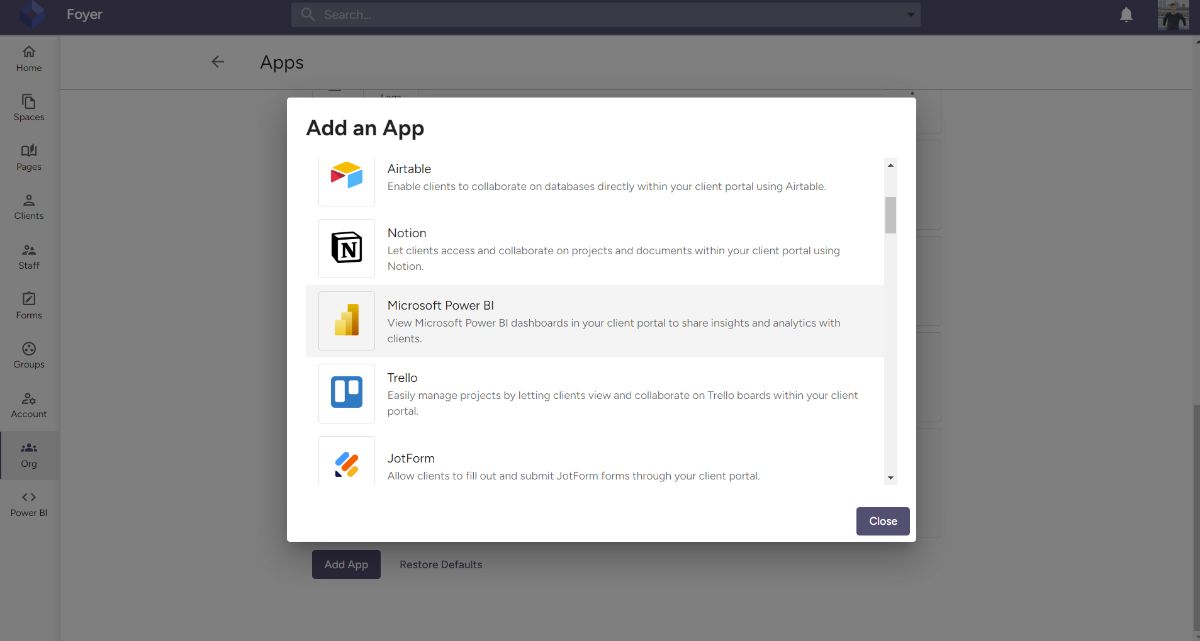
- Scroll to the bottom of the page and click Add App.
- You’ll see a list of apps that can be added to your client portal. To embed Power BI, you have two main options:
- Embed Power BI directly within your portal.
- Link to Power BI from your portal, which redirects users to the Power BI site.
For the most seamless integration, choose to embed Power BI directly into your client portal.
This keeps everything in one place, so your clients don’t have to leave the portal to access their dashboards.
Step 3: Customize the Power BI App
After adding the Power BI app to your portal, you can customize it to meet your needs. You can choose between two modes for embedding:
- Global: The same Power BI dashboard is displayed for all users.
- Per User: Different dashboards are shown to each user, based on their individual account.
To get started quickly, you can use the Global mode, which embeds the same dashboard for all users. Here’s how to customize the app:
- Click on the three dots next to the Power BI app in the list of enabled apps and select Edit.
- Customize the app’s icon, label, routing (the web address), and visibility (who can see the app).
- If you want to embed different Power BI pages for each user, switch to Per User mode.
Step 4: Embed Power BI Dashboards
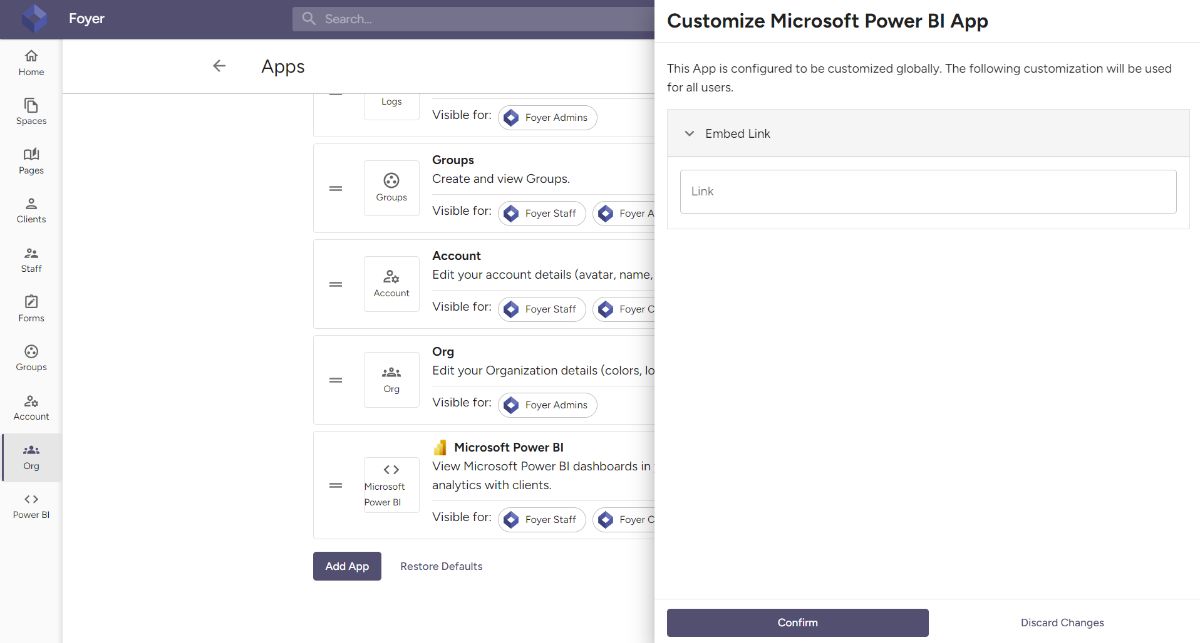
To embed Power BI into your Foyer client portal, you’ll need to provide the share link for the Power BI dashboard.
Here’s how to do that:
- Follow these instructions from Microsoft to get an embed code for your Power BI dashboard for the dashboard you want to embed.
- In Foyer, go back to your Power BI app customization screen and paste the link into the Link field.
- Click Confirm, and your Power BI dashboard will now be embedded directly into your client portal.
You can embed multiple dashboards by repeating this process, adding more apps for different reports or views.
Step 5: Explore Client Portal Features
Foyer doesn’t just stop at embedding Power BI dashboards.
You can enhance your Power BI customer portal with additional features that improve communication and collaboration:
- Document Sharing: Let clients upload and download important documents right from the portal.
- Messaging: Use Foyer’s messaging feature to communicate with clients about the data they’re seeing in Power BI, or to provide updates and insights.
- E-signatures: Need clients to approve reports or sign off on agreements? Foyer supports e-signatures via DocuSign to streamline the process.
And that's just the beginning! There are plenty more features to explore. Read here to learn about all of the features you get with Foyer.
All of these features make Foyer an ideal solution for building a complete customer portal that goes beyond just Power BI dashboards.
How to Share Power BI Dashboards with Specific Customers
One of the standout features of Foyer is the ability to customize which Power BI dashboards each client sees by using the "Per User" option.
This allows you to assign unique dashboards to individual clients based on what data you want to expose to them.
Here’s how to use the "Per User" feature to share individual Power BI dashboards with specific clients:
Step 1: Set Up the Power BI App in Per User Mode
When you add Power BI to your Foyer portal, you can choose between two modes: Global or Per User.
For individual client dashboards, you’ll want to select Per User mode so that each client sees their own data and reports.
- Go to the Orgs page in Foyer and click on Foyer Apps.
- Add the Power BI app (if you haven’t already) and click on the three dots next to the app to select Edit.
- Under the Customization section, switch the app mode from Global to Per User. This allows each client to have a unique Power BI dashboard assigned to them.
Step 2: Embed Individual Power BI Dashboards
Once you’ve enabled the Per User feature, the next step is to assign individual Power BI dashboards to each client. This ensures that only the relevant data is shared with the right users.
- For each client, gather the Power BI dashboard link specific to their data.
- Click the 3 dots on the Power BI app within Foyer and select the Customization option.
- In the dropdown, select the client you want to customize the dashboard for.
- Paste the unique Power BI dashboard link code into the Link field for that specific user.
Now, whenever the client logs in, they will only see the Power BI dashboard that is assigned to them.
Step 3: Test and Confirm User-Specific Dashboards
Once you’ve assigned individual Power BI dashboards to each client, it’s important to test the portal to confirm that each user is seeing the correct data.
- Use a test user account to log in as each client and ensure their personalized dashboard is displaying properly.
- Double-check that all permissions and access levels are set correctly to avoid any unintended data sharing.
By using the Per User feature in Foyer, you can provide a customized experience for your clients, ensuring they have access to the insights that matter to them.
Conclusion
Creating a Power BI customer portal with Foyer allows you to offer your clients real-time, personalized insights directly through embedded Power BI dashboards.
By using Foyer, you not only provide a secure and easy-to-use platform for viewing data but also enable additional features like document sharing, messaging, and e-signatures—all in one place.
Whether you're sharing the same dashboard with all clients or using the Per User feature to deliver unique reports to individual clients, Foyer makes it simple to manage and customize access to your Power BI dashboards.
With Foyer’s seamless integration and powerful customization options, you can create a robust, data-driven portal that makes accessing Power BI easy and secure.
Thanks for reading! If you have any feedback or questions, please send a comment below.