Custom Email Templating
Introduction
In some situations, Foyer will send emails to interact with your staff and clients. We support customizing these emails with your own content and formatting via email templating. There are two emails that can be templated:
- Client Invitation
- Staff Invitation
This guide goes over the features of email templating and how you can apply it to your invitations to maintain a seamless onboarding experience for your business.
Making your first template
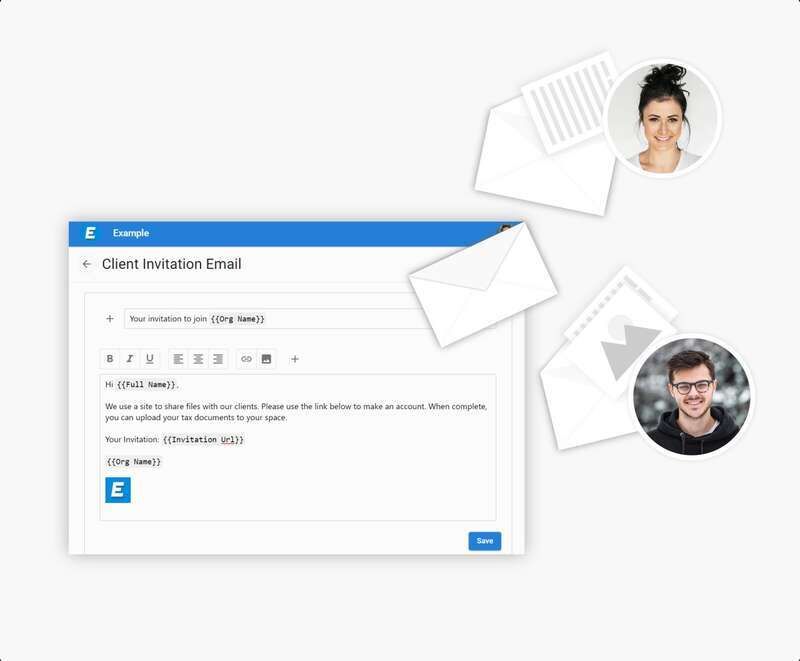
Administrator accounts can find the email templator control on the "Org" page in the "Emails" section. Clicking on either Staff or Client Invitation will bring you to a page with the email templator control.
The screenshot above shows the email templator control. Notice how there are two text boxes. The top is the subject line of your email, and the bottom is the email body.
Subject Line
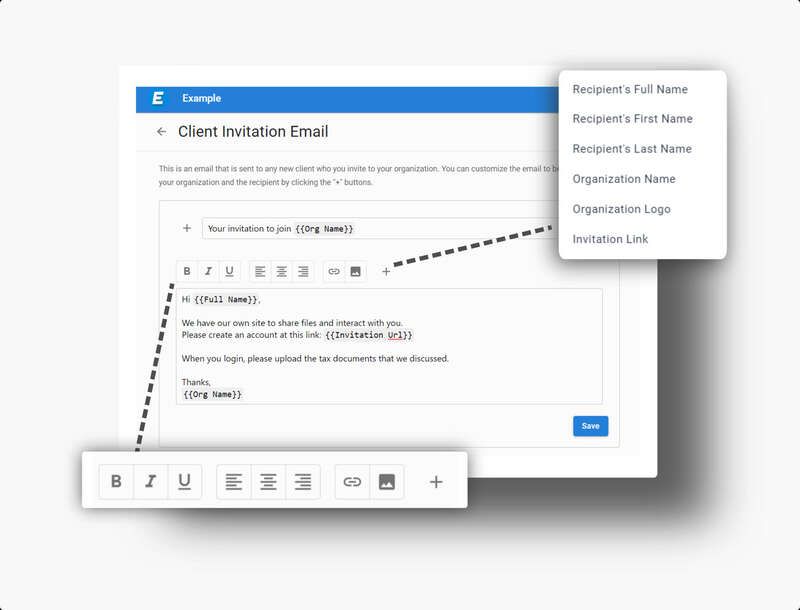
The subject line (first textbox) has a "+" button which can be used to bring up a menu to insert text that is customized based on your organization or the person who will receive the email. For example, by clicking on the "Recipient's Full Name" box, the textbox will be populated with a token {{Full Name}} which will be replaced with the name of the client that you are inviting.
There are four different templated values you can insert into the subject line:
- Recipient's Full Name
- Recipient's First Name
- Recipient's Last Name
- Organization Name
Email Body
The email body provides more formatting options than the subject line. You are given the following styling tools:
- Bold
- Italics
- Underline
- Align Left
- Align Center
- Align Right
To use any of the styling tools, highlight the text you want to modify, and click the relevant button in the toolbar.
Similar to the subject line, the body has a menu which can insert templated values. The following values are supported:
- Recipient's Full Name
- Recipient's First Name
- Recipient's Last Name
- Organization Name
- Organization Logo
- Invitation Link
To provide a better white-labeling experience, we have support for adding custom links and images to your emails as well. You can use this to provide a link to your business' homepage, or additional branding images. This option is in the toolbar next to the styling tools.
It is important to note that for invitation emails, you must provide an invitation link. That is the purpose of the email after all!
Clicking "Save" on an email template screen will not send any emails. It simply updates the template, so that future emails will use your new content and formatting.
Conclusion
Be sure to edit both the client and staff invitation email templates to maintain a consistent experience for your company. You can even test how templating works by inviting your own email as a client or staff. You will need to use a separate email or add a postfix to your email (like "+001"). For example, if your email is "sam@example.com", most email providers allow you to use "sam+001@example.com" as well. This email can be used on the "Invite Client" or "Invite Staff" pages (see the onboarding guide for more details).
Have feedback for this guide? Tell us what you think using comment section below. Interested in upgrading your plan to Standard, Premium, or Enterprise? Check out the pricing page for more information. Thank you for choosing Foyer. We are excited to be a part of your business' success.