How to Create a Document Management System [In 5 Steps]
![How to Create a Document Management System [In 5 Steps]](https://foyercus.blob.core.windows.net/287a2408185e68c371c/blog/373/c/da398cc8-afa8-4254-9cdb-ef3450aee54e.jpg)
![How to Create a Document Management System [In 5 Steps]](https://foyercus.blob.core.windows.net/287a2408185e68c371c/blog/373/c/da398cc8-afa8-4254-9cdb-ef3450aee54e.jpg)
Document management systems (DMS) are essential tools for modern businesses to manage documents online effectively.
A cloud document management system offers a streamlined approach to handle cloud document storage while protecting your data with encryption and access controls.
If you're looking to create a DMS (document management system) for your business, you've come to the right place.
In this guide, we'll be going over step by step how you can create your own document management system for cloud document storage, secure document sharing, and more.
Step 1: Choose a Cloud Document Management System
To create your own document management system (DMS), the first step is to decide which DMS software you want to use.
I'll show you how to set up Foyer for this guide, but feel free to check out other document management systems as well.
Foyer is great because it is a DMS that has all the essential features your business needs to securely manage documents online.
With Foyer, you can create your own document management system for secure file sharing, document storage, an integration with e-signature services, secure email, and more in just minutes.
All data is encrypted end-to-end, so you can be confident your business and your documents are safe.
Step 2: Complete the Onboarding Process
To create a document management system (DMS), visit the onboarding wizard, and enter your name, email, and business name.
You can create a document management system within within just 1 minute (there's no commitment necessary).
Once set up, you'll be able to access your DMS as a "subdomain" of Foyer like "example.usefoyer.com". During the onboarding process, you'll be able to choose which subdomain you want.
If you need to set up Foyer as a subdomain of your own domain (e.g. "dms.yourbusiness.com"), we can set that up for you too—just contact our Support team.
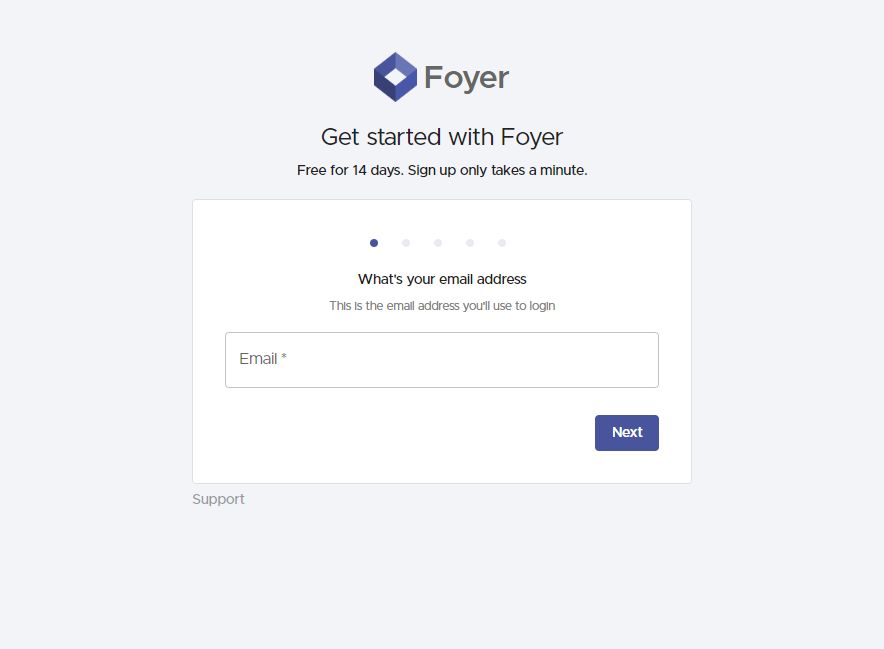
After the onboarding process completed, you'll be redirected to your DMS's home page.
Step 3: Add Documents to Your DMS
On the left, you'll see a drawer where you can access and configure all the features of your DMS (e.g. secure file sharing, custom forms, knowledge bases, etc...).
For now we are just going to cover how to share documents but later in the guide we will touch on additional features that come along with it.
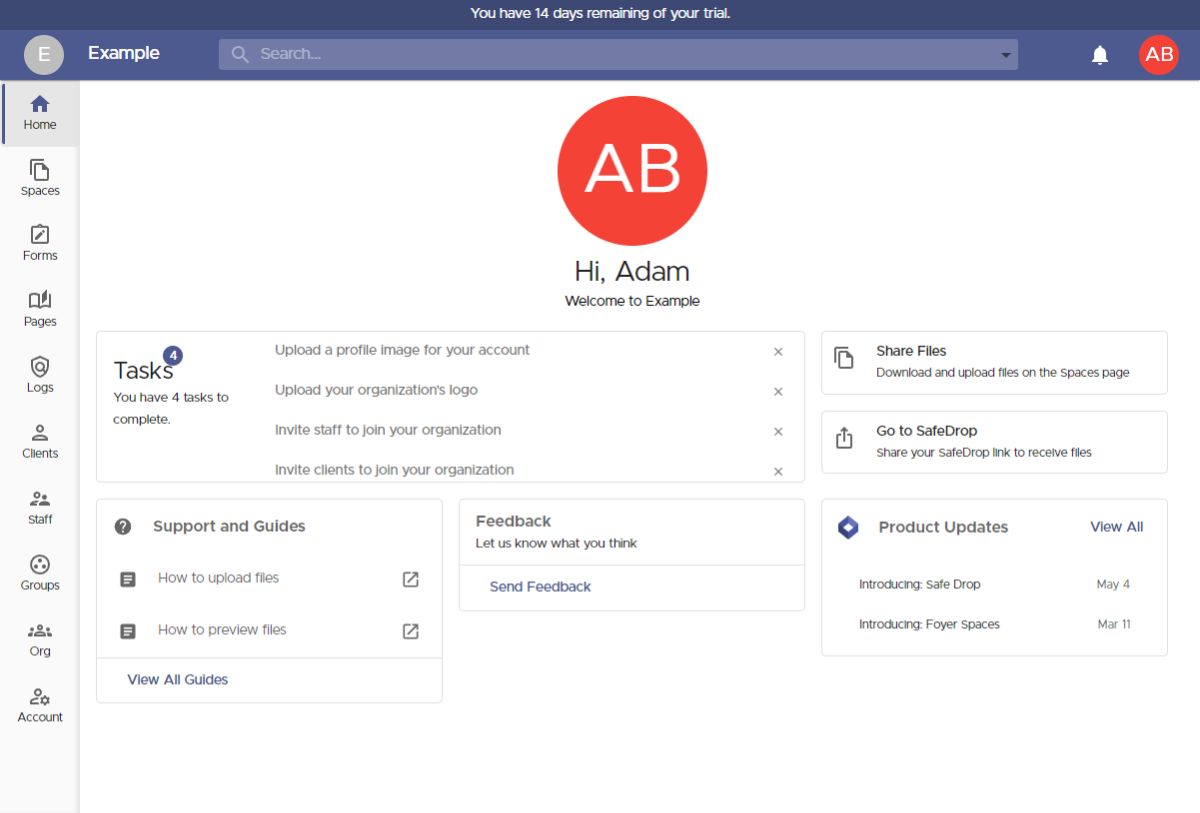
The most basic use case for a DMS is simply uploading documents. With Foyer, you can securely store documents by using "Spaces".
Spaces are secure places where you can share documents and send secure message. All the files and messages within one Space are only visible by the members of the Space (just like a group chat in Teams, Slack, iMessage, etc...).
You can making a space by visiting the Spaces page (click on "Spaces" on the left drawer), then by clicking the "+" icon on the left.
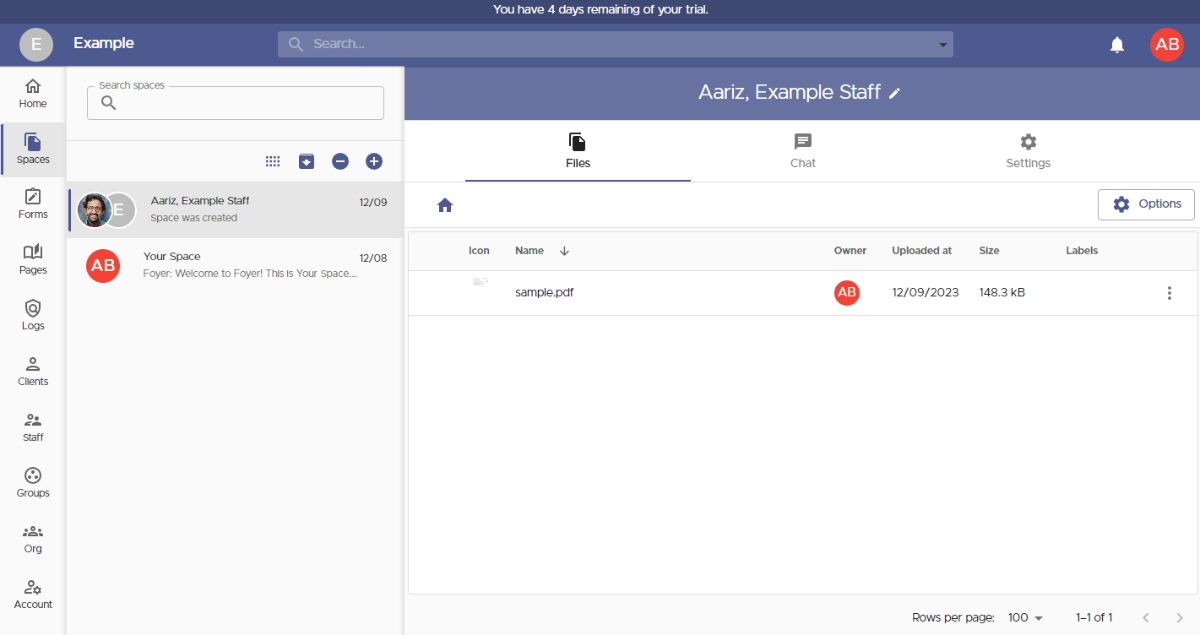
When adding a new space, you'll see a dialog like the one below. You can set the name of the Space, and choose which members have access to any files or messages that will be shared.
If you're storing internal documents, you can choose "Staff" to give all employees at your organization access.
You can also share spaces with "groups". Groups are a great way to organize your business contacts, so you can assign access to an entire external business all at once. We will cover that in the next step!
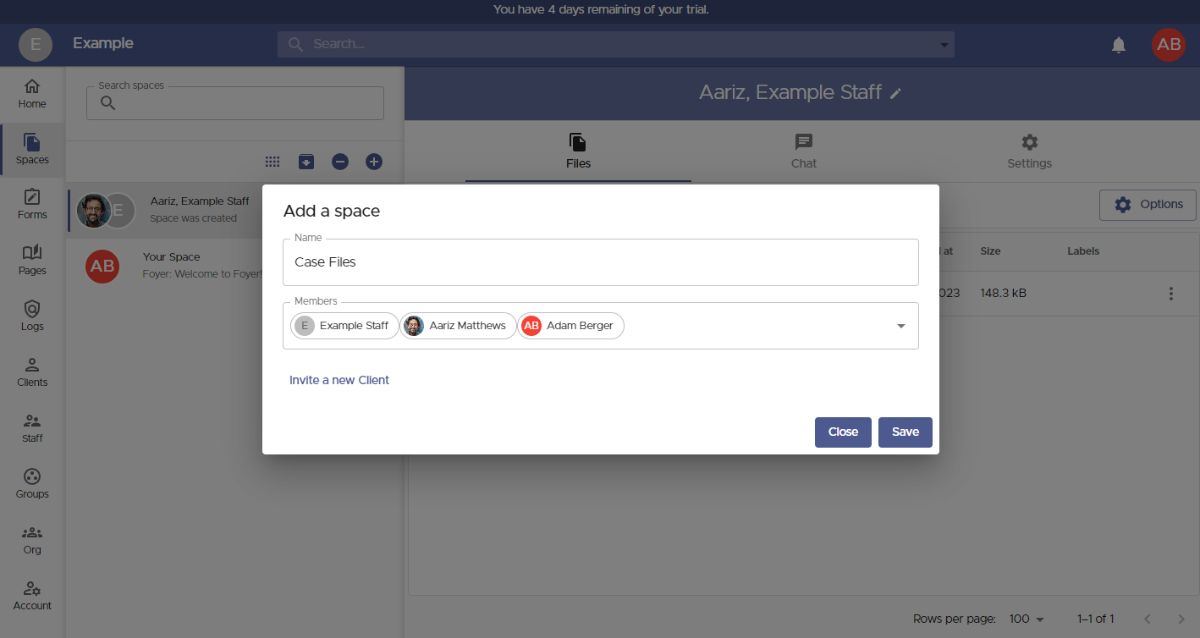 You can also share documents with external clients. To do that, you can just click the "Invite a new Client" button.
All you need to invite a new client is their email. Other information like name, phone number, and profile picture are all optional (they are free to fill in those details themselves too)!
Before you save the client, there are two options you might want to check out that are great for use cases.
First, is tags. With tags, you can organize your clients via labels. You could use this to organize your clients by which industry they are in (e.g. "Law Firm", or "Healthcare").
Second, is groups. With groups, you can organize your business clients into what businesses they belong to. Using groups makes it easy to assign access to resources (e.g. Spaces, Pages) to entire businesses all at once, instead of needing to remember which client belongs to which business.
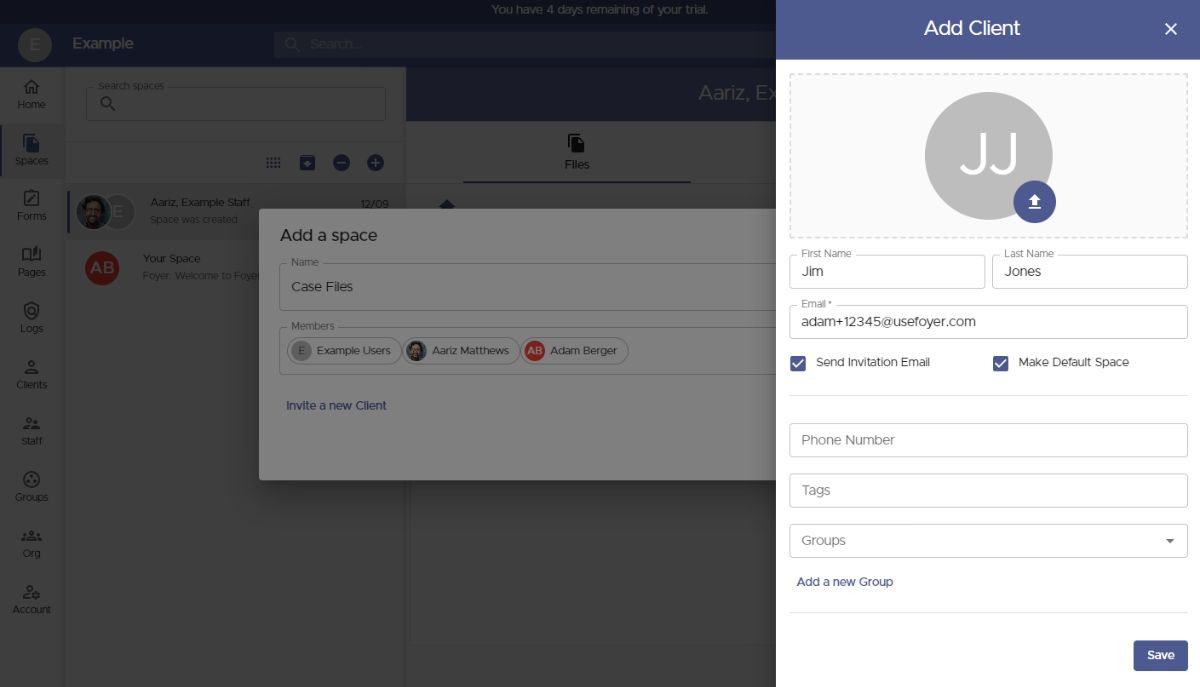 Any new clients you add will automatically be added to the "Members" list, and they will have access to any files you make in your new Space.
To add a group, just start typing the name of a group, and click on the result. Groups are added to this list just like clients.
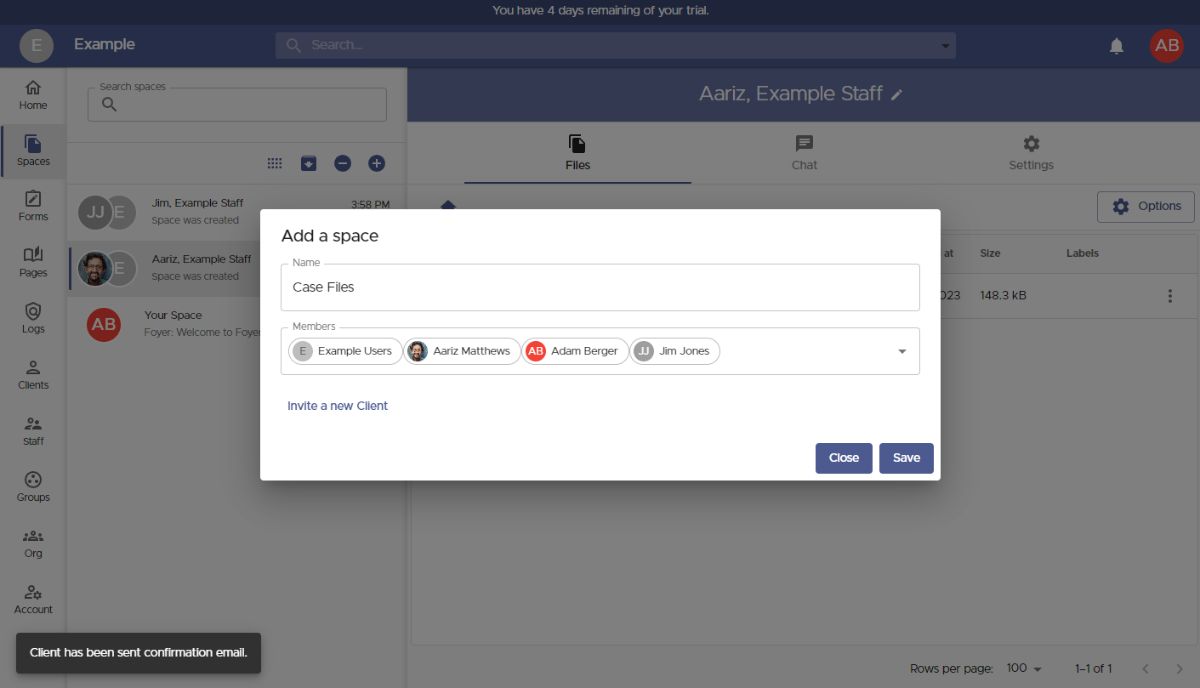
When you've added all the users and groups you need, click "Save", and you'll be directed to your new Space.
You can share files with everyone in the Space, by just dragging and dropping a file, or use the "Options" button. You can upload any files of any size, and any type. You can even upload entire folders!
To add or remove users or groups from the Space, visit the "Settings" tab, and edit the members list.
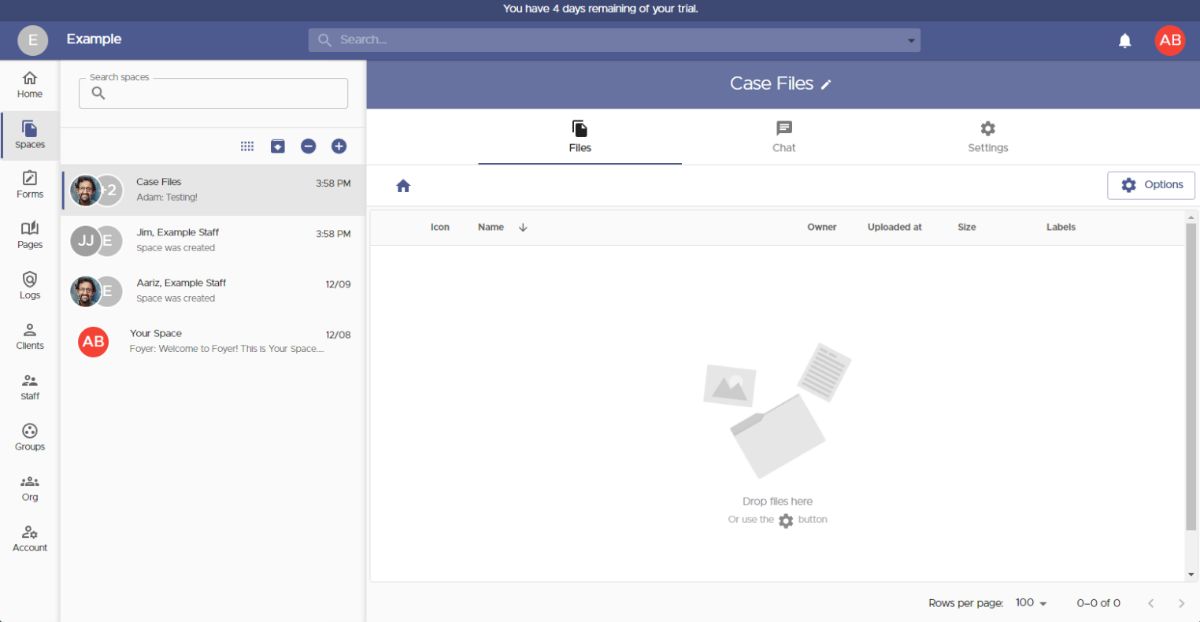
That covers the first option of sharing files with your client portal using "Spaces".
Another way to share files with your DMS is to use Foyer's SafeDrop feature, which is to allow clients to send you files without needing to login.
Every organization has a SafeDrop portal included. You can find you link on the "Home" tab, or by visiting "example.usefoyer.com/upload" (replacing "example" with your org's subdomain name).
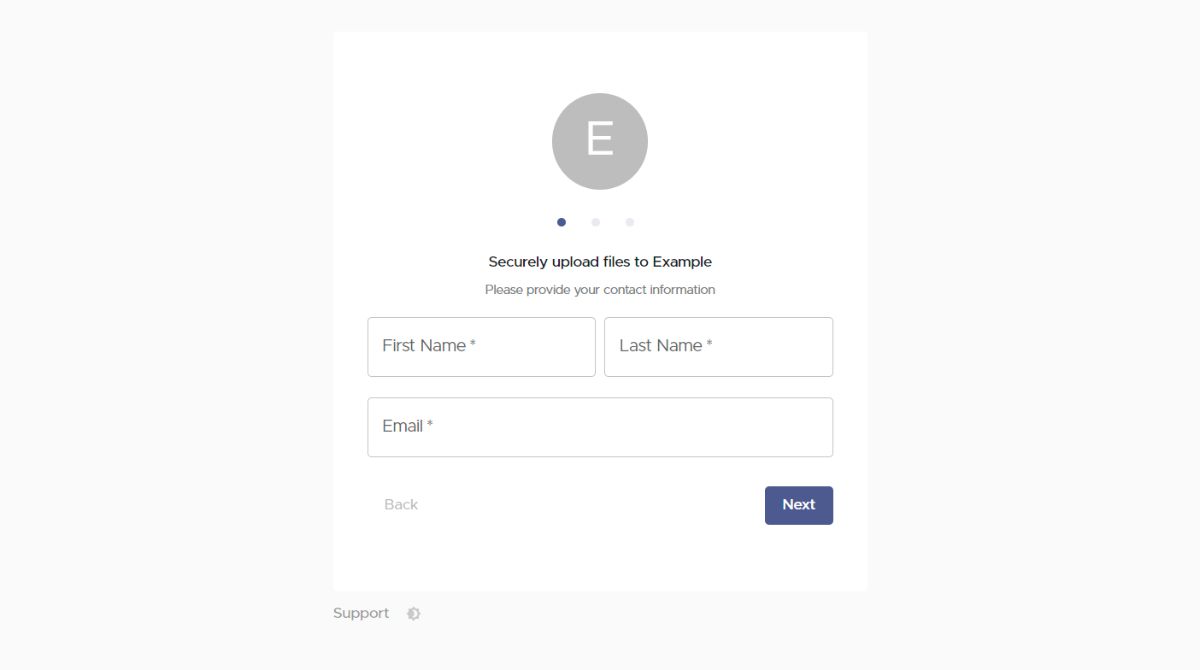
You can send your Foyer SafeDrop link to any client, and they can easily send you files from any device. They just have to enter their name, email, an optional message, and then any number of files.
Any files uploaded this way will show up on your Spaces page, and have a name like "SafeDrop from ...". Just like normal Spaces, you and the client will receive a notification for any files that are uploaded.
Anyone who has used your SafeDrop portal will show up as a "guest" client on your Clients page. To help manage your business contacts, you can click on any entry on the Clients page, and assign them to their relevant tag or groups.
Step 4: Integrate Your Document Management System Into Your Website (Optional)
Now that you've got your document management system all setup, lets get it on your website!
The steps will be a bit different depending on what web hosting provider you use, but the general formula stays the same.
To integrate with your website, you'll want to add a link to your website's navigation bar to either the login page, or your Foyer SafeDrop page (for file uploads).
- If you're linking to your client login page, you'll want to use a link like "https://yourorg.usefoyer.com". Just remember to replace "yourorg" with the subdomain name you chose when you onboarded to Foyer.
- If you want to link to your secure file upload page, you'll want to use this URL: "https://yourorg.usefoyer.com/upload". Again, don't forget to replace "yourorg" with your actual organization's subdomain name.
If you're looking for some instructions for your hosting provider, check out some of our posts below:
Great! So your DMS is now integrated with your site. On to the last step, which is exploring which features will be useful for your business.
Step 5: Explore Your DMS's Features
White-Labeling Your Document Management System
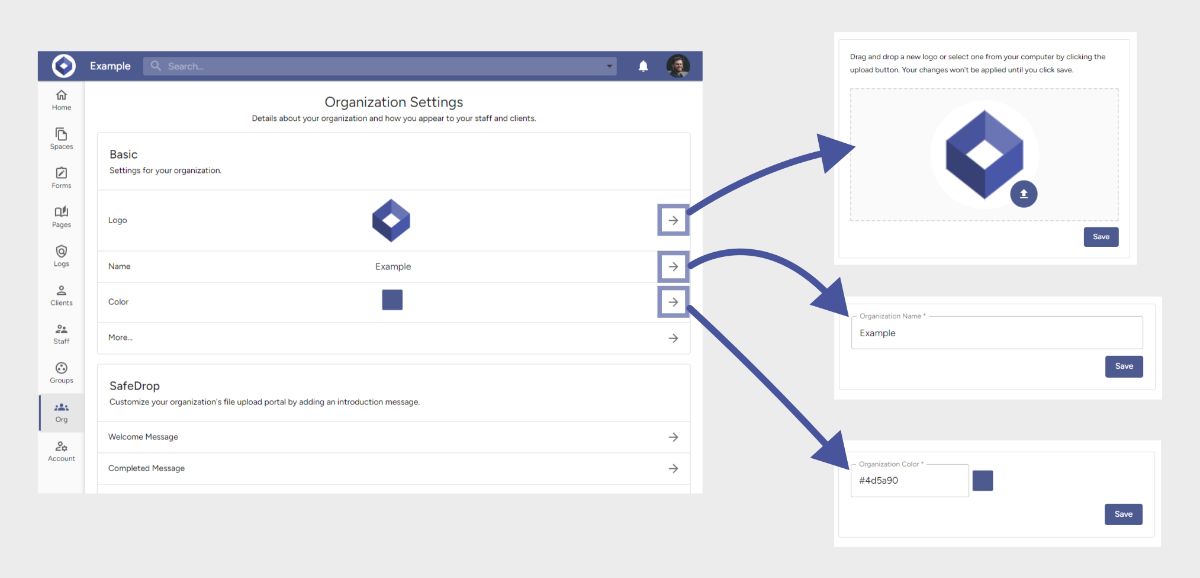 With any cloud document management system, it is critical that you can white-label the interface to match your own brand. White-labeling helps your business clients recognize your brand, and build trust that your customer portal is legitimate. There are plenty more reasons why white-labeling is beneficial too.
Foyer's DMS lets you customize colors, logos, emails, your domain name, and more.
On the "Org" page you can update:
- Your Logo
- Shown on the login/sign up pages, all pages when logged in, on all forms, and on your SafeDrop page.
- Name
- Shown in the header, and on login/sign up pages
- Color
- Used in the header, on all buttons for every page
If you scroll down on the Org page you'll also find Foyer's email template that allows you to customize all your client and staff invitation emails.
How to Create Knowledge Bases In Your DMS
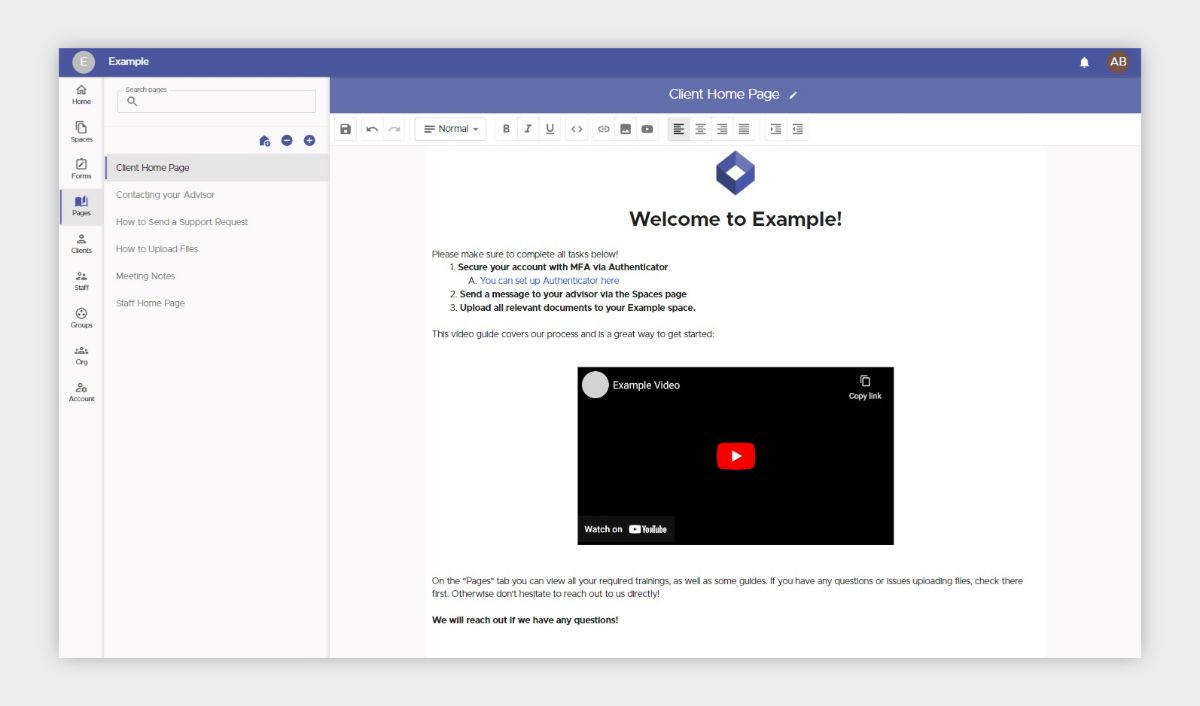
With your Foyer document management system, facilitating knowledge exchange among your team and clients is seamless.
To create knowledge base pages, navigate to the "Pages" section and click the "+" icon in the left drawer. Name your page and incorporate content using the rich-text editor. You can: embed videos, images, format text, and more.
Under the edit icon (beside the page title), you can designate which users and groups have access to the page. Shared pages will appear under the recipients' "Pages" tab, enabling knowledge base collaboration among your staff, while clients retain read-only access.
Moreover, you can assign a knowledge base page as the home page, ensuring that clients or staff are welcomed with specific content upon login. This proves invaluable for onboarding and seamlessly linking back to resources, enhancing your customer DMS's utility.
Some business opt to use a dedicated service for knowledge bases, like Notion, but it is nice to have your knowledge base integrated right into your DMS with Foyer.
How to Make Custom Forms For Your DMS
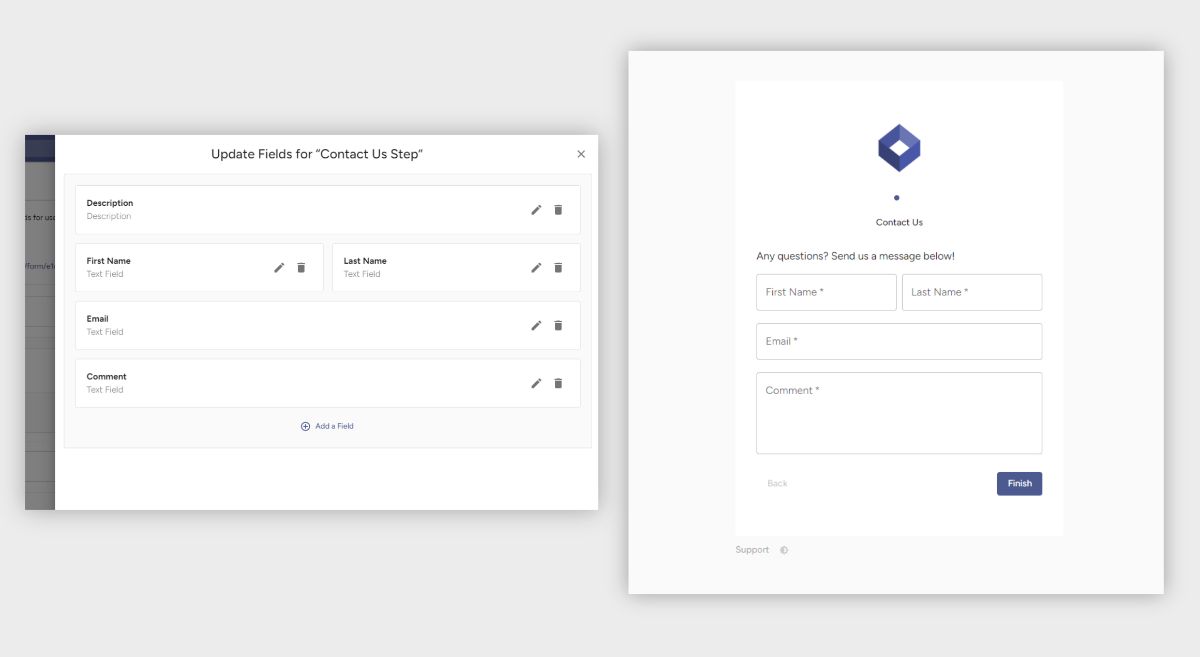
When you're interacting with other businesses, you'll often want to collect custom data (whether it be for feedback gathering or collecting onboarding information).
Foyer provides a solution just for this called Forms. Forms enable you to collect the exact information you need by letting you choose and a wide array of fields (e.g. text, files, multiple choice).
All data collected by your forms go straight into your document management system where it can be easily shared internally in your organization. You can even collect files of any type and size (including large files). All you do is add a field, and choose the "file" field, and save the form.
You'll get an email to all your staff whenever a form is submitted so you never miss any updates from your clients. Anyone can opt-out of these notifications by visiting their notification preferences.
To get started, visit the "Forms" tab, click "Form Definitions", and "Add Form".
Each form is comprised of "steps", and each step has any number of fields. Fields can be textboxes, file inputs, or multiple choice check boxes.
You can choose the style of your form between the two built-in settings: "stepper" and "row". Stepper will treat each step as a different page (perfect for mobile), while "row" will show the whole form as a single page (ideal for desktop).
You'll often see business create forms using a service like Jotform, but having your forms built-in to your own document management system is a great convenience.
How to Keep Your DMS Secure Using Audit Trails
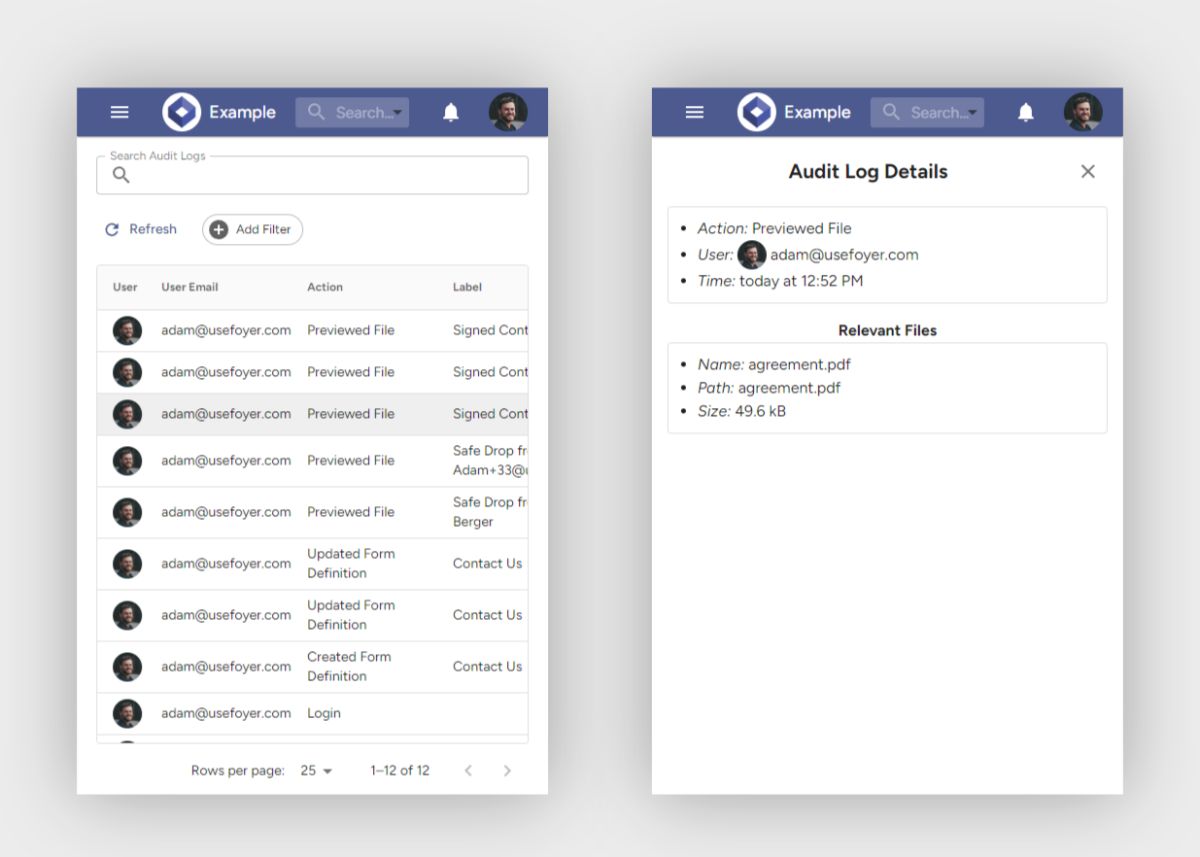
Document management systems are not only about productivity, but also security. That's why Foyer has complete audit trails built-in, so you can track every security event that occurs within your organization to keep your clients and your business as a whole safe.
Each audit log is stamped with when it occurred, who did it, and what exactly happened. For security, these logs cannot be deleted. So you'll always have a way to go back in time to replay what happened. Here are a few example audit log actions:
- Deleting files
- Previewing files
- Disabling or enabling Two Factor Authentication (2FA)
- Important to know if someone is subverting security measures
- Unsuccessful Login Attempts
- Tells you if someone may be attempting to access your account
There are over 50 different audit log actions, so you'll have the full picture of what's going on in your DMS.
Also, if any of your customer are in the healthcare industry, audit trails is essential if you are storing HIPAA data or any other personally identifiable information (PII).
In addition, Foyer provides searching, filtering, and sorting through all audit logs to make auditing easy.
How to Secure Your Email Using Foyer's Secure Email Outlook Add-in
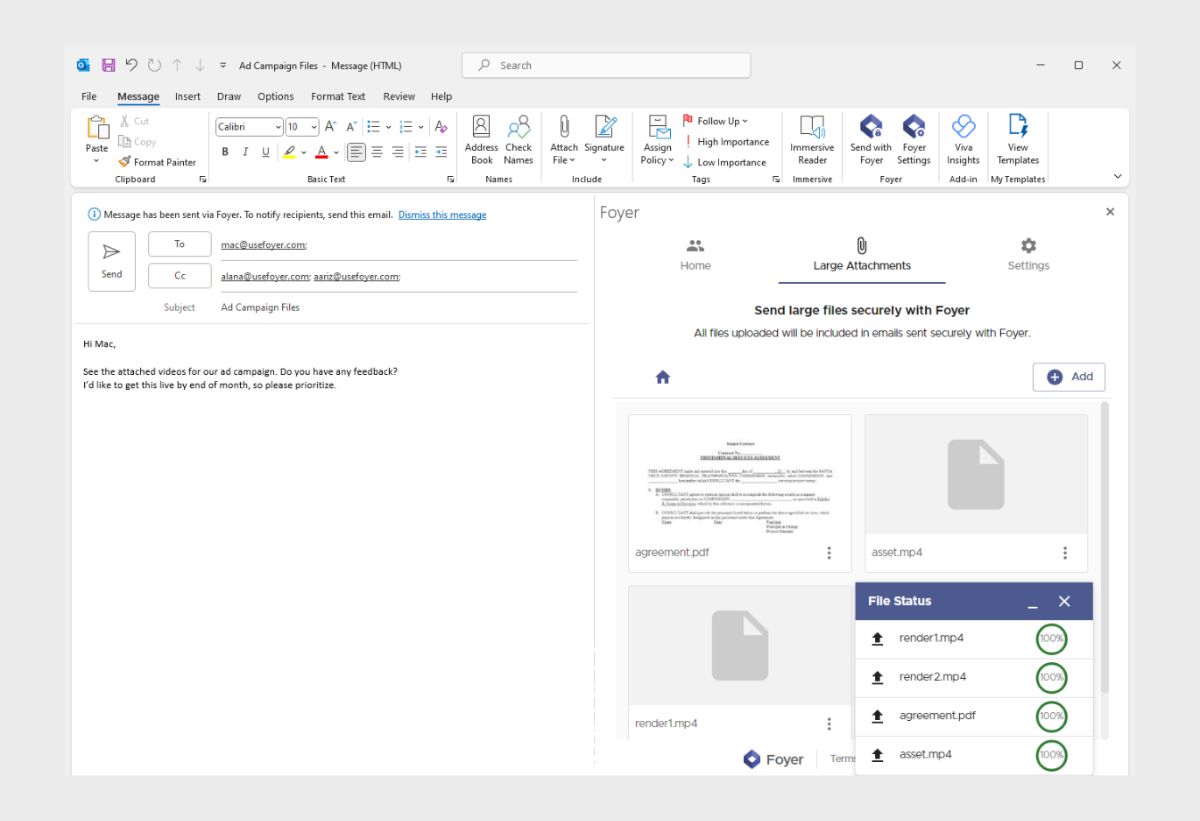
Foyer's Secure Email Outlook Add-in facilitates secure email communication, which is ideal for use cases where you're exchanging contracts, forms, and other sensitive data. It is particularly effective for:
- Sending end-to-end encrypted files and messages via email.
- Transmitting large files of any size and type through email.
Given the inherent risks associated with standard email for file transmission, adopting a secure email service is paramount for many businesses. Foyer's Secure Email Outlook Add-in addresses this concern by encrypting all file attachments and email contents, ensuring robust protection against data leaks.
Additionally, the add-in simplifies the process of sending large files, surpassing the typical 20MB attachment size limit imposed by traditional email providers. You can seamlessly drag and drop any file, regardless of its size, for secure email transmission.
For detailed instructions, please refer to comprehensive guide on how to send secure email.
If you're using another email provider than Outlook, check out this list of secure email providers. Whether you use Foyer secure email or not, you should really be encrypting all your email.
How Will You Use Your Document Management System?
I hope this guide made it easy to create your own cloud document management system!
If you have any existing data that you need to migrate, let our Support team know, and we can discuss a solution for you.
Thanks for reading. If you have any questions at all, please send a comment below!


