Squarespace Client Portal: Step-by-Step Guide (2025 Edition)

Need a Squarespace client portal to share files and keep client conversations in one place? You're at the right spot.
In this guide, you’ll learn the fastest way to add a Squarespace client portal for secure file sharing, custom forms, internal knowledge bases, and more.
While it's technically possible to create some client portal features using the site editor in Squarespace, it is a lot of work. You'd have to create forms for client registration, securely sending files, integrating with cloud storage, and client-only pages. Even then, it won't cover some of your basic needs.
That's why the recommended way to create a client portal for a Squarespace website is to use a dedicated client portal. Client portal services like Foyer are the quickest way to create a comprehensive Squarespace client portal. With Foyer you can launch a full client hub, embed or link it into any Squarespace page, and be ready in about 10 minutes.
TL;DR
- Squarespace doesn’t include a built-in client portal. You can cobble one together with Member Areas or embed a purpose-built client portal for Squarespace like Foyer.
- Most freelancers and agencies pick a portal service because it adds file-sharing, chat, knowledge base, and forms in about 10 minutes.
How to Create a Client Portal for Any Squarespace Website
Foyer is an ideal solution for Squarespace sites: it bundles every must-have client portal feature—secure file sharing, encrypted messaging, DocuSign e-signatures, and secure email—without the usual setup headaches. Instead of spending days tweaking the Squarespace editor, you can spin up a fully featured portal in minutes.
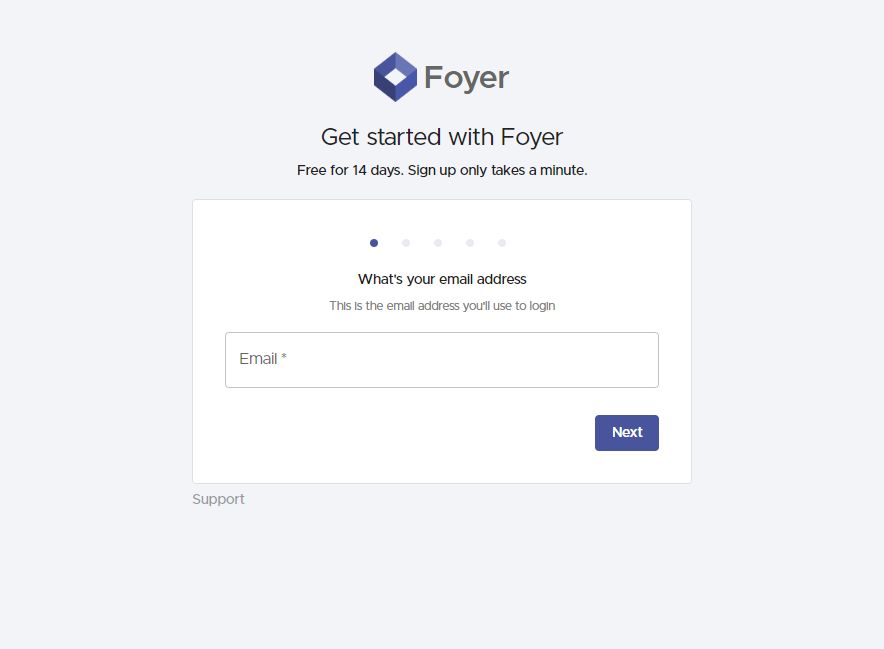
To get started, head to the onboarding wizard, add your name, email, and business name, and Foyer will create your portal in about a minute—no payment or long-term commitment required for the trial.
Your portal lives on its own Foyer subdomain (e.g., example.usefoyer.com). Pick whatever subdomain you like during onboarding, and you’re ready to roll.
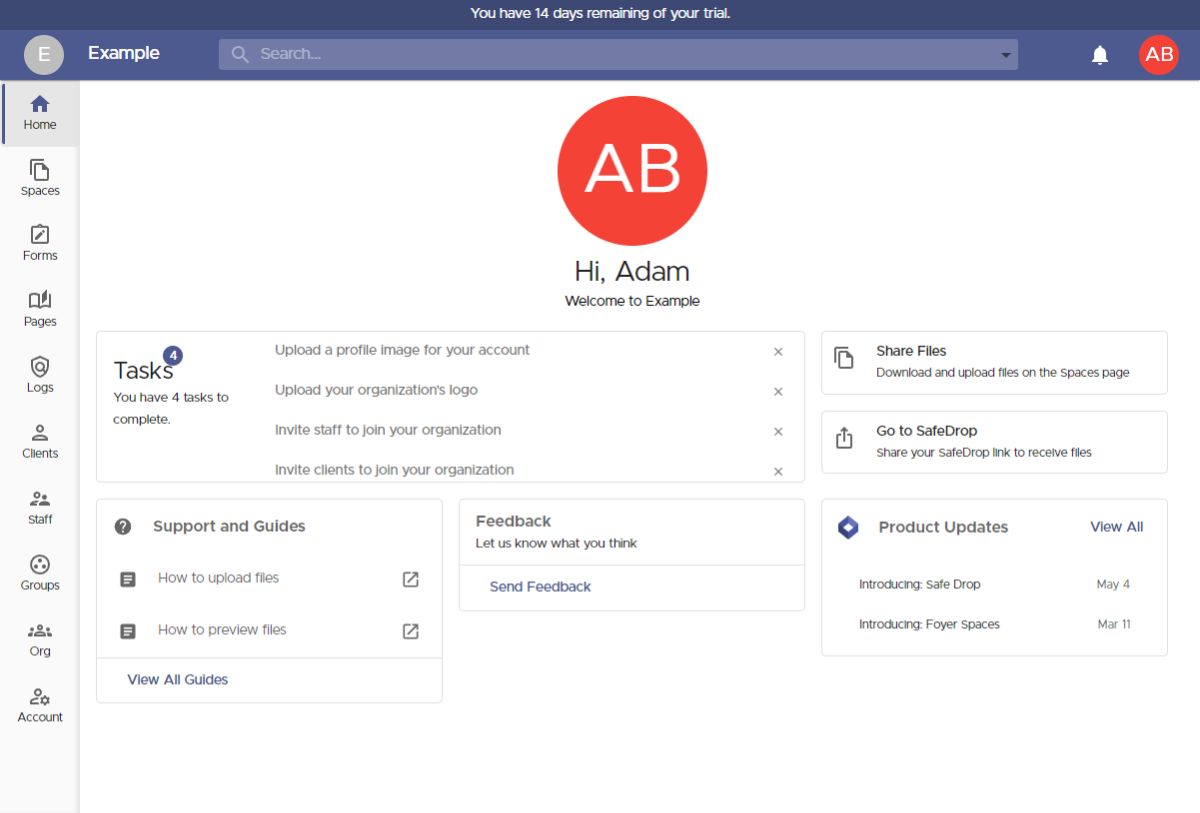
As soon as your portal is spun up, Foyer logs you in automatically. Take a moment to browse the left-hand drawer—you’ll see every feature at your fingertips. In this guide we’ll zero in on file sharing, but keep in mind you also have e-signatures, secure email, an internal knowledge base, and plenty more to explore.
Foyer gives you two handy ways to share files:
- Invite clients to a Space. Use this method when you already have the client’s email address.
- Let clients self-register with SafeDrop. They create their own account and can securely upload files to you.
We’ll walk through both options—starting with a direct invite to a Space.
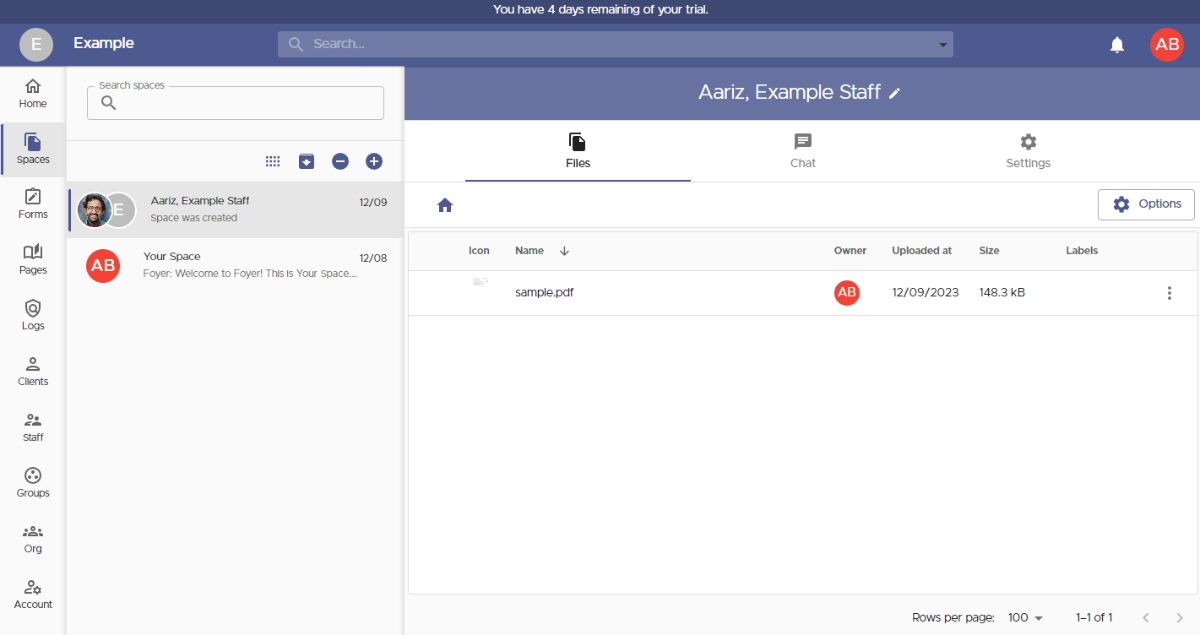
A Space is a private hub for file sharing and secure messaging between you, your team, and specific clients. Everything inside a Space—documents, chats, and updates—is visible only to its members, much like a private channel in Slack or Teams.
To create a Space, head to the Spaces page from the left-hand drawer and click the “+” icon.
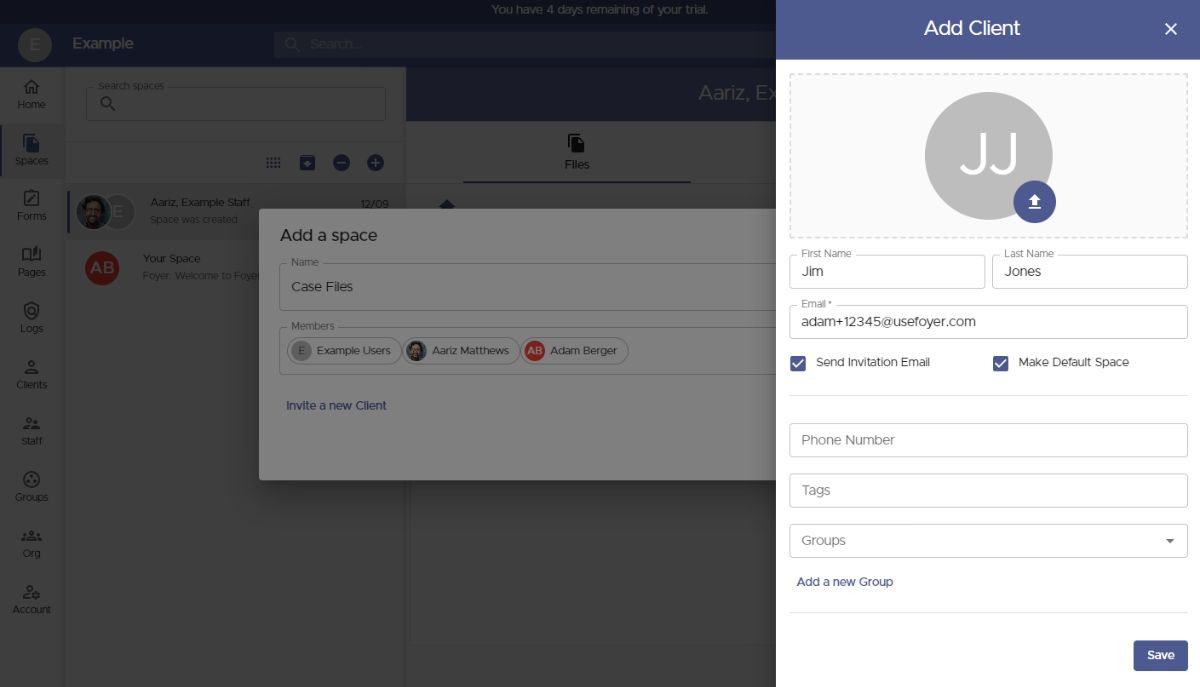
When adding a new space, you'll see a dialog like the one below. You can set the name of the Space, and choose which members have access to any files or messages that will be shared. If you need to invite a new client, you can just click the "Invite a new Client" button.
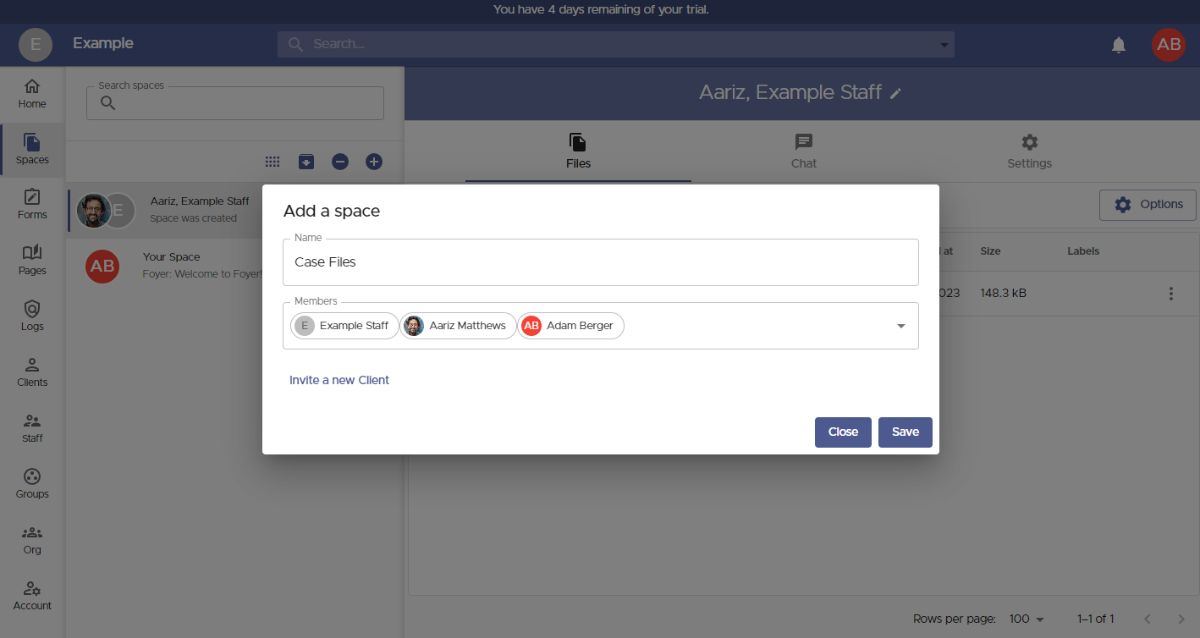 All you need to invite a new client is their email. Other information like name, phone number, and profile picture are all optional (they are free to fill in those details themselves too)!
Just add in your client's email, and click "Save".
 The new client will automatically be added to the "Members" list, and they will have access to any files you make in your new Space.
There will be a message on the bottom left of your screen confirming that the client has been sent their invitation.
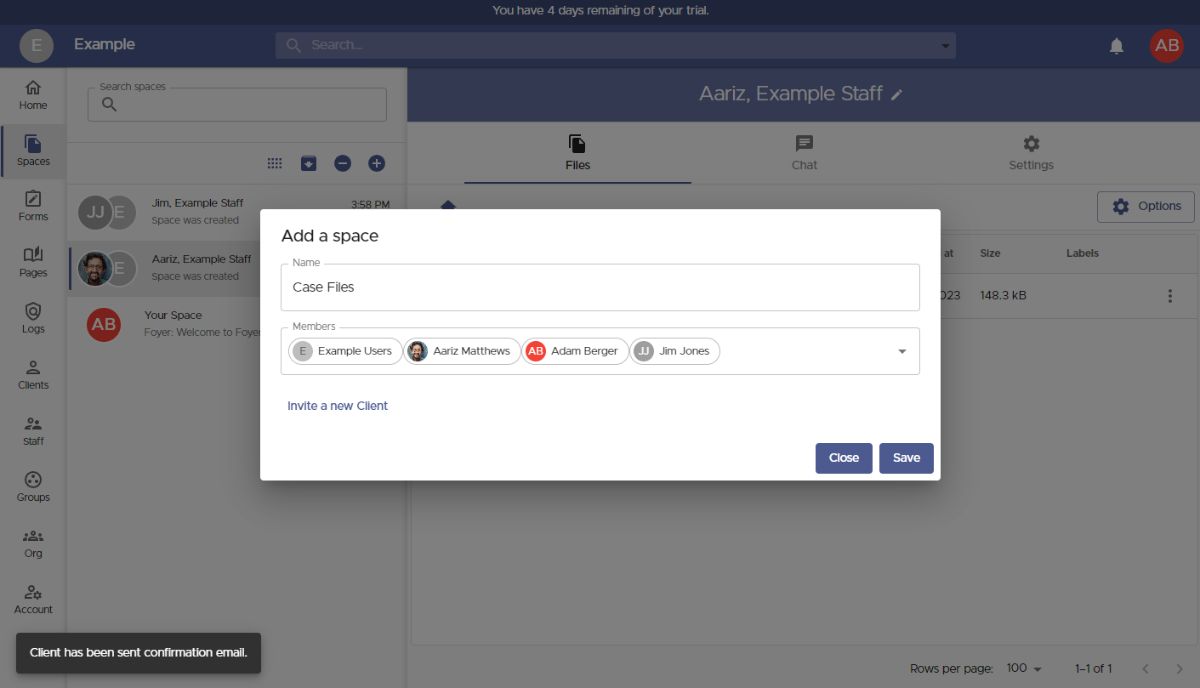
Hit Save in the “Add a space” dialog, and Foyer will drop you right into your new Space. To share files with everyone there, just drag and drop—or use the Options menu—to upload any file or even whole folders, regardless of size or type. Want to add or remove participants? Open the Settings tab and update the members list.

Sometimes it’s quicker to let clients upload files without creating an account. That’s where Foyer SafeDrop comes in. Each organization gets its own SafeDrop portal automatically. Grab the link on your Home tab or go directly to example.usefoyer.com/upload—just swap “example” for your subdomain.
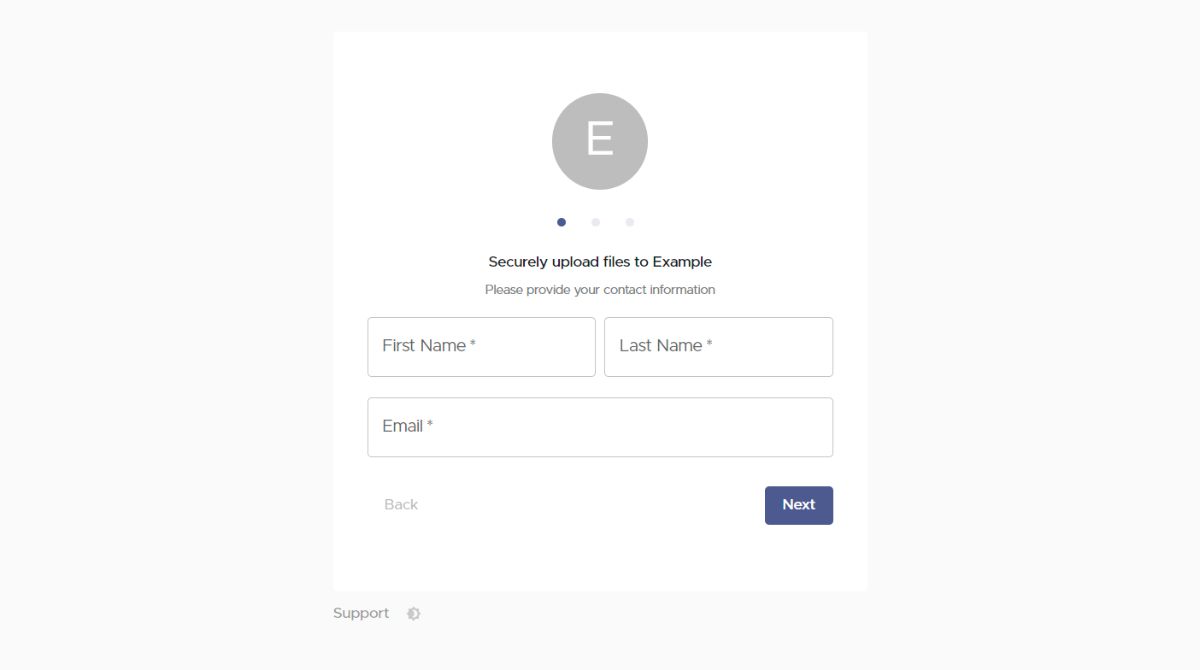
You can send your Foyer SafeDrop link to any client, and they can easily send you files from any device. They just have to enter their name, email, an optional message, and then any number of files.
Any files uploaded this way will show up on your Spaces page, and have a name like "SafeDrop from ...". Just like normal Spaces, you and the client will receive a notification for any files that are uploaded.
How to Integrate a Client Portal Into a Squarespace Website
Now that you have a client portal set up, you just have to link or embed it into your Squarespace site.
The easiest way to integrate a client portal into a Squarespace website is to add a link in your site navigation, so that is what we will cover in this guide, but you can also embed your client portal using the official Squarespace guide.
To get started, navigate to your Squarespace site in the site builder, and click on the "Website" tab.
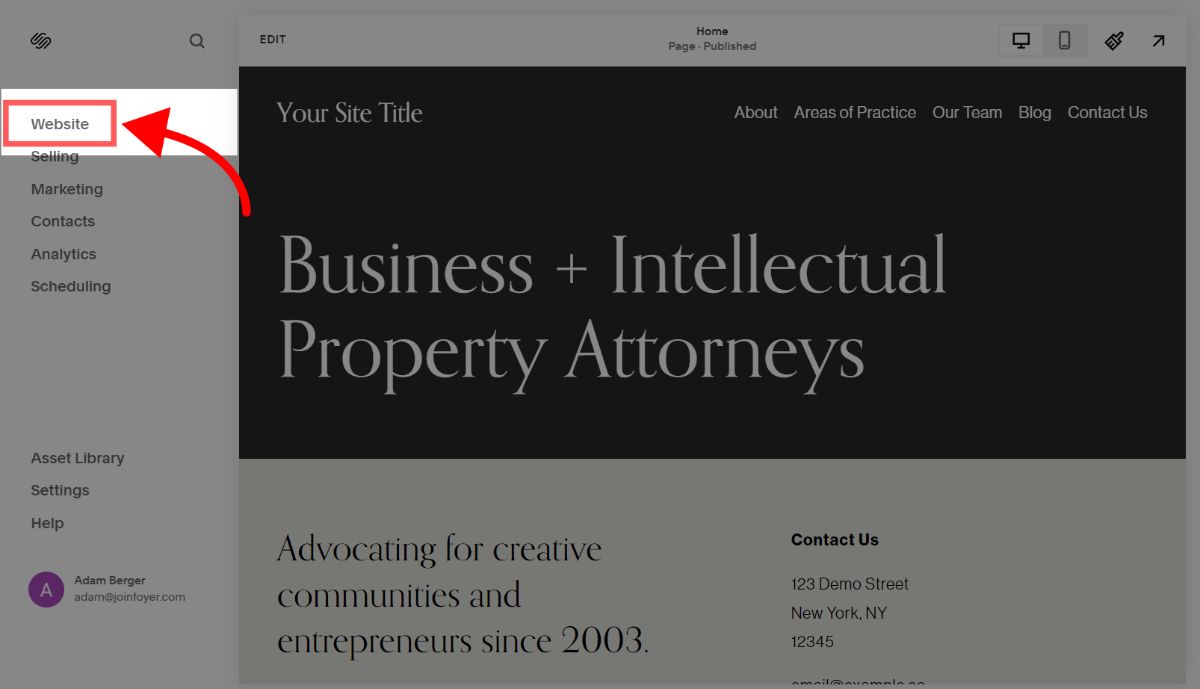
The "Pages" drawer will appear, showing the Main Navigation to your site. Click on the "+" button (see the screenshot below), and scroll down to click on the "Link" option.
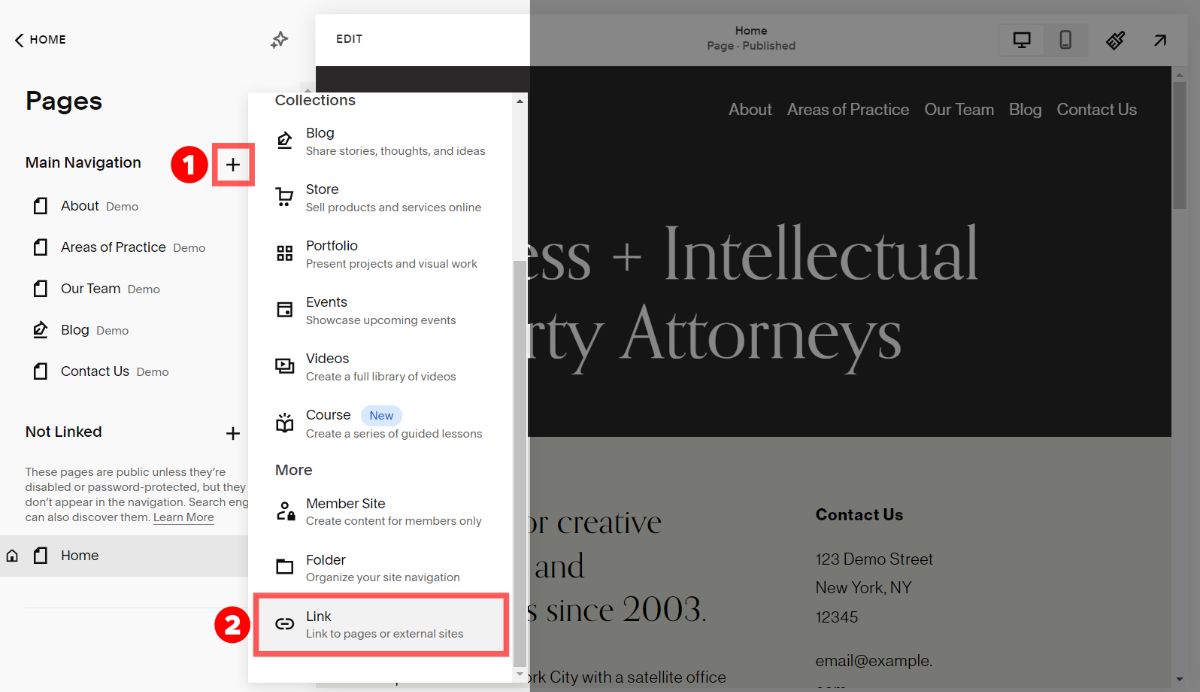
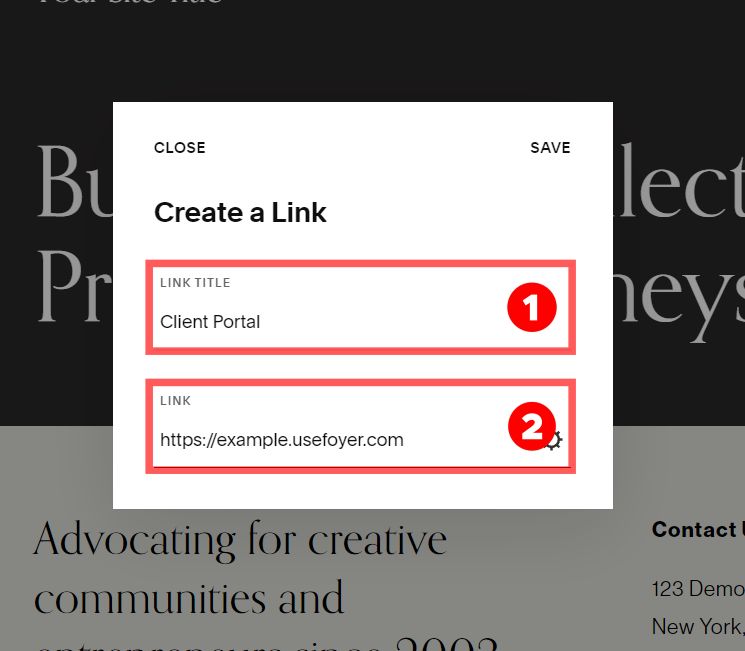
A dialog will appear where you can add the link title and destination address. It's best to name the link something like "Client Portal" or "Client Login" if you're directing clients to your Foyer login page.
Otherwise, if you're using Foyer SafeDrop, you could name the link "Send a File", and then your link would be to "example.usefoyer.com/upload".
Some businesses include both links, because there are often times when clients want to either login, or send files without needing to login. Make it easy for your clients. You know what they say "the client is always right"... or something like that.
Once you've added your client portal link, you can preview your Squarespace website by clicking on the arrow icon on the top right of your screen. Look for the link you added, and click on it to make sure it leads to the correct page.

How to Use Your Squarespace Client Portal
The most common use for a client portal is to share files with your clients (i.e. uploading and downloading). But there's a lot more to it than just that!
How to White-Label Your Client Portal
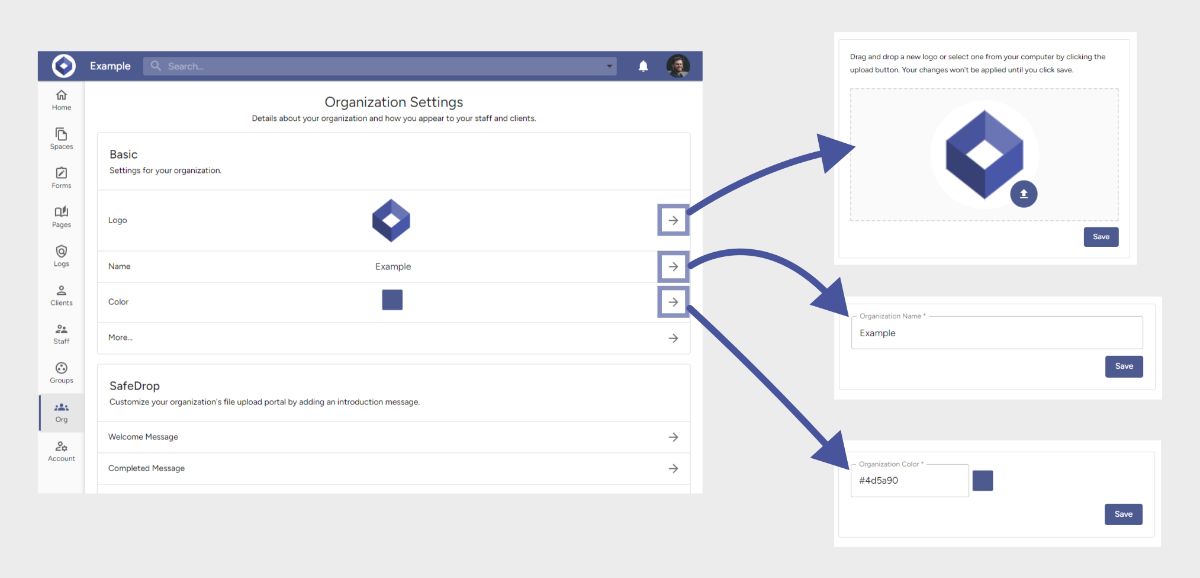 Foyer allows you to customize the look (from the brand colors to the logos used), to match the look-and-feel of your Squarespace site. If you still need to update your Squarespace site's colors, check out this guide from SquareSpace.
White-labeling matters: a familiar brand experience reassures clients that they’re in the right place.
On the Org page you can update:
- Logo – appears on the login/sign-up screens, every in-app page, forms, and your SafeDrop portal
- Name – shows in the header and on authentication pages
- Primary color – used in the header and on all buttons
Foyer also includes an email template editor, so every invitation email matches your brand voice.
Need a full custom domain? Drop us a note at sales@usefoyer.com and we can map your portal to something like portal.example.com and send emails from your own domain.
Create Custom Forms For Your Client Portal
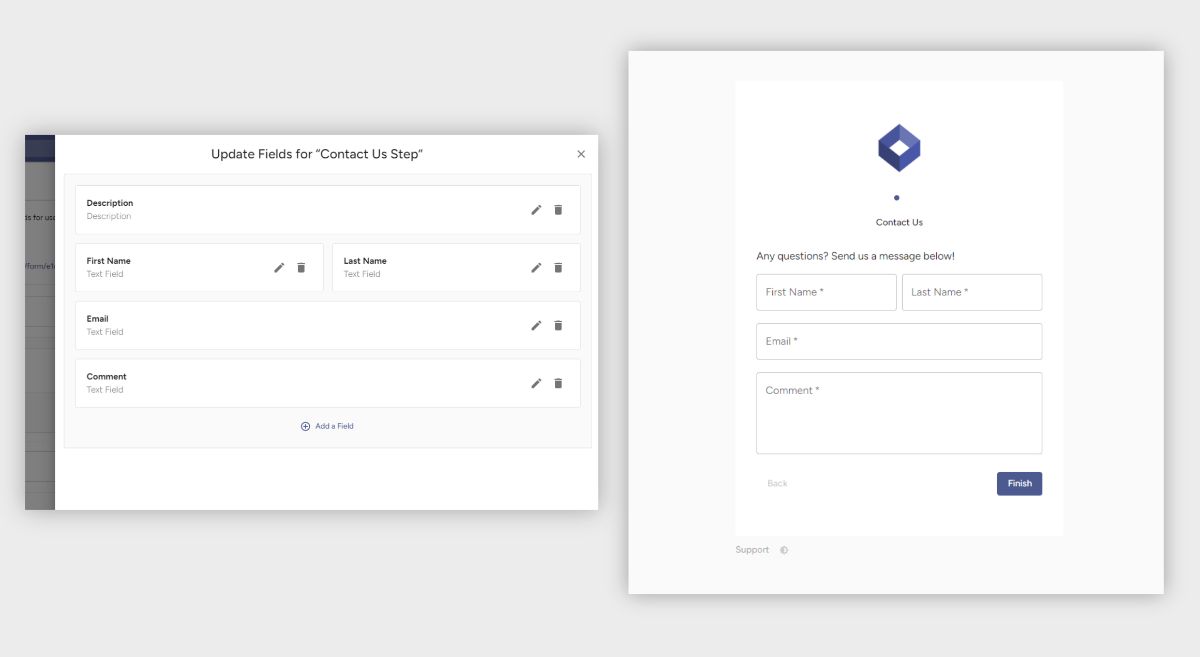
With Foyer, you can create custom forms that can be embedded in any Squarespace site, or linked to directly. Just like Squarespace, you can design a form to collect the exact information you need.
All submissions flow straight into your client portal, ready to share with your team. Need file uploads? Add a File field—Foyer accepts any file type or size, including very large uploads.
Each time a form is submitted, Foyer emails your team so nothing slips through the cracks.
To create a form:
- Log in to Foyer and open the Forms tab.
- Click Form Definitions * Add Form.
- Build your form using “steps.”
- Stepper shows each step on its own screen—great for mobile.
- Row displays the entire form on one page—ideal for desktop.
Both layouts are fully responsive, so your forms look good on any device.
Create Knowledge Bases In Your Client Portal
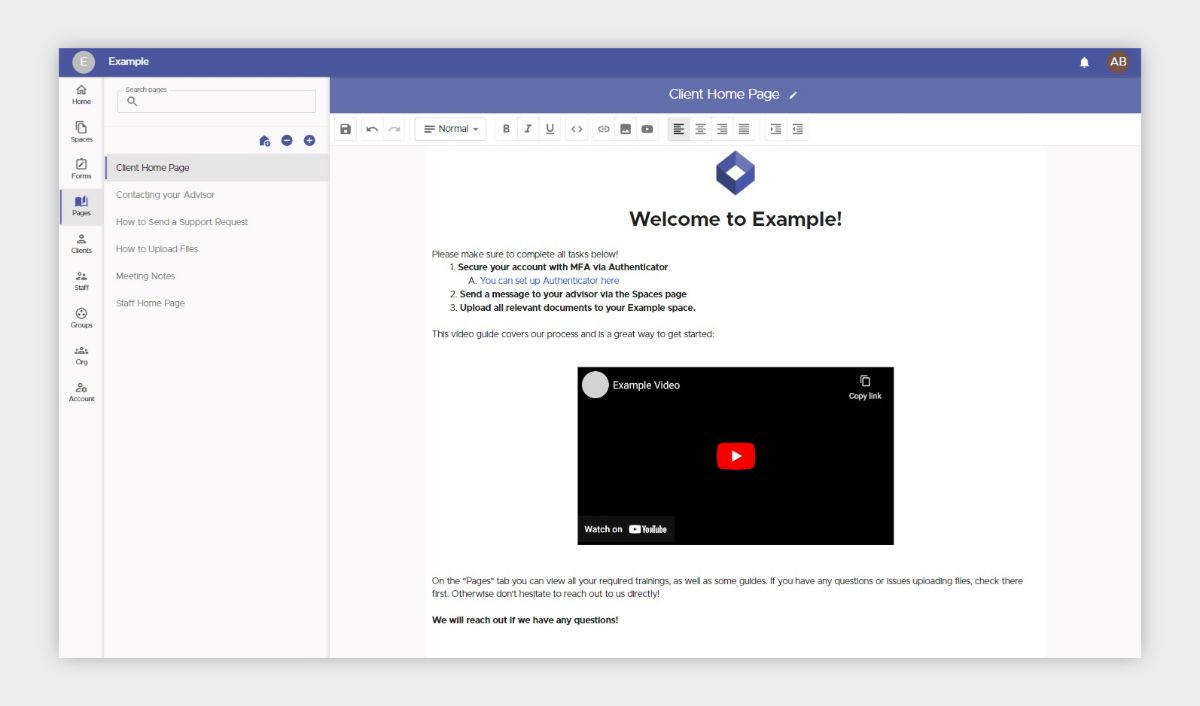
Squarespace is perfect for public-facing content, but things get tricky when you need to share information with just a handful of people. Your Foyer client portal makes that private knowledge-sharing effortless.
Head to Pages and hit the “+” icon to create a new knowledge base page. Give it a name, then drop in text, images, or video with the rich-text editor—format it any way you like.
Click the edit icon beside the page title to choose exactly which users or groups can view the page. Those people will now see it under their Pages tab. Your team can co-edit; clients get view-only access.
Need a custom landing screen? Set any page as a home page so it appears right after users log in—perfect for onboarding or linking back to key resources on your Squarespace site.
Investigate Security Events Using Foyer's Audit Log
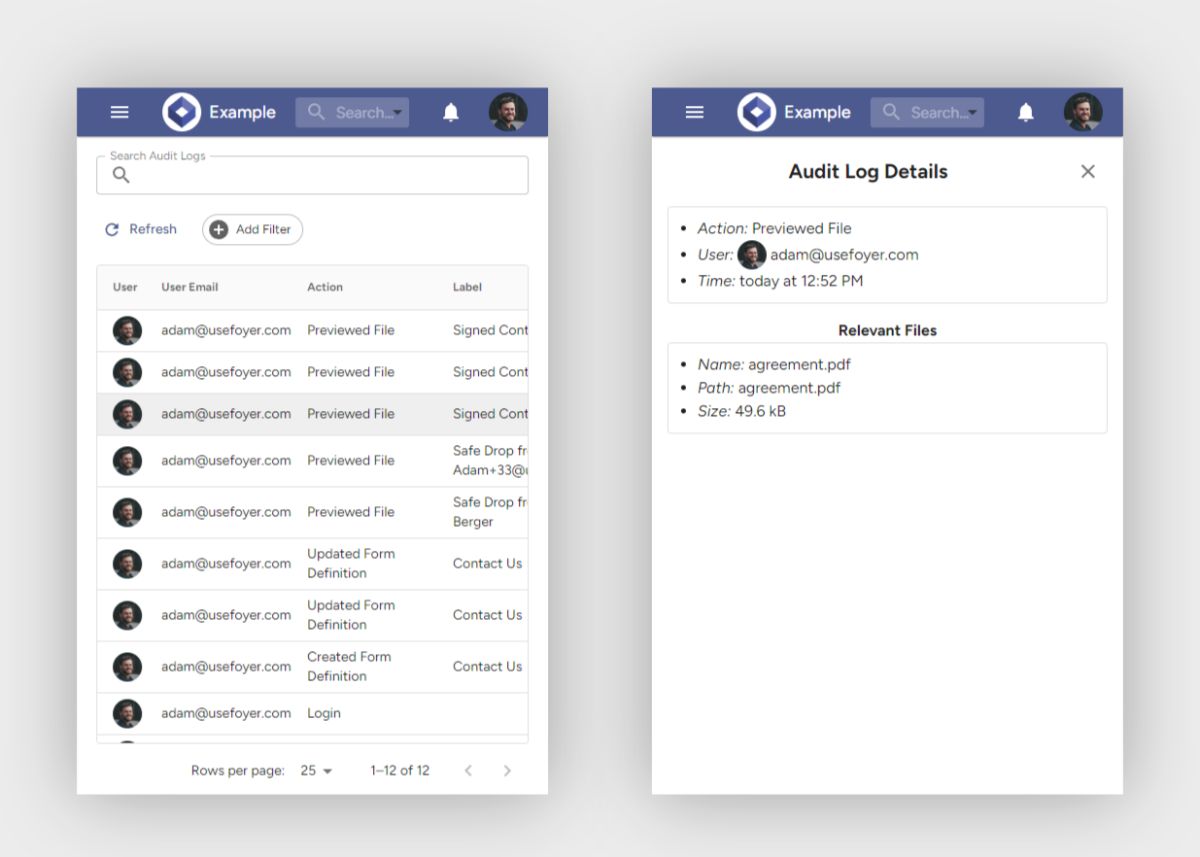
Using a dedicated client portal like Foyer is the best choice when looking to add a client portal to your Squarespace site not just because of the productivity features it provides, but because of the protection it provides for your client's data.
Foyer comes complete with audit logs for every action, so you'll have the "who", "what", "when" for everything that happens in your client portal like:
- File previews
- File downloads
- File Deletes
- Logins and logouts
- Enabling and Disabling Multi-factor authentication
- Login attempts (failures)
- Form submission views
- And over 50 more actions
Audit trails is essential if you are storing HIPAA data or any other personally identifiable information (PII).
In the screenshot above you can see an example of viewing audit log details. There are tons of filtering and sorting options (like the user, action, time, label) so you can perform comprehensive investigations. It even works on mobile, so you can audit your client portal on-the-go.
Send Secure Email Using Foyer's Secure Email Outlook Add-in
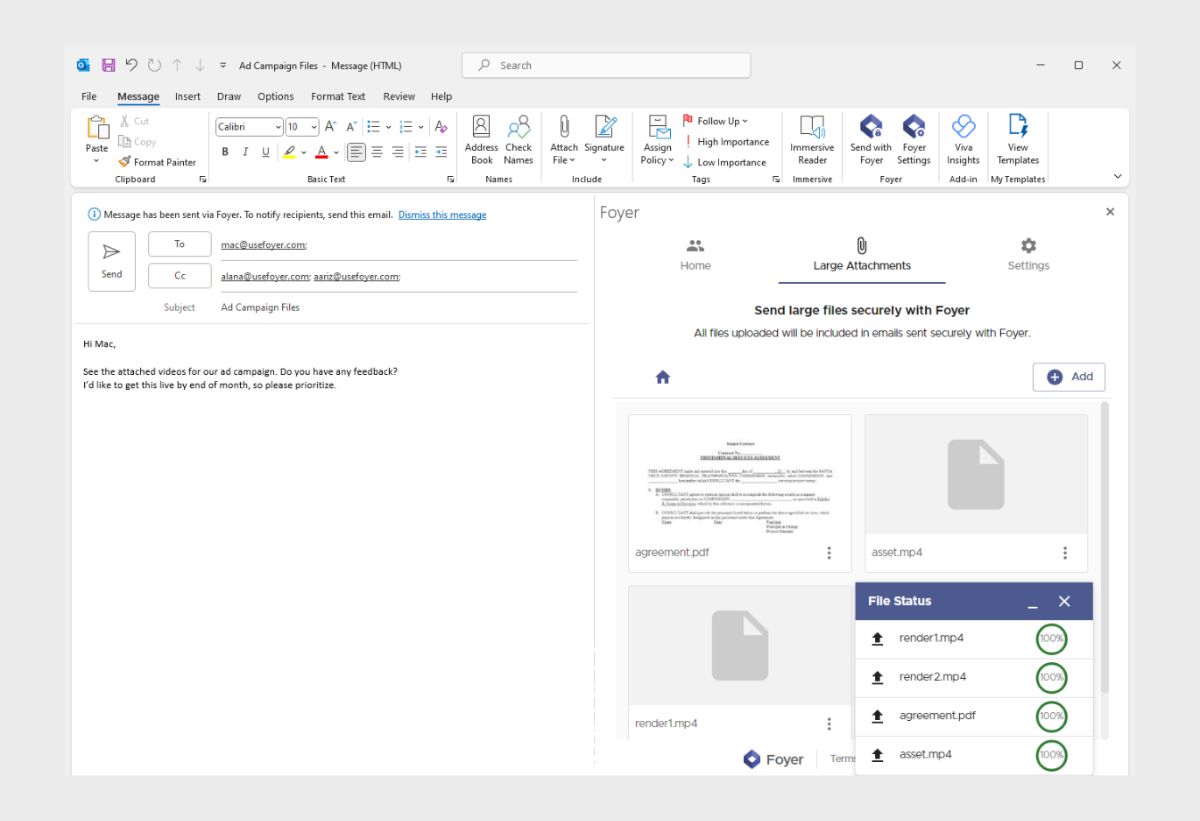
Every Foyer subscription includes a bunch of built-in features, you'll be surprised just how many there are!
You can send secure emails with Microsoft Outlook using our Secure Email Outlook Add-in. Using our email add-in is perfect for two use cases:
- Sending end-to-end encrypted files and messages over email
- Sending large files of any size and any type over email
Many businesses need to use a secure email service of some kind, as on its own, email is not a secure method of sending files. This puts data you send over email at risk for being leaked.
Foyer's Secure Email Outlook Add-in encrypts all your file attachments, and email contents so you don't have to worry about data leaks over email.
In addition, the add-in makes sending large files easy. Typically, email providers limit attachment sizes to 20MB. But with Foyer's add-in, you can just drag and drop any file, and they will be sent along with the email regardless of their size.
For more instructions, check out our complete guide on how to send secure email.
Collect File Signatures Using Foyer's DocuSign Integration

Foyer has partnered with the industry leading e-signature solution, DocuSign, to simplify collecting file signatures from your clients.
You can select any file within Foyer, and request file signatures from your clients or staff. You're receive updates directly in your client portal on the status of each file signature, and the final signed copy of the file will be securely uploaded into your client portal.
Using a client portal integration with DocuSign helps keep your business secure by avoiding transferring files over email, which is an inherently unsecure means of sharing files. You certainly wouldn't want a signed copy of any file to be leaked!
For more information, check out our comprehensive guide on how to how to send file signature requests.
Ready to Launch your Squarespace Client Portal?
Your new portal comes packed with features, but you don’t have to use them all at once. Start with the essentials:
- Invite your first clients or turn on SafeDrop to handle secure file sharing.
- Once those basics are humming, explore Foyer’s advanced tools—e-signatures, custom forms, knowledge-base pages, and more.
If you already have some client data in another system like SharePoint, Google Drive, or within Squarespace, and you need advice or help migrating, you can reach out to Foyer's support team and they can help make the transition seamless.
If you don't know which client portal to use, check out Foyer's best client portal software comparison blog.
I hope this guide made it easy for your business to integrate a client portal into your Squarespace site. If you have any questions, or feedback on this guide or Foyer, please don't hesitate to send a comment below! Thanks for reading.