Create a Framer Client Portal [Step-By-Step]
![Create a Framer Client Portal [Step-By-Step]](https://foyercus.blob.core.windows.net/287a2408185e68c371c/blog/721/c/e7901091-6fa6-403c-9edc-de0113ab129f.jpg)
Framer is a powerful platform designed for building visually stunning and interactive websites, offering a user-friendly interface and advanced design capabilities. With Framer’s flexible components and dynamic functionality, you can create a Framer Client Portal that enhances user experience and streamlines client interactions. Whether you need a way to manage customer communications or securely share resources, a Framer Client Portal can be a game-changer for your business.
However, while Framer excels in website design and prototyping, Framer doesn’t include a built-in Framer Client Portal for tasks like secure file sharing, form submissions, messaging, or obtaining signatures. Without a dedicated system in place, managing client relationships directly within Framer can be challenging. A Framer Client Portal provides a seamless way to centralize client communication and ensure smooth collaboration.
Fortunately, Framer allows you to integrate external solutions to create a fully functional Framer Client Portal that meets your needs. In this guide, I’ll show you how to set up and link a Framer Client Portal within your website, making it easy for clients to access important documents, communicate with your team, and submit necessary forms. For additional help, Framer’s support documentation is readily available.
How To Create a Client Portal for Framer
The Foyer client portal features include managing client interactions efficiently, including secure file sharing, encrypted messaging, and seamless integration with e-signature platforms like DocuSign. With built-in encryption, both your business and client data remain protected at all times.
Setting up your Framer client portal is quick and straightforward—just follow Foyer’s onboarding steps by entering your business name, email, and other key details. Within a minute, your client portal will be up and running, with no initial commitment required.
You can configure your client portal as a subdomain within Foyer, such as "example.foyer.com." Alternatively, you can use a custom subdomain like "portal.yourbusiness.com" for a more branded experience. If you need any assistance during the setup process, Foyer’s sales team is always available to help.
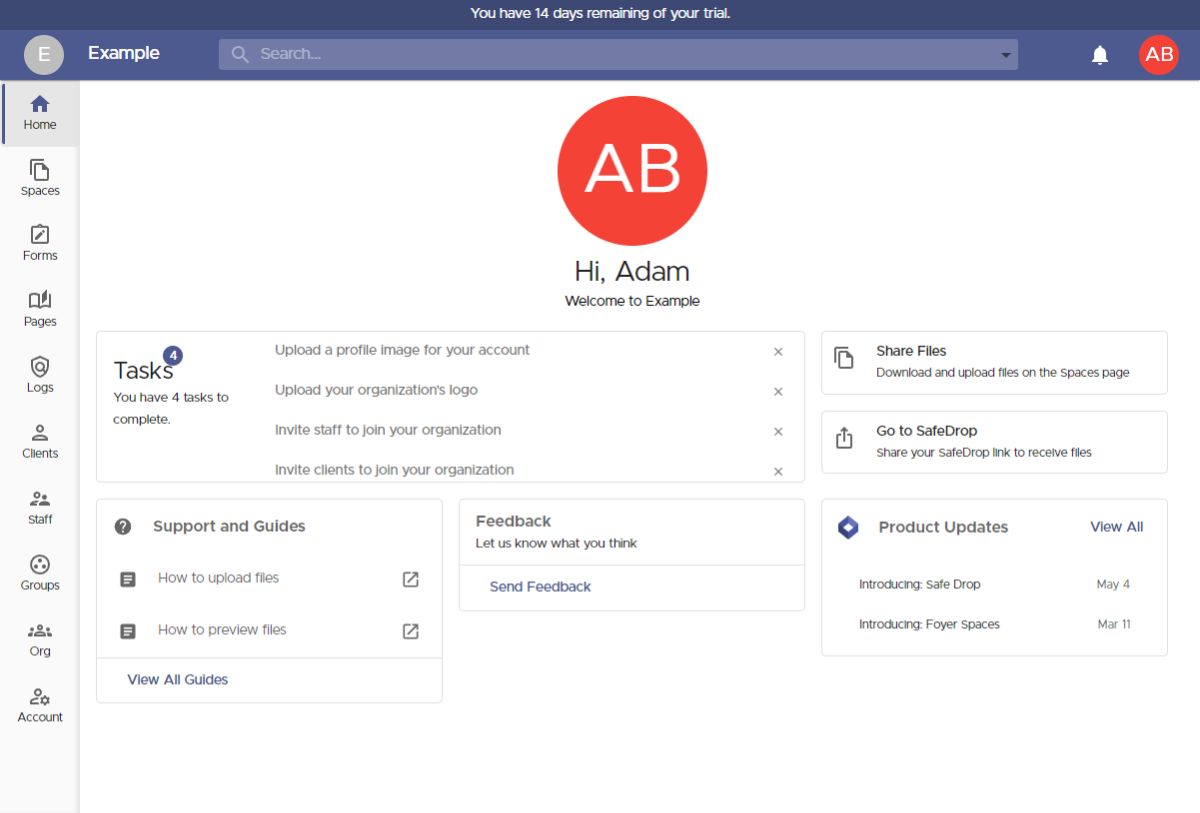
After completing the onboarding process, you'll land on your client portal's homepage. A navigation menu on the left side gives you access to customize features such as secure file sharing, custom forms, and knowledge bases.
For now, we'll focus on sharing files with your clients, but later in this guide, we'll dive into other essential features to further enhance your portal’s functionality.
 A common part of working with business clients is sharing files, and Foyer provides two easy ways to do this:
- You can invite clients directly to Spaces, which requires their email address.
- Alternatively, you can share a link to your SafeDrop page, allowing clients to upload files without needing to sign in.
I'll guide you through both methods, starting with how to invite clients to a Space. But first, let's define what a Space is.
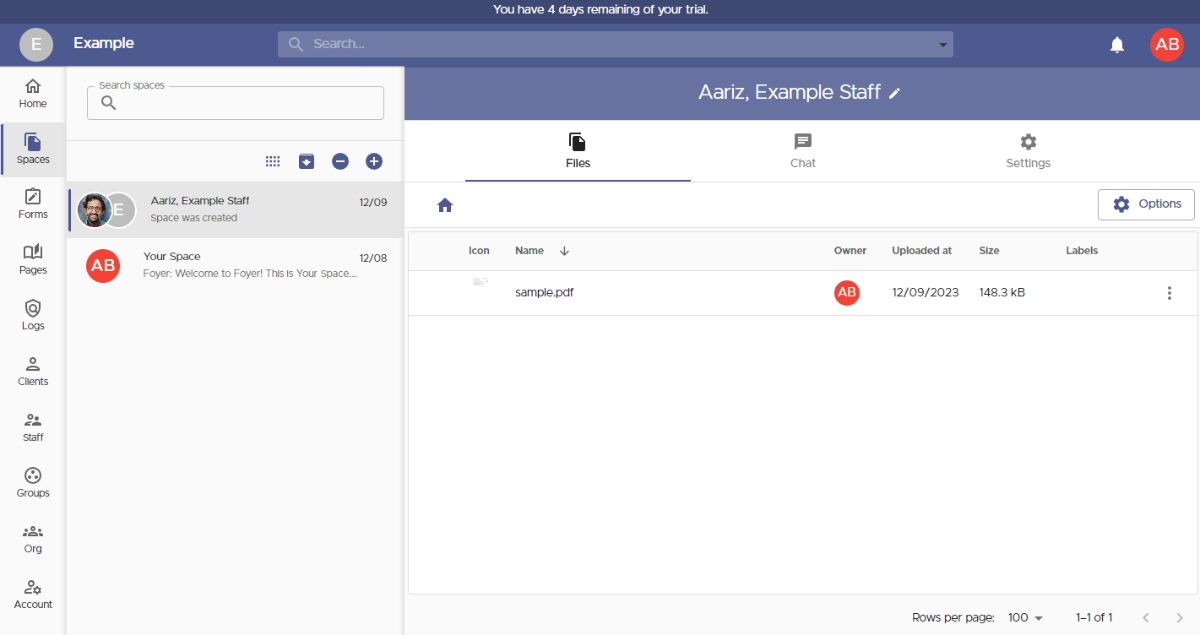
Spaces are secure, private environments where you can share files and exchange encrypted messages with clients and team members. Only members of a Space have access to its content, similar to a group chat in platforms like Teams, Slack, or iMessage.
To create a Space, navigate to the Spaces page by selecting "Spaces" from the left-hand menu, then click the "+" icon.
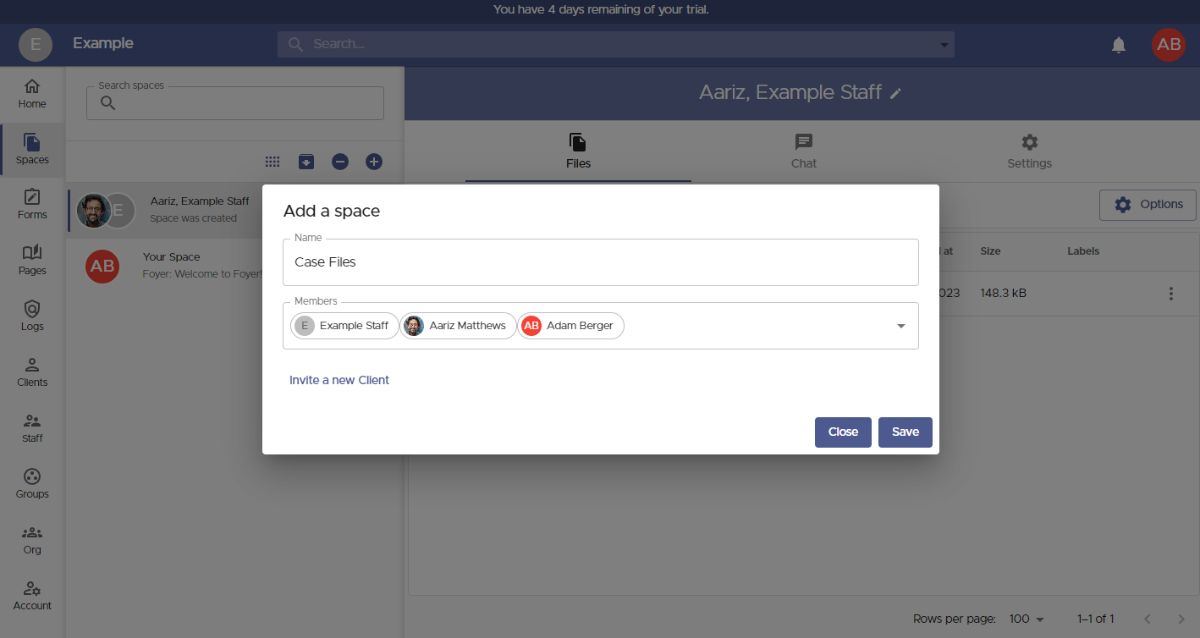
 When creating a new Space, a dialog box will appear, allowing you to name the Space and select which members will have access to the shared files and messages.
You also have the option to share Spaces with groups, making it easier to manage business contacts by granting access to an entire external organization at once.
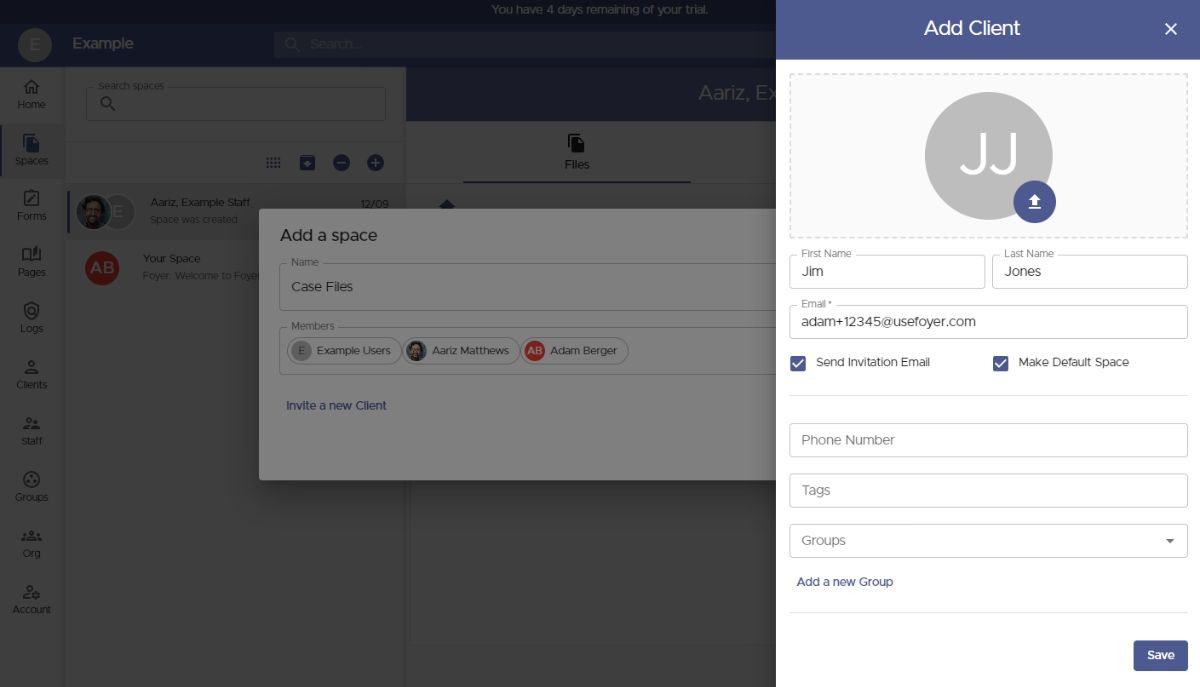
To invite a new client, simply click the "Invite a New Client" button.
 To invite a new client, all you need is their email address. Additional details like their name, phone number, and profile picture are optional and can be filled in by the client later if they choose.
Before saving the client, there are two useful features you might want to explore. The first is tags, which allow you to categorize clients with labels—such as grouping them by industry (e.g., "Law Firm" or "Healthcare").
The second is groups, which help you organize clients based on their associated businesses. This feature makes it easy to assign access to resources like Spaces and Pages to an entire organization at once, eliminating the need to manually manage individual client access.
 When you invite a new client in Foyer, they will automatically be added to the Members list and gain access to any files you create within the designated Space.
To add a group, simply start typing the group's name and select it from the suggestions. Groups are added in the same way as individual clients, making it easy to manage access efficiently.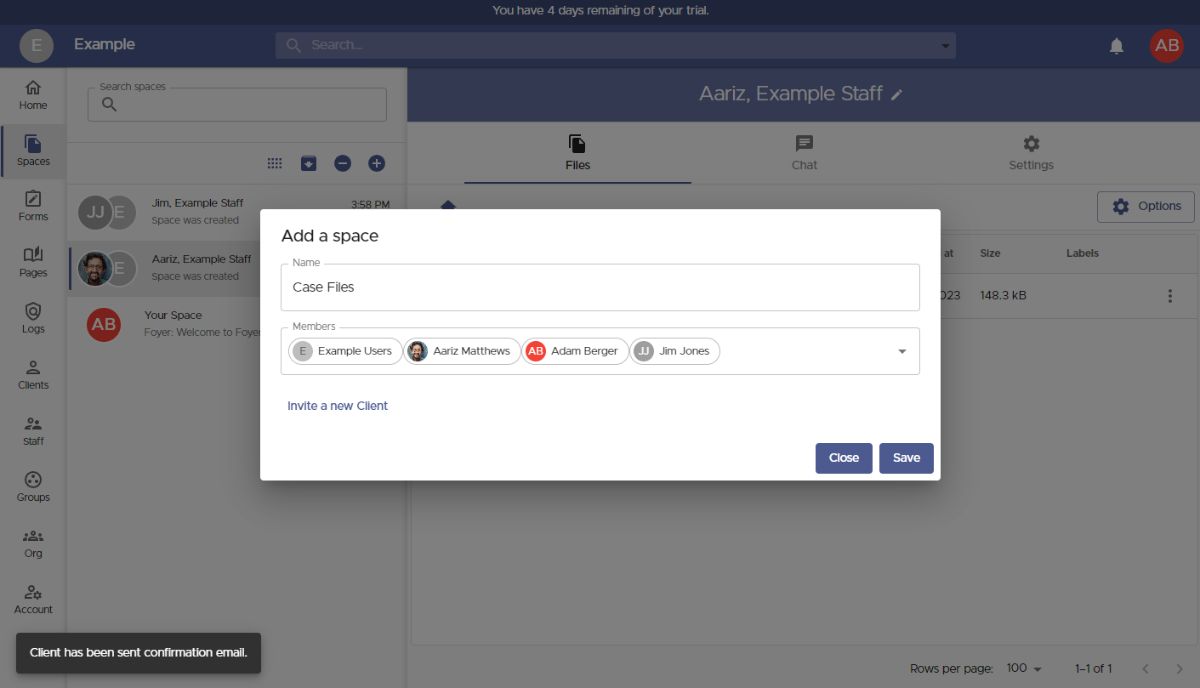 Once you've added all the necessary users and groups, click "Save," and you'll be taken to your newly created Space.
To share files with everyone in the Space, simply drag and drop them in, or use the "Options" button. There are no restrictions on file size or type, and you can even upload entire folders for convenience.
If you ever need to modify access, you can easily add or remove users or groups by going to the "Settings" tab and updating the members list as needed.
 That wraps up the first method of sharing files through your client portal using Spaces. Now, let’s explore the second option, which allows your business clients to send files to you without needing to log in.
This feature, known as SafeDrop, is built into your Foyer client portal. Every organization has its own dedicated SafeDrop portal. You can find your unique link under the "Home" tab or by visiting "example.usefoyer.com/upload" (just replace "example" with your organization’s subdomain).
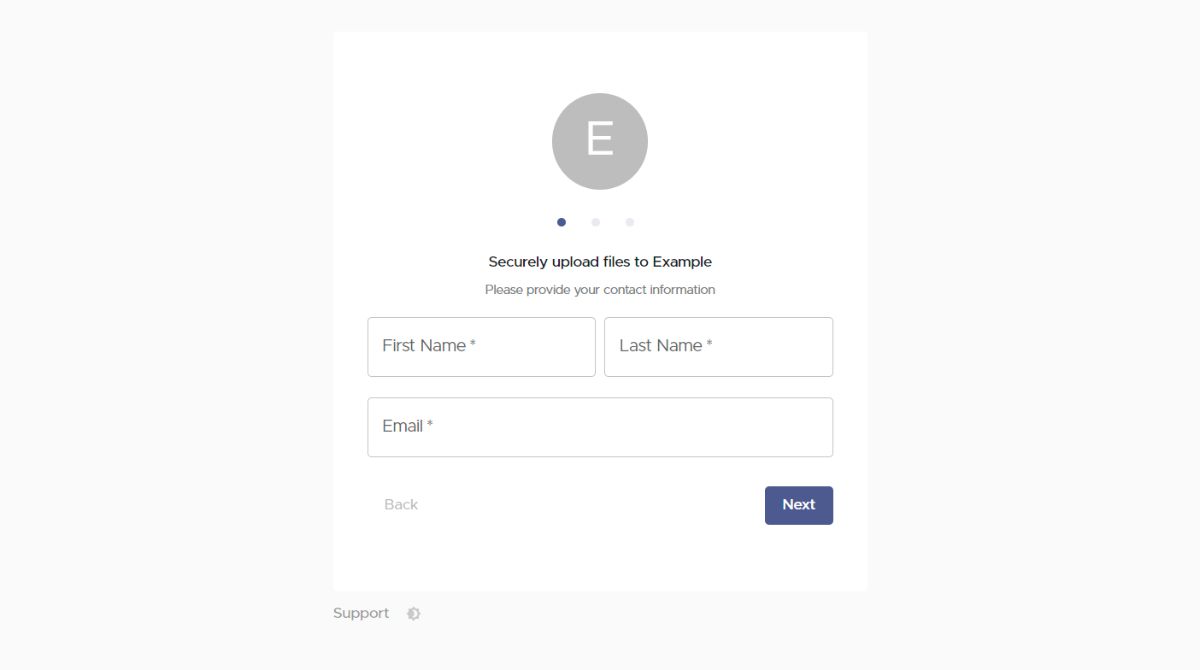 You can share your Foyer SafeDrop link with any client, making it easy for them to send files from any device. They simply need to enter their name, email, an optional message, and upload their files.
Files uploaded through SafeDrop will appear on your Spaces page, labeled as "SafeDrop from...". Just like with regular Spaces, both you and the client will receive notifications whenever files are uploaded.
Anyone who uses your SafeDrop portal will be automatically added as a "guest" client on your Clients page. To better organize your contacts, you can click on any guest entry and assign them to relevant tags or groups.
How to Integrate Your Client Portal Into Your Framer Website
Now that we have the basics of the client portal setup, we can now integrate it with your Framer website to create a Framer Client Portal. The simplest way to do this is by adding a link to your main menu. Lets do it.
You'll first want to sign up on Framer's website if you don't already have account. For this demonstration, I've gone with the free trial. Now, we need to have a menu on our site where we can place our client portal. Once logged in,
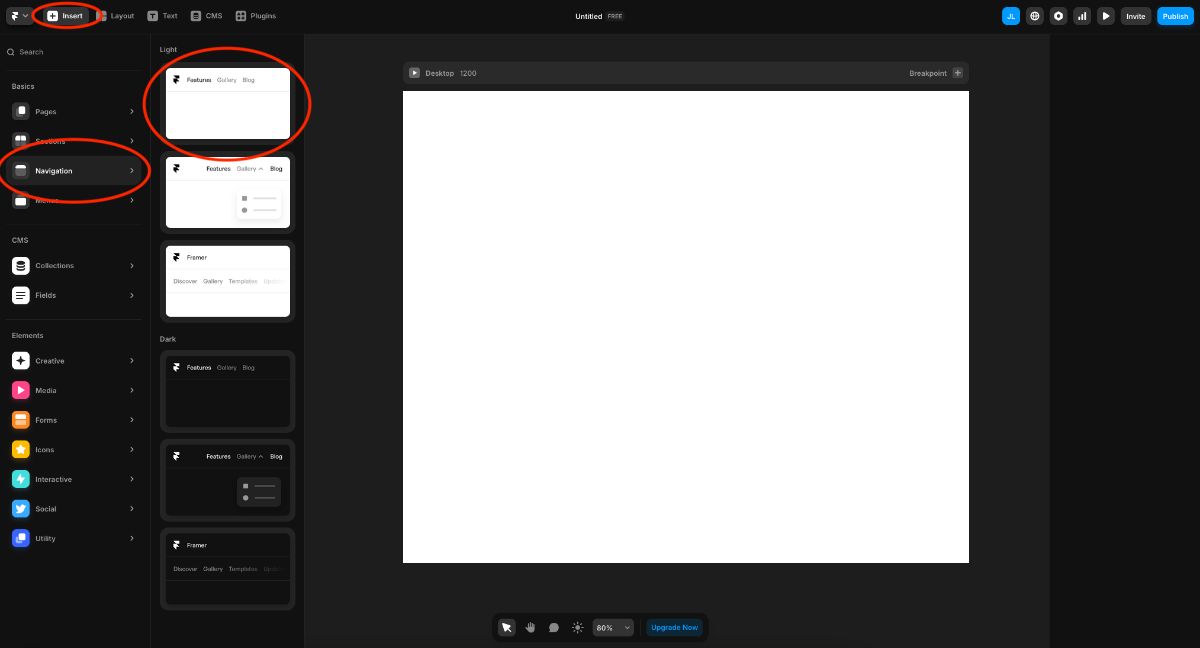
- Click the "Insert" button at the top right to reveal the "Basics" section.
- Select "Navigation"
- Choose the top light option.
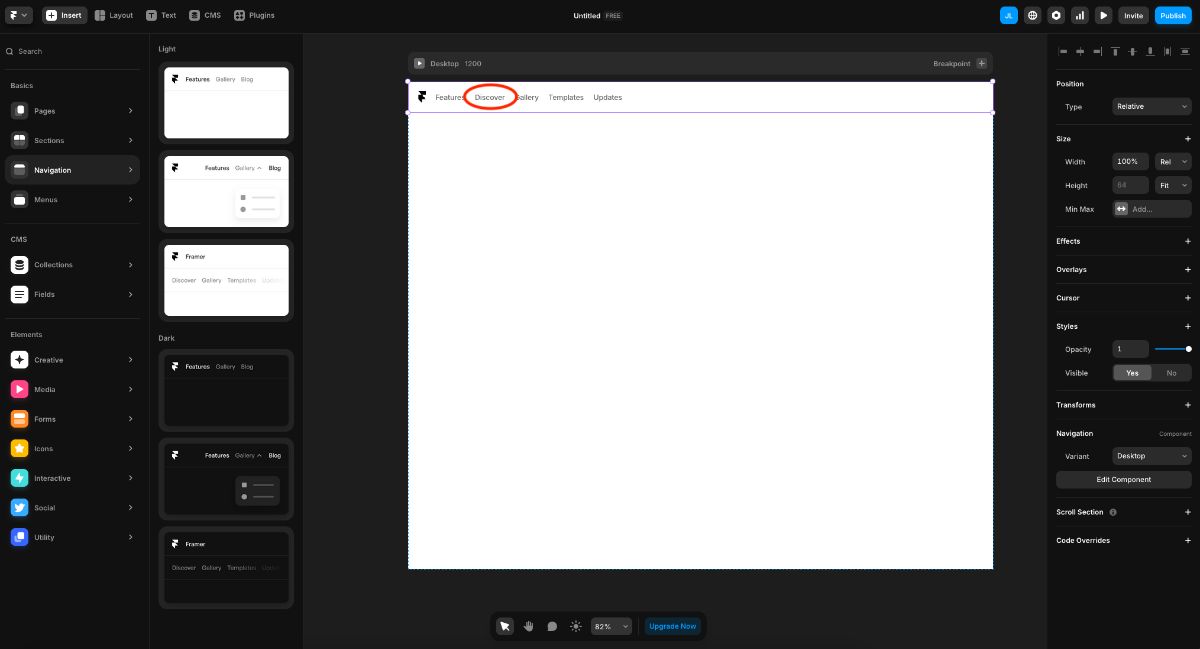
Now that we have the new navigation bar on our website, we need to double click it to make further edits.
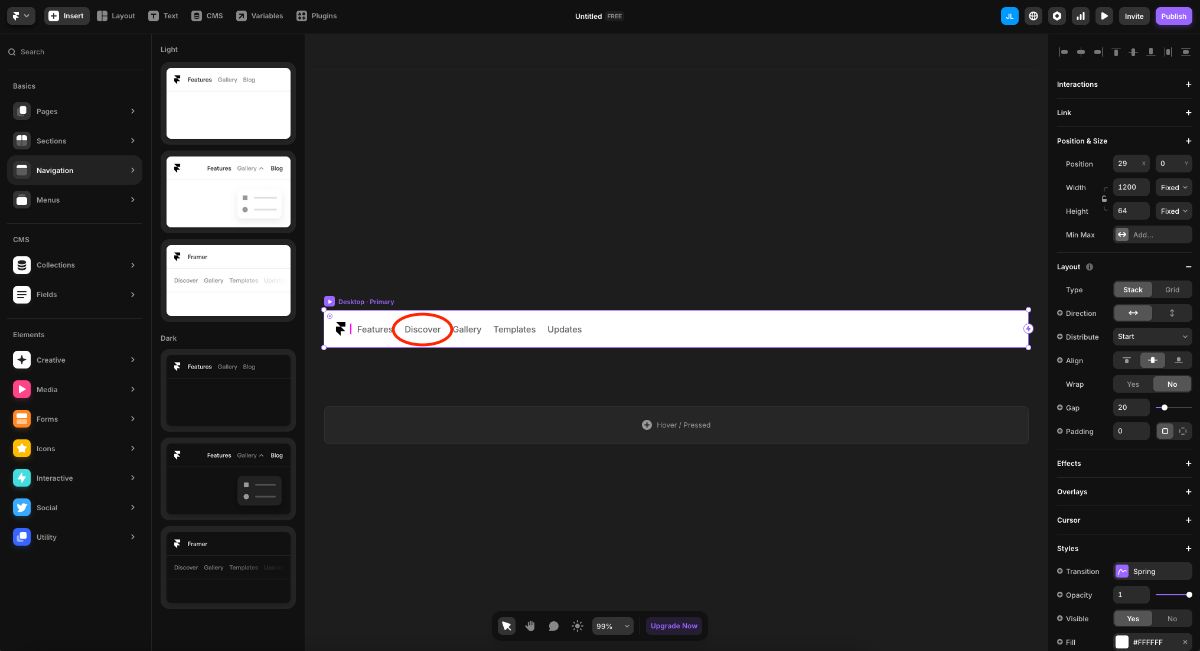
This part may seem repetitive but bare with me! We'll need to select one of the main menu items once more. For this demo, I selected the default "Discover" text.
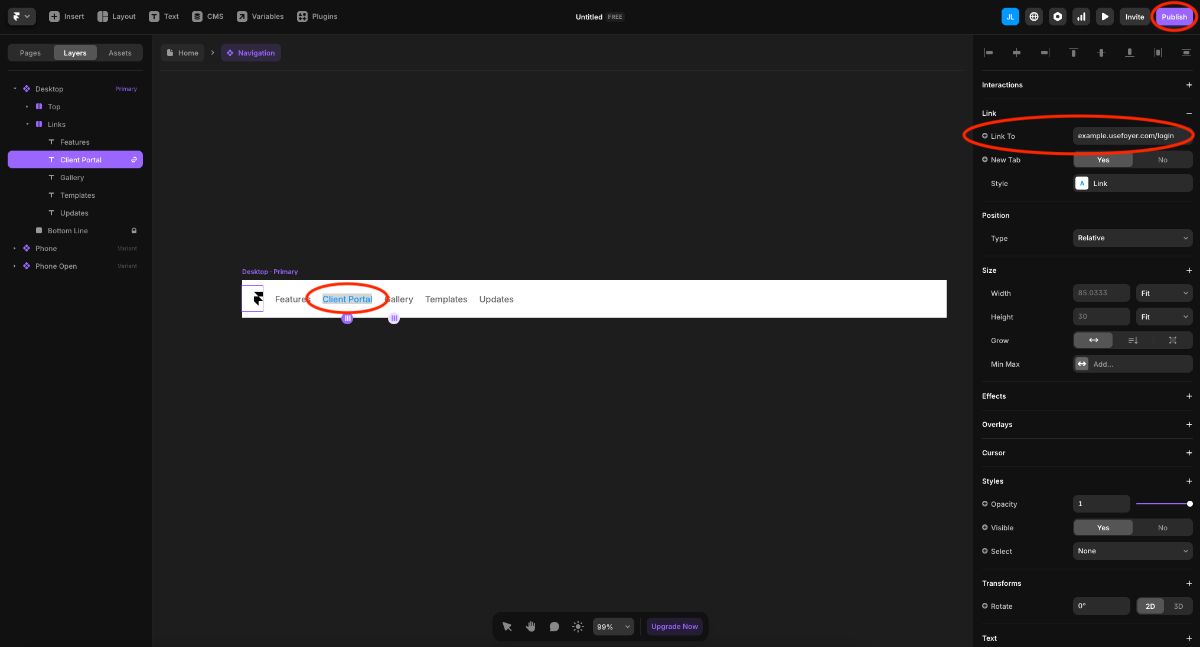
For this section, you need to define the name as it will appear in the menu and the URL it will navigate users to. You could use "Client Portal" or "Upload Documents" options below. It really depends on how you want your users to interact with your client portal. For the example image, I went with the "Client Portal" option.
- If you'd like your clients to login to access their files, enter your Foyer subdomain like this: example.usefoyer.com
- If you'd like your clients to only be able to upload documents (not view), enter your Foyer SafeDrop link: example.usefoyer.com/upload
Once you have defined the name and URL, click "Publish" and you're all done! We now have a new main menu on our Framer website that points to our brand new Framer Client Portal.
How to Create Knowledge Bases In Your Client Portal
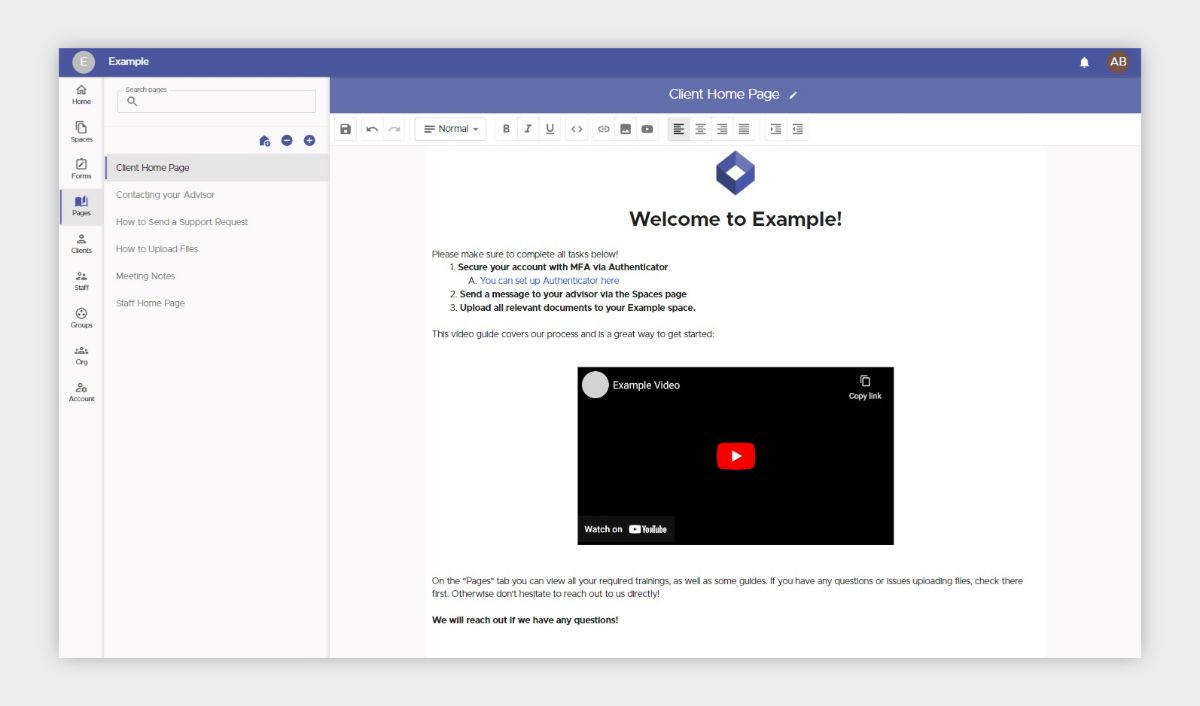
With your Foyer client portal, sharing knowledge between your team and clients is straightforward. To create knowledge base pages, go to the "Pages" section and click the "+" icon in the left drawer. Name your page and use the rich-text editor to add content, such as embedding videos, images, and formatting text.
By clicking the edit icon next to the page title, you can set which users and groups have access to the page. Shared pages will appear in the "Pages" tab of recipients, allowing for collaborative knowledge sharing among staff, while clients will have read-only access.
Additionally, you can designate a knowledge base page as the home page, ensuring that clients or staff see specific content upon login. This feature is especially useful for onboarding and providing easy access to resources, enhancing the overall functionality of your customer portal.
While some businesses prefer dedicated services for knowledge bases, like Notion, having the knowledge base integrated directly into your Foyer customer portal offers added convenience.
How to Make Custom Forms For Your Client Portal
When engaging with other businesses, you might need to collect custom data for purposes such as gathering feedback or onboarding information. Foyer offers a solution for this called Forms. Forms allow you to gather specific information by selecting from a variety of fields, including text, files, and multiple choice.
All data collected through your forms is directly integrated into your customer portal, making it easy to share internally within your organization. You can also collect files of any type and size, including large files. Simply add a field, select the "file" option, and save the form.
You and your staff will receive email notifications whenever a form is submitted, ensuring you never miss any updates from clients. If needed, anyone can opt out of these notifications through their notification preferences.
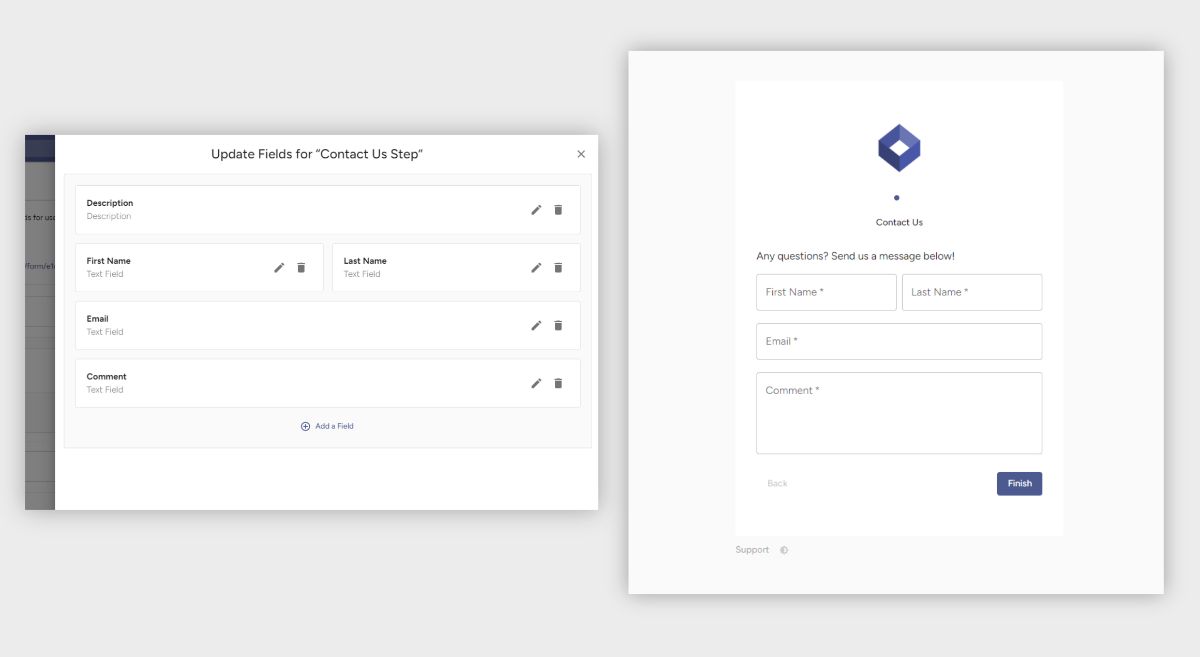
To begin, go to the "Forms" tab, click "Form Definitions," and then "Add Form." Each form consists of "steps," with each step containing one or more fields such as textboxes, file inputs, or multiple choice checkboxes.
You can choose between two built-in form styles: "stepper," which presents each step as a separate page (ideal for mobile devices), or "row," which displays the entire form on a single page (best for desktop use).
While many businesses use external services like Jotform for creating forms, having forms integrated directly into your customer portal provides added convenience.
How to Keep Your Customer Portal Secure Using Audit Trails
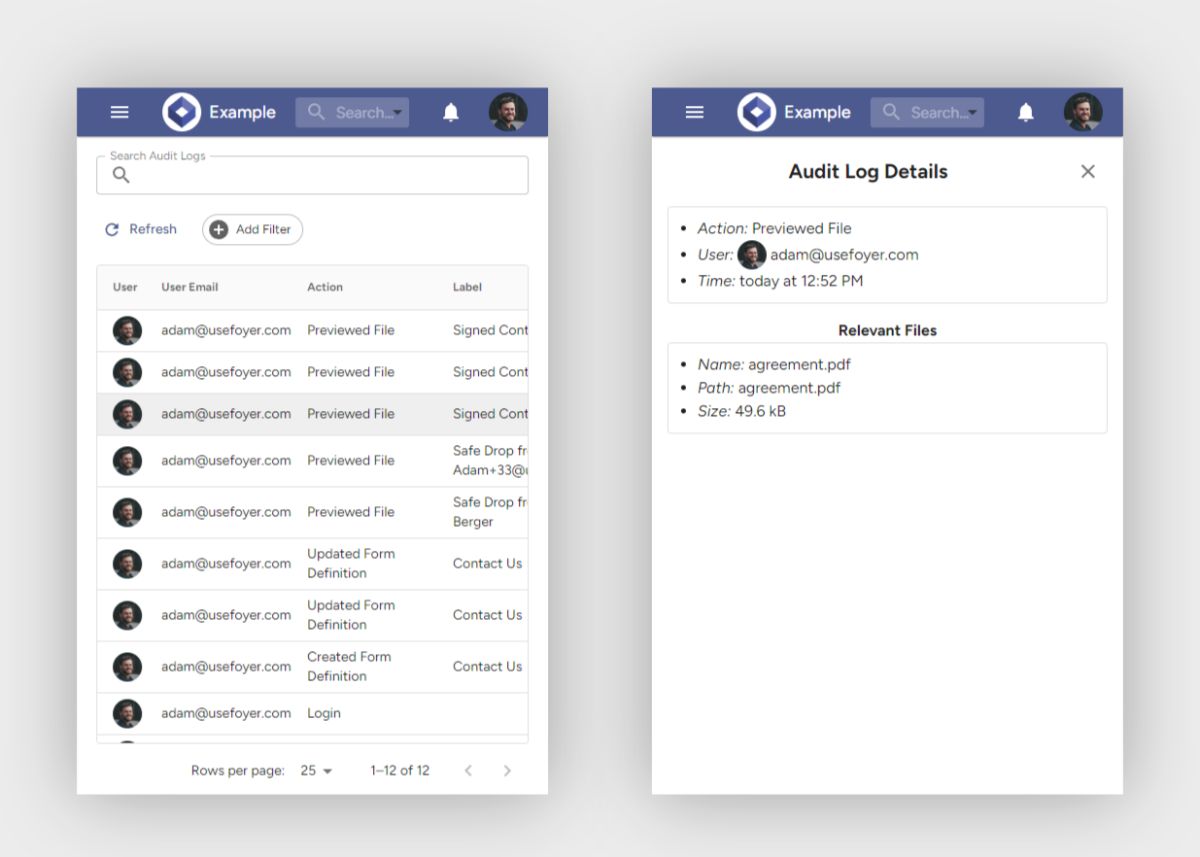
Client portals are not only about enhancing productivity but also about ensuring security. That's why Foyer includes comprehensive audit trails, allowing you to monitor every security event within your organization to keep both your clients and business secure.
Each audit log records the time of the event, the person involved, and the details of what happened. For security reasons, these logs cannot be deleted, ensuring you always have a record to review past events. Examples of actions tracked in audit logs include:
- Deleting files
- Previewing files
- Disabling or enabling Two Factor Authentication (2FA)
- Unsuccessful login attempts
With over 50 different audit log actions, you’ll have a complete view of activities within your client portal. This is particularly crucial for clients in the healthcare industry, where audit trails are essential for storing HIPAA data or other personally identifiable information (PII).
Foyer also offers features for searching, filtering, and sorting through audit logs, making the auditing process straightforward and efficient.
How Will You Use Your Framer Client Portal?
I hope this guide has helped you create a client portal using Framer and shown you how to take advantage of features like secure file sharing, custom forms, knowledge bases, and secure email to boost your business’s productivity and security.
If you don't know which client portal to use, check out Foyer's comparison of the best client portal software options available today.
If you’re unsure where to begin, I recommend starting with setting up a secure file-sharing portal (using tools similar to "Spaces" or "SafeDrop" as described above). This will provide a safe way to exchange files with your clients. After that, you can focus on integrating custom forms for feedback or onboarding and using DocuSign for signatures.
If you need assistance migrating existing data into your client portal, feel free to contact our Support team to explore potential solutions.
Thank you for reading! We appreciate any feedback you have—please leave a comment below!