Create a Hostinger Client Portal (Step-By-Step)

Hostinger is a powerful web hosting platform that enables businesses to create and manage websites with ease. It offers a range of features, including domain registration, website builders, email hosting, and performance optimization tools.
There’s a reason why Hostinger is a popular choice among website owners—it provides affordable, reliable hosting solutions with excellent speed and security.
However, while Hostinger excels at hosting and website management, it doesn’t come with built-in client portal software functionality for secure file sharing, customer logins, messaging, invoicing, or client collaboration. That’s where creating a Hostinger client portal becomes essential for businesses looking to offer a seamless experience to their clients.
With the right tools and integrations, you can set up a Hostinger client portal with features that allows clients to access documents, make payments, and communicate with your team efficiently. Whether you run an agency, a consulting business, or a membership site, a Hostinger client portal can help streamline your operations. If you run into any issues along the way, you can always refer to Hostinger's support materials for guidance.
In this guide, I’ll show you how to create a Hostinger client portal step by step.
How to Create a Client Portal for Your Hostinger Website
In this section, we’ll walk through the step-by-step process of creating a client portal and integrating it with your Hostinger website.
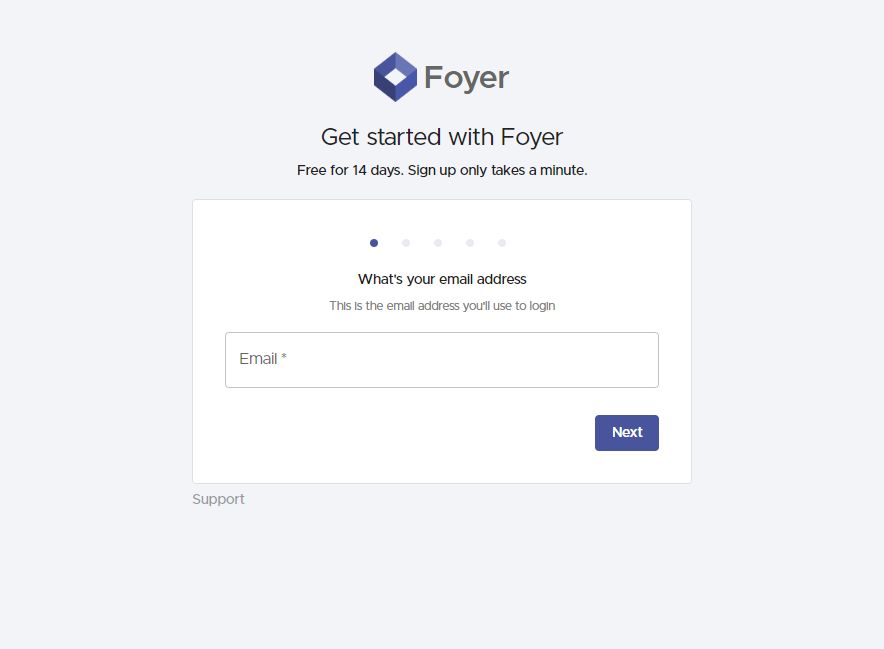
Foyer offers an intuitive onboarding wizard that simplifies the process of setting up a client portal. It’s completely free for 14 days, with no credit card required.
To get started, visit the onboarding wizard and enter your name, email, and business name. Your client portal will be created automatically in about a minute.
Your portal will be hosted as a subdomain of Foyer, such as example.usefoyer.com. You’ll have the option to choose your preferred subdomain during the setup process.
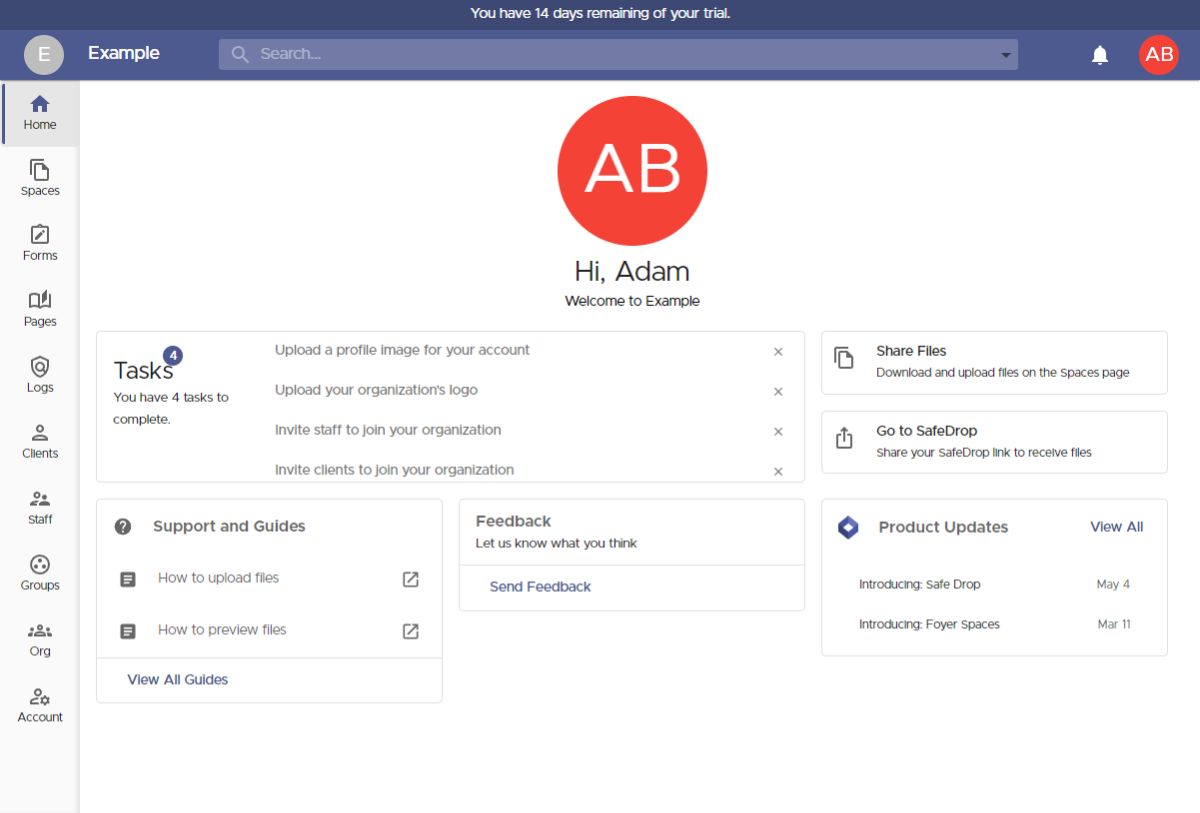
Once the onboarding process is complete, you’ll be redirected to your client portal's homepage. On the left, you’ll find a menu where you can access and configure various features of your portal, such as secure file sharing, custom forms, and knowledge bases.
For now, we’ll focus on how to share files, but later in this guide, we’ll explore some of the most essential features available to you.
A common use case for a Hostinger client portal is securely sharing files with business clients. With Foyer, you have two ways to do this:
- Invite clients directly to Spaces – This requires you to know the client's email address.
- Use your "SafeDrop" page – This allows business clients to send you files without needing to sign in.
I'll walk you through both methods, starting with how to invite clients directly to a Space. Spaces are secure areas where you can share files and exchange encrypted messages with clients and staff. Everything within a Space—files, messages, and interactions—is only visible to its members, similar to a private group chat in Teams, Slack, or iMessage.
To create a new Space, navigate to the Spaces page (by clicking "Spaces" in the left menu), then click the "+" icon on the left.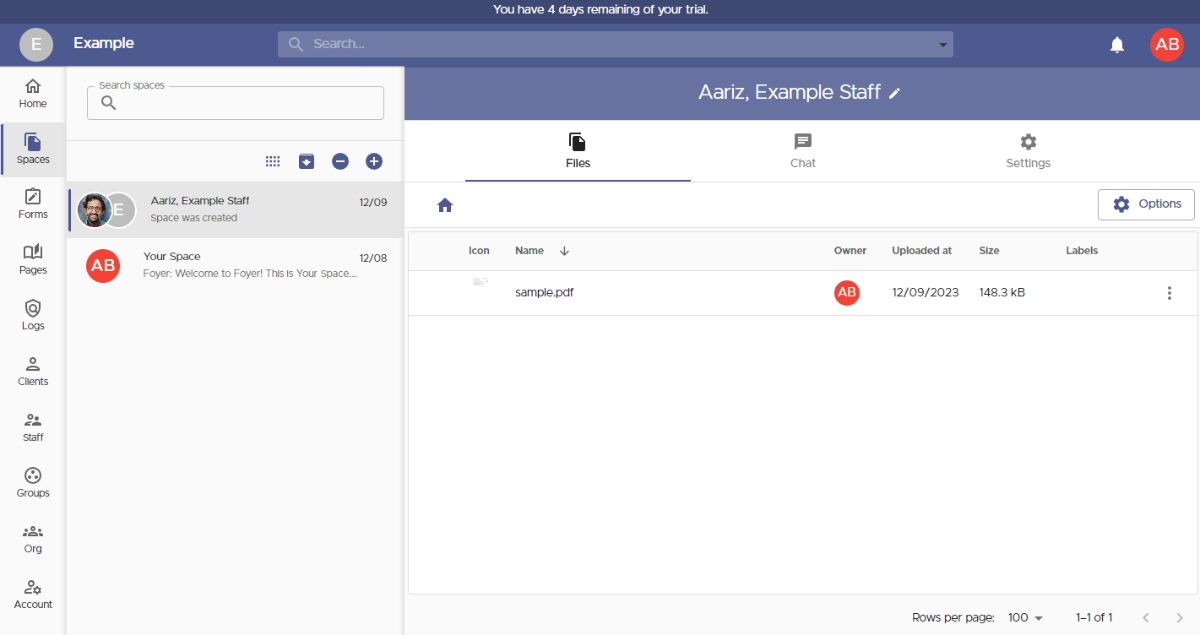
When creating a new Space, a dialog box will appear where you can name the Space and select which members will have access to shared files and messages.
You can also share Spaces with Groups, which help organize your business contacts and allow you to grant access to an entire external business at once. We’ll go over this in the next step!
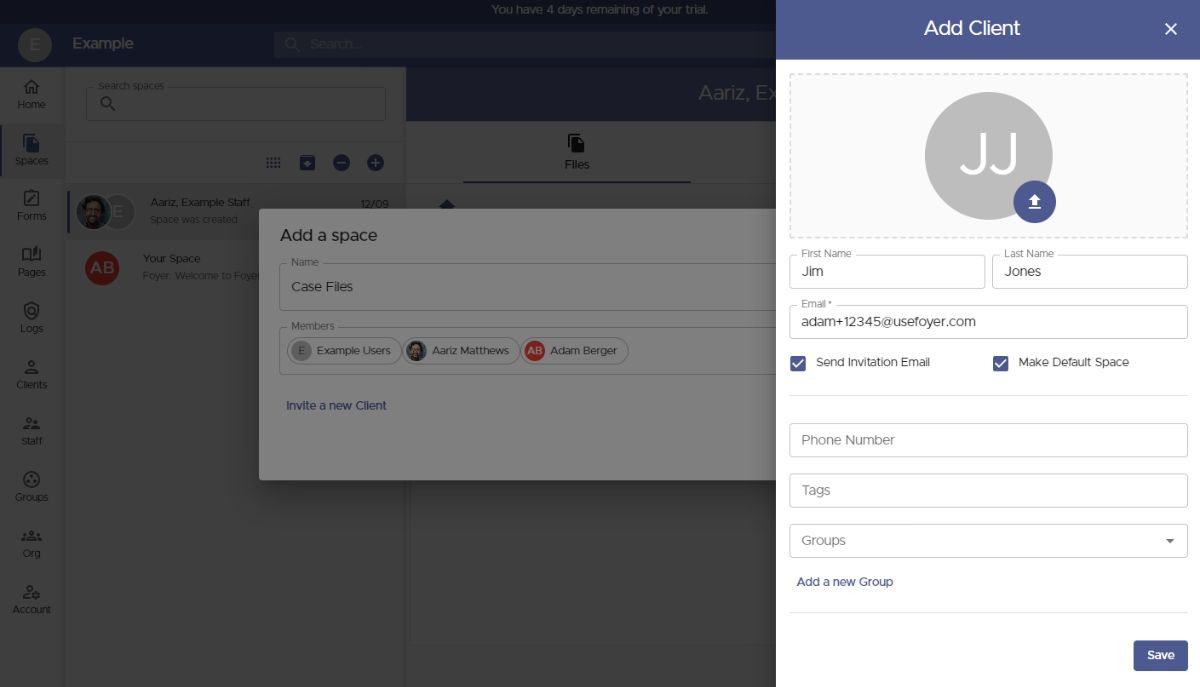
If you need to invite a new client, simply click the "Invite a New Client" button.
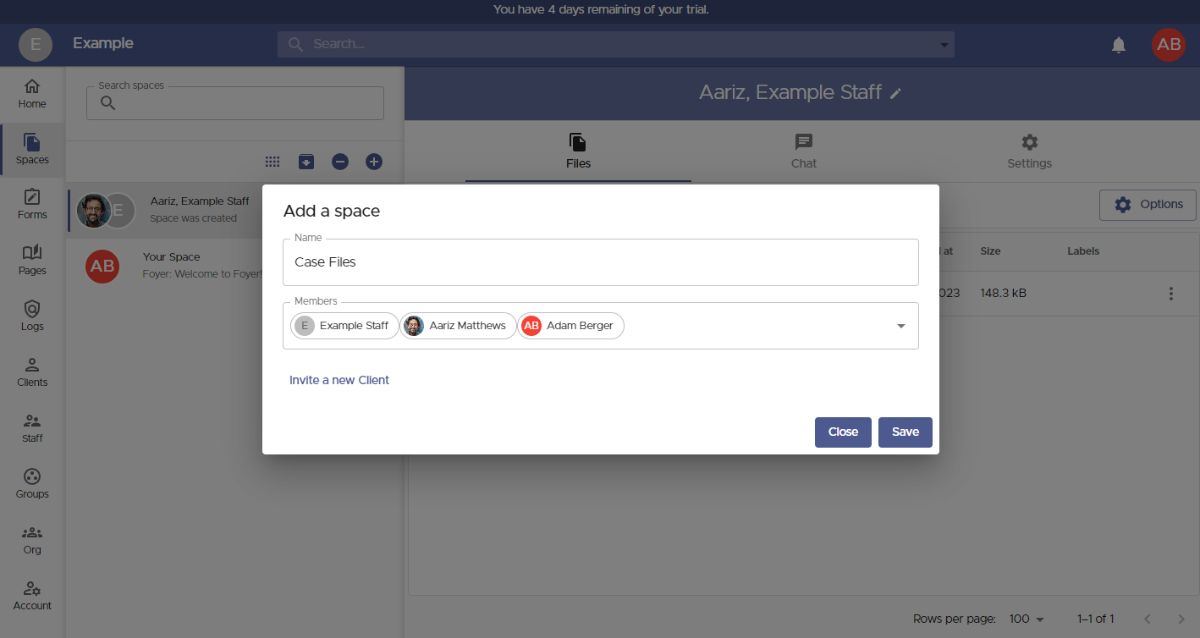 To invite a new client, all you need is their email. Other details like name, phone number, and profile picture are optional—clients can update those themselves if they choose!
Before saving the client, there are two useful options to consider:
- Tags – Tags allow you to categorize clients using labels. For example, you can organize them by industry, such as "Law Firm" or "Healthcare", making it easier to manage different client types.
- Groups – Groups help you organize clients based on the businesses they belong to. This makes it easy to assign access to resources like Spaces and Pages to an entire business at once, rather than manually managing individual clients.
 Any new clients you add will automatically appear in the Members list and will have access to any files you create within the new Space.
To add a group, simply start typing the group's name and select it from the results. Groups are added to the list in the same way as individual clients.
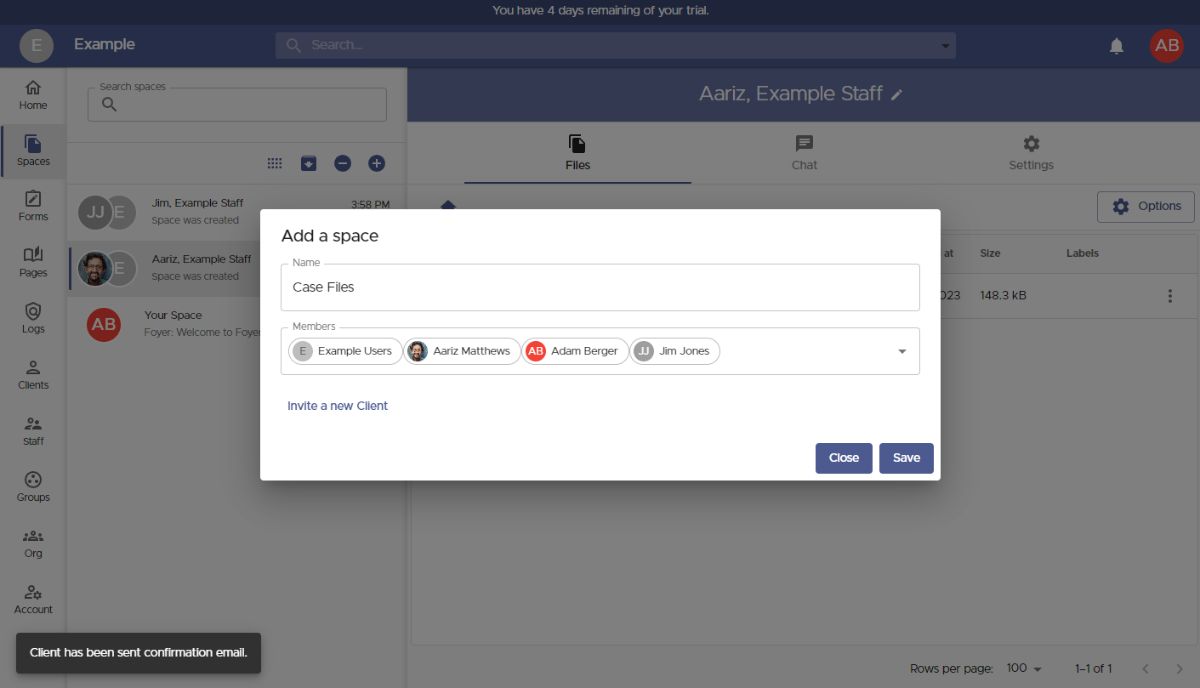
Once you've added all the necessary users and groups, click "Save", and you'll be taken to your new Space.
To share files with everyone in the Space, simply drag and drop a file or use the "Options" button. You can upload files of any size and type—even entire folders!
If you need to add or remove users or groups later, go to the "Settings" tab and update the members list.

That wraps up the first method of sharing files through your client portal using Spaces. Now, let’s explore the second option—allowing business clients to send you files without needing to log in.
In your Foyer client portal, this feature is called SafeDrop.
Every organization has a SafeDrop portal included. You can find your link on the Home tab or by visiting example.usefoyer.com/upload (replacing "example" with your organization's subdomain).
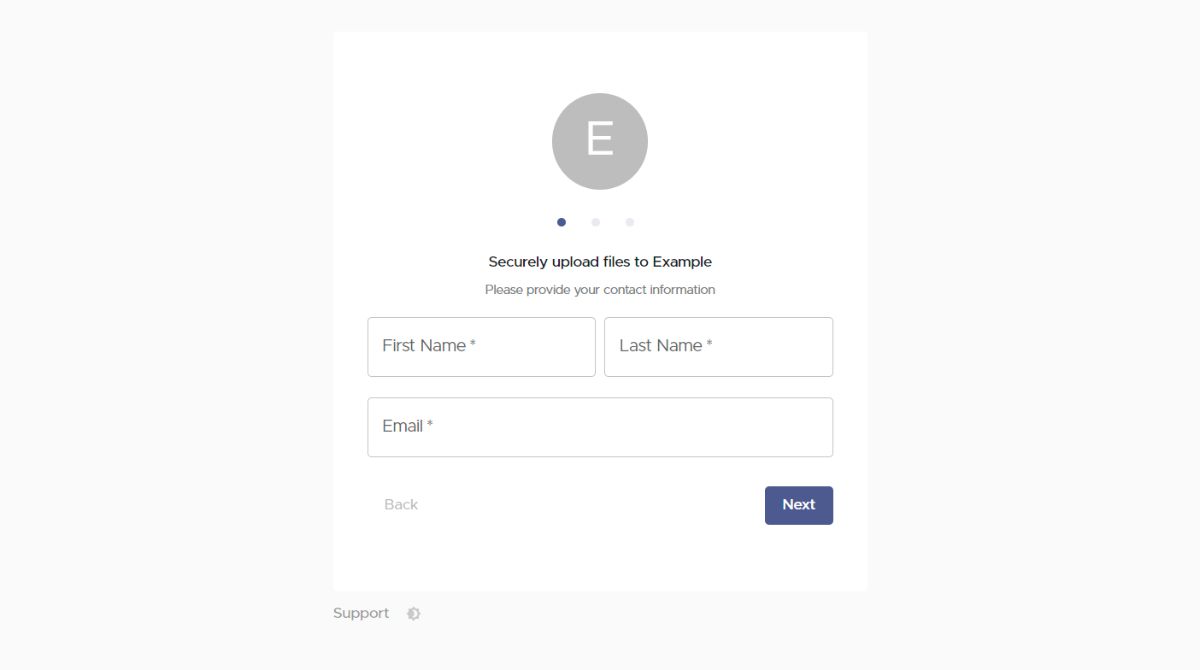
You can share your Foyer SafeDrop link with any client, allowing them to easily send you files from any device. They simply need to enter their name, email, an optional message, and upload as many files as needed.
Any files uploaded through SafeDrop will appear in your Spaces page with a name like "SafeDrop from ...". Just like regular Spaces, both you and the client will receive a notification whenever a file is uploaded.
Anyone who submits files via SafeDrop will be listed as a "guest" client on your Clients page. To better manage your business contacts, you can click on any guest entry and assign them to the appropriate tags or groups.
How to Integrate Your Client Portal Into a Hostinger Website
Now that your client portal is set up, the next step is to integrate it with your Hostinger site. The simplest way to do this is by adding a link to your client portal in your site’s navigation menu.
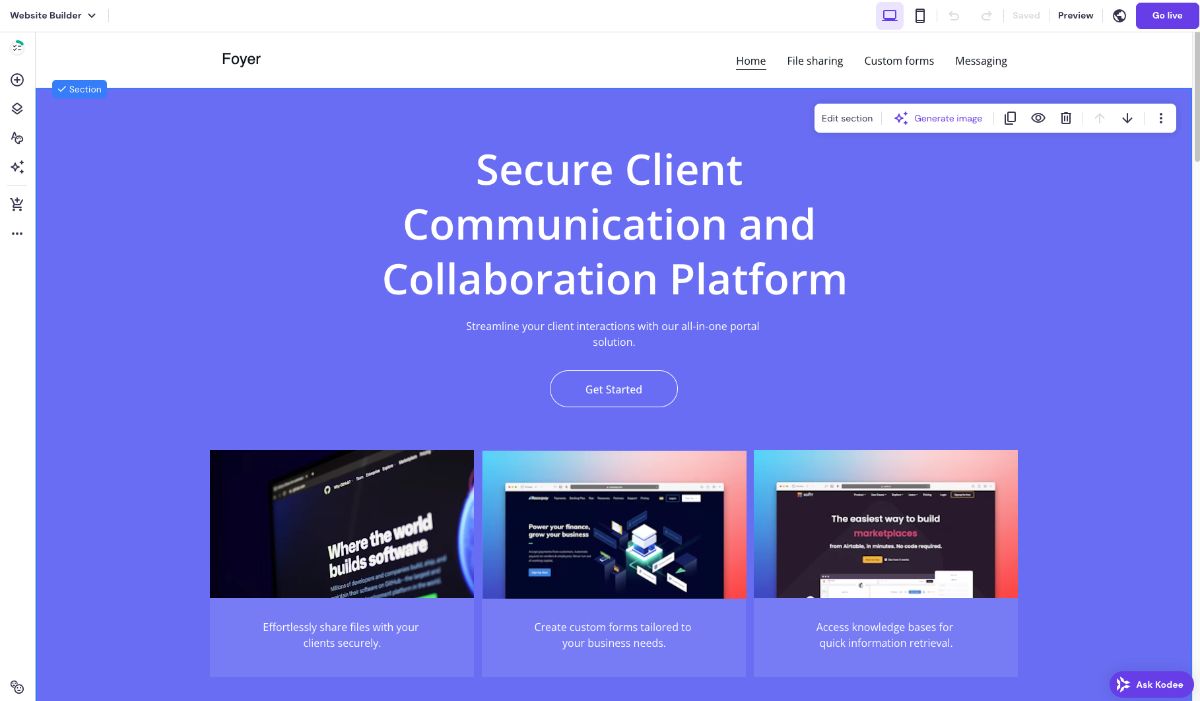
To begin, open the website editor in your Hostinger account. I used Hostinger free trial with the AI website builder. Yours should look similar to the screenshot below:
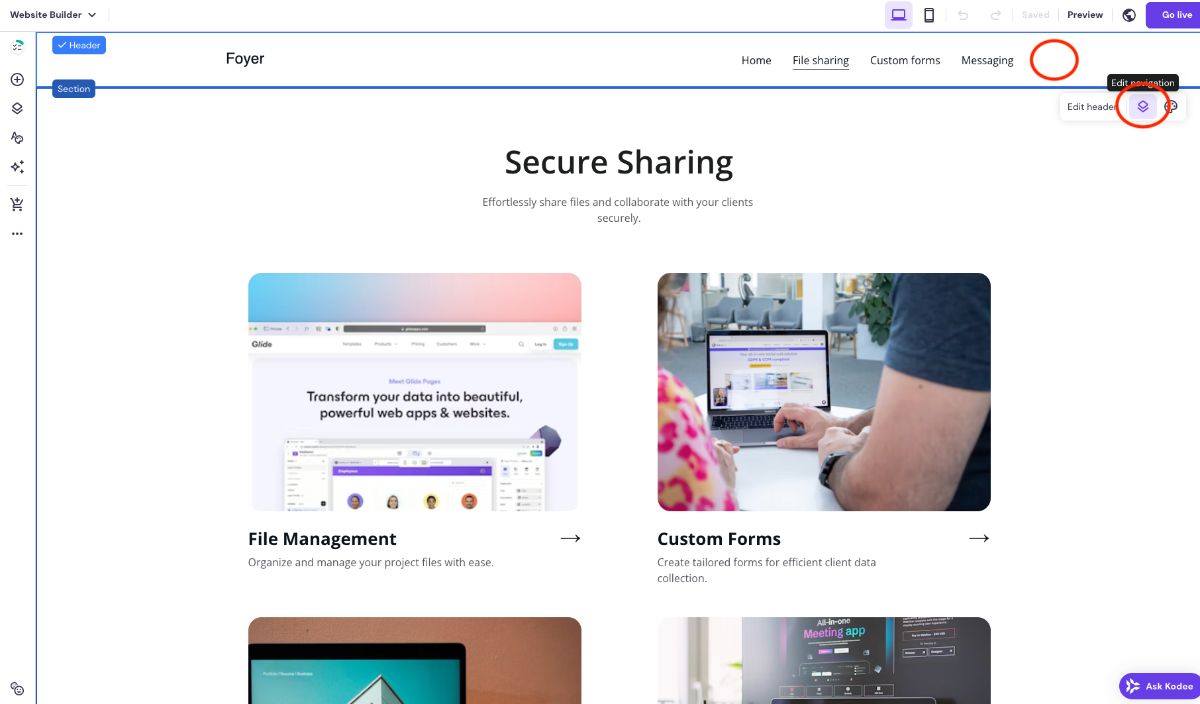
Now that we're logged in, we need to edit the top navigation bar. First, click the open white space in the navigation bar which will then prompt new menu items. You'll want to click the "Edit Navigation" icon as shown below.
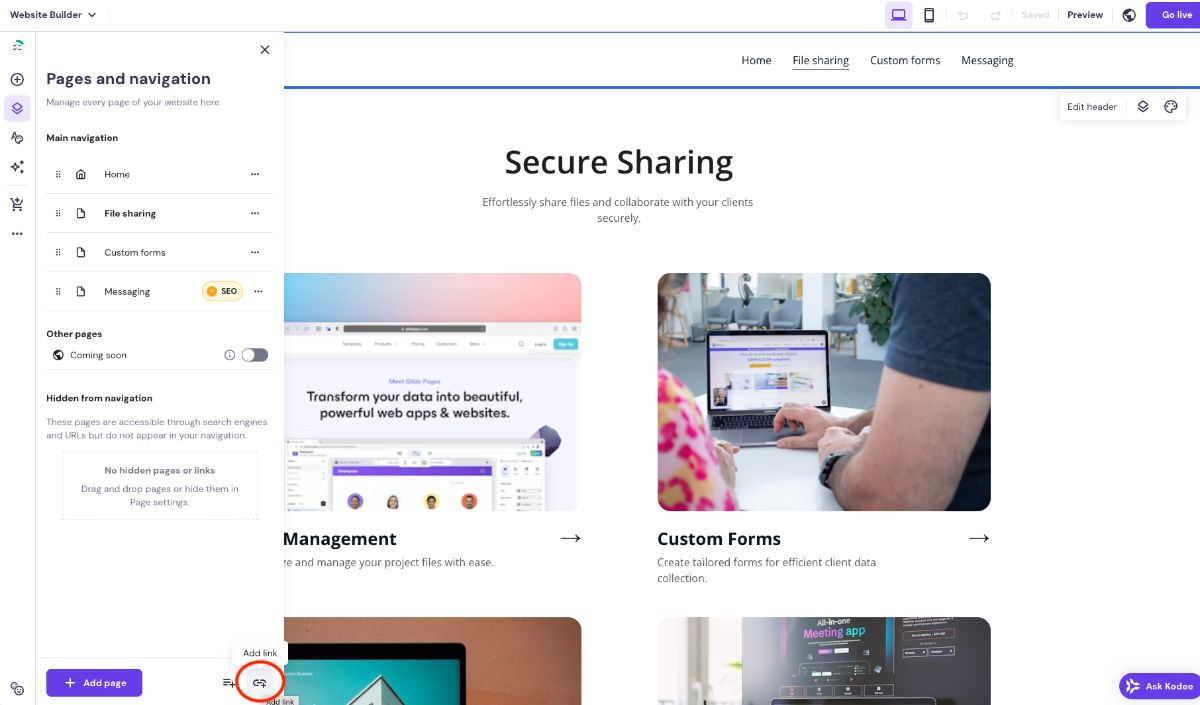
With the "Edit Navigation" bar selected, the "Pages and navigation" drawer section will expand on the left hand side. Here, on the bottom left side of the screen, we'll click the "Add link" icon.
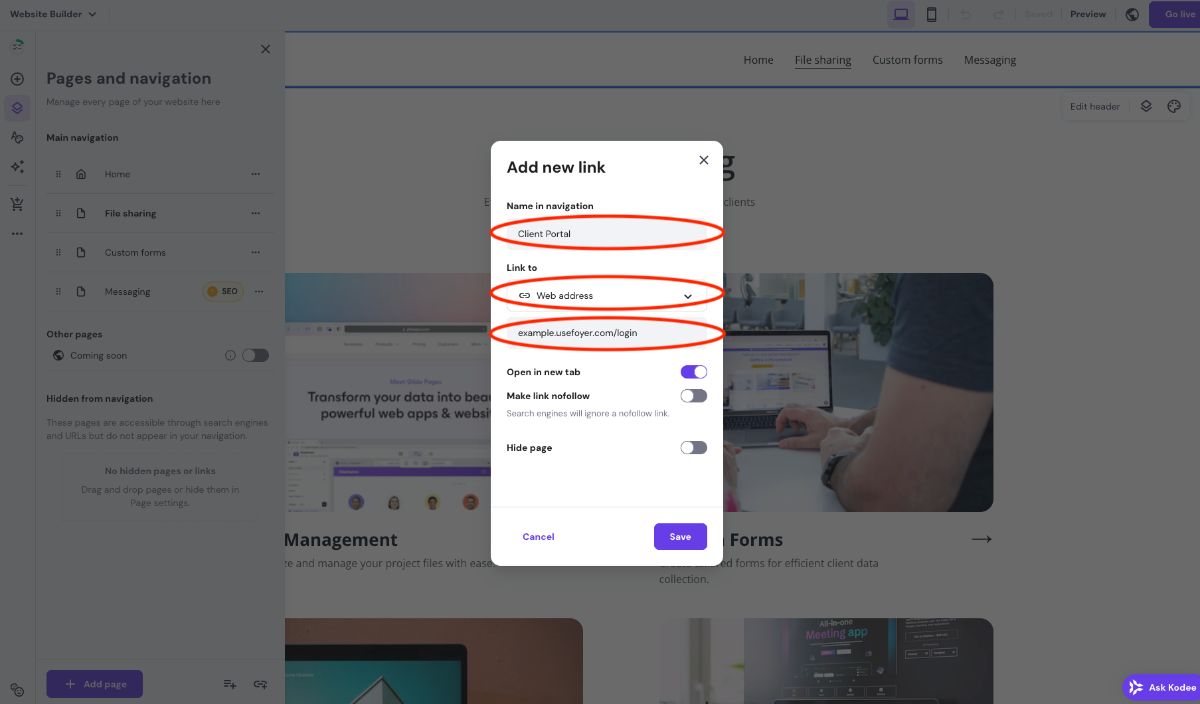
For this section, you need to define the name as it will appear in the menu and the URL it will navigate users to. Make sure the link is set to "Web Address" to reveal an external link. You can choose between options like "Client Portal" or "Upload Documents", depending on how you want clients to interact with your portal. In the example image, I selected the "Client Portal" option.
- If you want clients to log in to access their files, enter your Foyer subdomain like this: example.usefoyer.com
- If you only want clients to upload documents (without viewing files), use your Foyer SafeDrop link: example.usefoyer.com/upload
Once you've set the name and URL, click "Save", and you're all set! Your Hostinger website now includes a main menu link that directs users to your new Foyer Client Portal.
Now that you're all set with the client portal integrated into your Hostinger site, we can continue updating your client portal for your customers!
How to Create Knowledge Bases In Your Client Portal
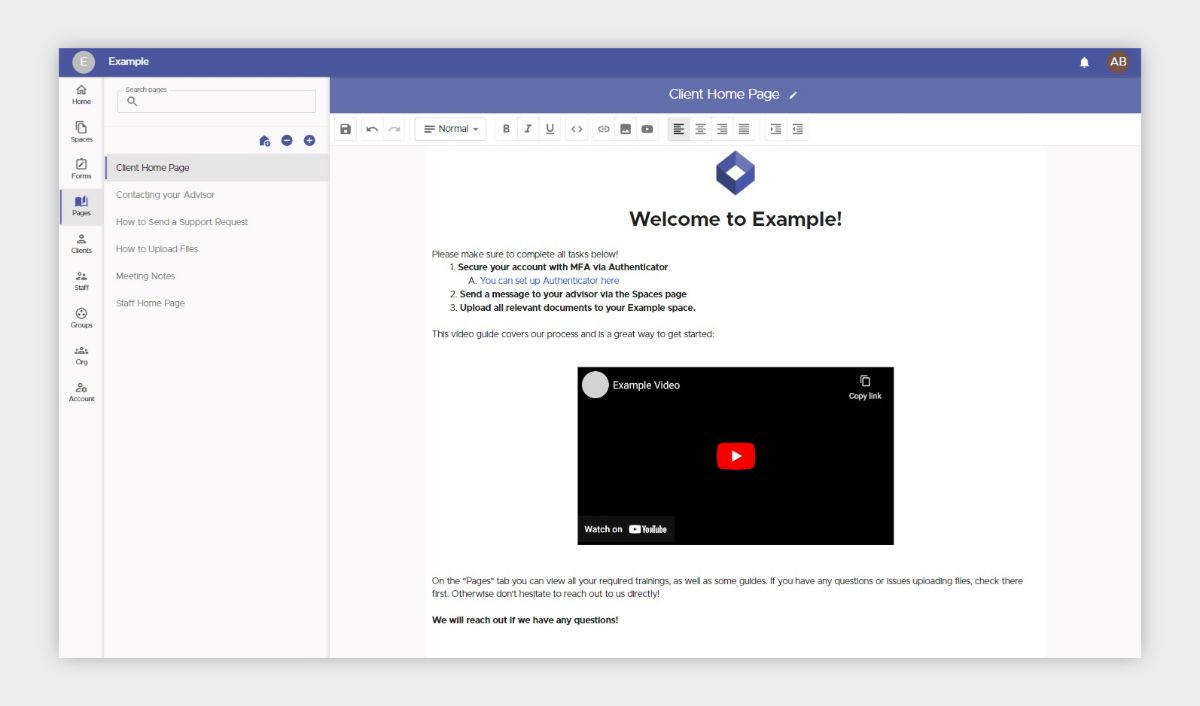
With your Foyer client portal, sharing knowledge between your team and clients is simple. To create a knowledge base page, navigate to the "Pages" section and click the "+" icon in the left menu. Give your page a name and use the rich-text editor to add content, including embedded videos, images, and formatted text.
By clicking the edit icon next to the page title, you can control which users and groups have access to the page. Shared pages will appear under the "Pages" tab for recipients—staff members can collaborate, while clients will have read-only access.
Additionally, you can set a knowledge base page as the home page, ensuring clients or staff see specific content immediately upon login. This is particularly useful for onboarding and providing easy access to important resources, improving the overall functionality of your client portal.
While some businesses use dedicated knowledge base tools like Notion, integrating your knowledge base directly into Foyer makes it more convenient by keeping everything in one place.
How to Make Custom Forms For Your Client Portal
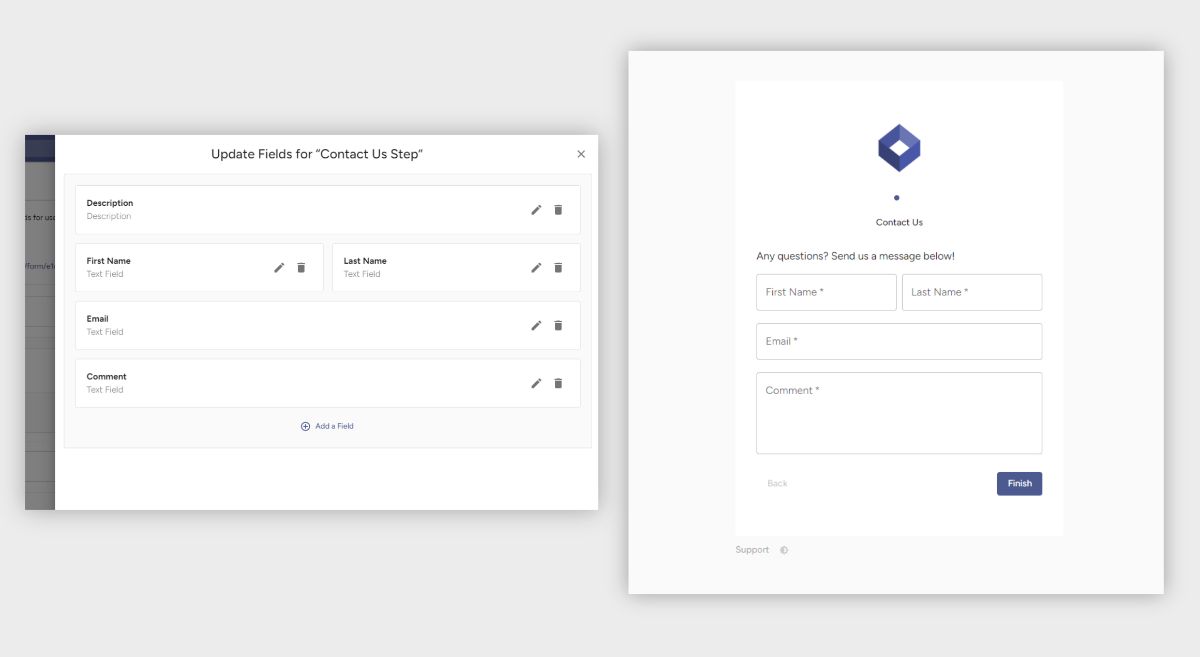
When working with other businesses, you may need to collect custom data for tasks such as onboarding or gathering feedback. Foyer simplifies this with its Forms feature, allowing you to gather specific information using a variety of field types, including text, file uploads, and multiple-choice options.
All data submitted through your forms is seamlessly integrated into your client portal, making it easy to share internally within your organization. You can also collect files of any type and size—even large files—by adding a field, selecting the "File" option, and saving the form.
You and your team will receive email notifications whenever a form is submitted, ensuring you never miss important updates from clients. If needed, users can adjust their notification preferences to opt out of these alerts.
To get started, navigate to the "Forms" tab, click "Form Definitions," and then select "Add Form." Each form is made up of "steps," with each step containing one or more fields, such as text boxes, file uploads, or multiple-choice checkboxes.
Foyer offers two built-in form styles:
- Stepper – Displays each step on a separate page (ideal for mobile users).
- Row – Shows the entire form on a single page (best for desktop use).
While many businesses rely on external tools, integrating forms directly into your Foyer client portal provides greater convenience and keeps all client interactions in one place.
How to Keep Your Customer Portal Secure Using Audit Trails
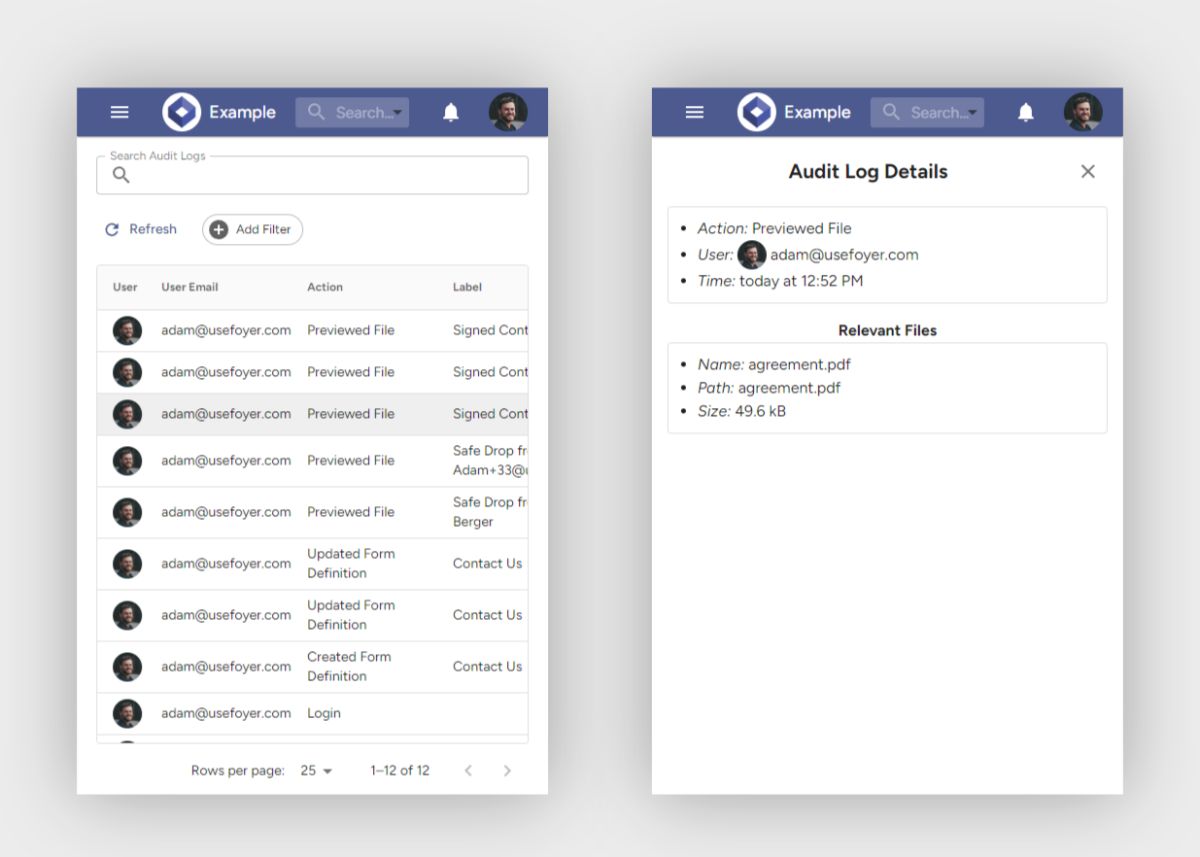
Client portals are not just about improving productivity—they also play a critical role in security. That’s why Foyer provides comprehensive audit trails, allowing you to track every security event within your organization to safeguard both your business and clients.
Each audit log records the event’s timestamp, the person involved, and details of the action taken. For security reasons, these logs cannot be deleted, ensuring you always have a reliable record of past activities.
Examples of tracked actions in audit logs include:
- File deletions
- File previews
- Enabling or disabling Two-Factor Authentication (2FA)
- Unsuccessful login attempts
With over 50 different audit log actions, you’ll have a detailed view of all activity within your client portal. This level of security is particularly valuable for industries like healthcare, where audit trails are essential for HIPAA compliance and protecting personally identifiable information (PII).
Foyer also provides powerful tools for searching, filtering, and sorting audit logs, making it easy to review security events and maintain compliance effortlessly.
How Will You Use Your Hostinger Client Portal?
I hope this guide has helped you set up a client portal with Hostinger and given you a clear understanding of how to utilize features like secure file sharing, custom forms, knowledge bases, and secure messaging to enhance your business’s productivity and security.
If you’re unsure where to start, I recommend beginning with a secure file-sharing portal using tools like Spaces or SafeDrop (as explained above). This will ensure a safe and efficient way to exchange files with your clients. From there, you can explore integrating custom forms for feedback or onboarding and incorporating DocuSign for electronic signatures.
If you're wondering where to get started first or don't know which client portal to use, check out Foyer's comparison of the best client portal software options.
Thank you for reading! We’d love to hear your thoughts—feel free to leave a comment below!