Create a Microsoft Word Client Portal (Step-By-Step)
Microsoft Word is a powerful word processing tool that allows users to create, edit, and format documents with ease. It's part of the Microsoft 365 suite, which offers various pricing plans tailored to different needs, from personal use to large enterprises. For more details on their pricing and features, visit the Microsoft 365 pricing page or explore the Microsoft Word homepage.
Creating a Microsoft Word client portal software involves designing a document or series of documents that act as a central hub for client information and interactions. While Word isn't typically used for dynamic client portals like specialized software, like a Microsoft Word client portal, it can still be an effective tool for static or semi-interactive client management. Integrating a Microsoft client portal with other Microsoft 365 applications, such as Excel for data management, PowerPoint for presentations, and Teams for communication, can significantly enhance the functionality of your client portal. This ecosystem allows for seamless data sharing and collaboration, providing a more comprehensive and interactive experience for both you and your clients. Instead of making a specific Microsoft Word Client Portal, you could check out an entire blog we wrote for creating a Sharepoint Client Portal with Power Pages here.
However, if your requirements extend beyond what can be effectively managed with Word and other Office tools, a dedicated client management solution like Foyer might be the better choice. Foyer offers a specialized platform with advanced client portal features designed specifically for client engagement and management, providing a more robust and tailored solution compared to a standalone Word-based portal. This can streamline your workflows, improve client interactions, and ensure a more integrated approach to managing client relationships.
First let's jump into the step-by-step guide to setting up a Microsoft Word client portal:
1. Define Your Objectives
Before you start, clarify the purpose of your client portal. Determine:
- What information clients need to access.
- The level of interaction required (view-only, feedback, etc.).
- How often the information will need to be updated.
2. Design the Document Structure
a. Create a New Document: Open Microsoft Word and start a new blank document.
b. Plan the Layout: Decide on the layout and structure of your portal. Common sections might include:
- Welcome Page: An introduction to the portal with instructions or a summary.
- Client Information: A section or document with relevant client details.
- Reports or Updates: Sections for periodic updates, reports, or project status.
- Action Items or To-Do Lists: A section for tracking tasks or client requests.
c. Use Templates: Consider using or designing templates to standardize the look and feel of your portal. This helps maintain consistency and professionalism.
3. Populate Content
a. Add Client Information: Input relevant client details such as contact information, project specifics, and service history. Use tables or lists for clarity.
b. Insert Reports or Updates: Include any reports, charts, or updates that are relevant. You can embed charts from Excel if needed:
- Go to “Insert” > “Object” > “Create from File” and select your Excel file.
c. Create Action Items: Develop a section for tracking tasks or client requests. Use tables or bullet points to organize these items clearly.
4. Incorporate Interactive Elements
a. Add Hyperlinks: Include hyperlinks to relevant documents, websites, or sections within the Word document. This can help clients navigate to additional resources or related information:
- Highlight the text or object.
- Right-click and select “Hyperlink.”
- Enter the URL or link to another document or section.
b. Include Forms for Feedback: If you need client feedback or data, you can include fillable forms or link to Microsoft Forms:
- Go to “Insert” > “Text” > “Text Box” or use the “Developer” tab to create fillable fields.
5. Secure the Document
a. Restrict Editing: To prevent unauthorized changes, restrict editing permissions:
- Go to “File” > “Info” > “Protect Document” > “Restrict Editing.”
- Set editing restrictions and passwords as needed.
b. Backup Regularly: Ensure you save backups of your document to prevent data loss. Use OneDrive or another cloud storage solution for regular backups.
6. Share the Portal
a. Distribute the Document: Share the Word document with clients via email or cloud storage. Ensure that the sharing settings allow clients to access but not modify the document unless necessary.
b. Use Collaborative Tools: For ongoing collaboration, consider using OneDrive or SharePoint to manage and share the document. This allows clients to view the latest version and facilitates easier updates.
7. Maintain and Update
a. Regular Updates: Periodically update the document with new information, reports, or action items. Notify clients when significant updates are made.
b. Monitor Feedback: Collect and review client feedback to improve the portal’s content and functionality. Adjust as needed based on client needs and preferences.
By following these steps, you can create a Microsoft Word client portal that effectively communicates and manages client information. While it may not offer the dynamic features of more specialized portals, it can still serve as a useful tool for presenting and organizing client data.
How to Create a Microsoft Word Client Portal for Teams with Foyer
Foyer is client portal that has all the essential features your business needs to interact with clients from any industry. You'll get a client portal for: secure file sharing, encrypted messaging, an integration with DocuSign for e-signatures, secure email, and more in just minutes. All data is encrypted end-to-end, so you can be confident your business and your customer's data is safe. While it's not strictly a Microsoft Word Client Portal, this may be the best approach if you don't have to stay within the Microsoft ecosystem.
Pros
- Chat
- File Exchange
- Custom pages and onboarding experience
- Custom branding look and feel across the entire user experience
- Microsoft Security Integrations
- Third Party Integrations
Cons
- No video conferencing
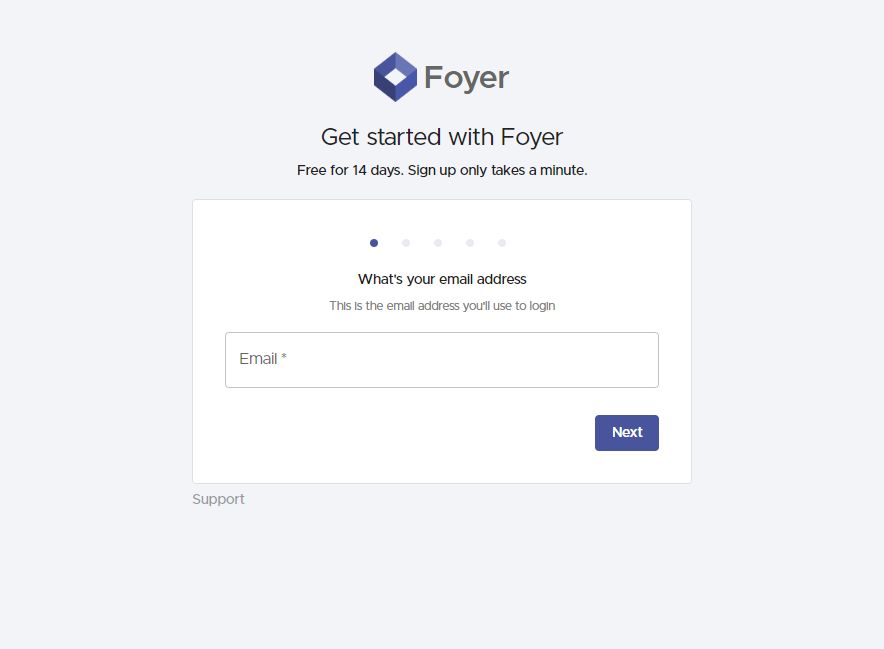
To set up your client portal visit the onboarding wizard, and enter your name, email, and business name. Your client portal will be created within just 1 minute (there's no commitment necessary).
You can access your client portal as a "subdomain" of Foyer like "example.usefoyer.com". During the onboarding process, you'll be able to choose which subdomain you want. If you need to setup Foyer as a subdomain of your own domain (e.g. "portal.yourbusiness.com"), we can set that up for you too just contact our Support team.
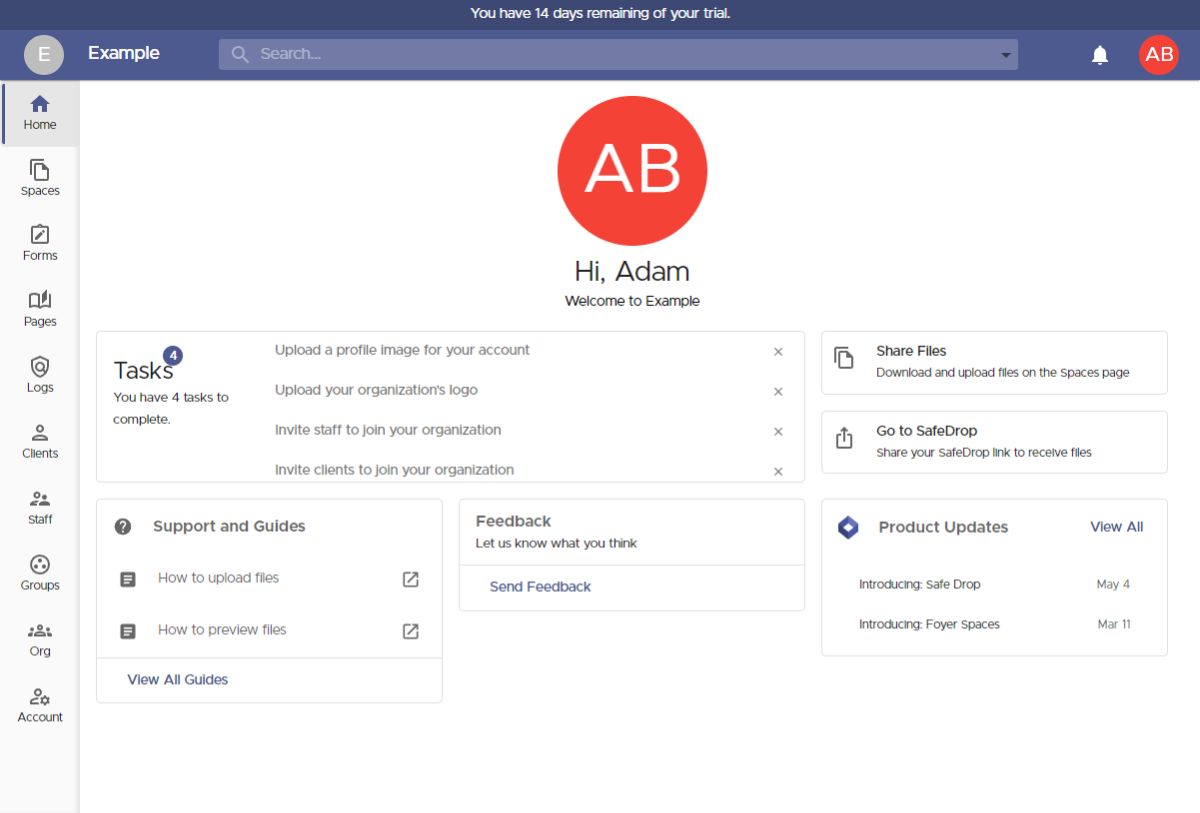
 After the onboarding process completed, you'll be redirected to your customer portal's home page. On the left, you'll see a drawer where you can access and configure all the features of your portal (e.g. secure file sharing, custom forms, knowledge bases, etc...).
For now we are just going to cover how to share files, but later in the guide we will touch on some of the most essential features you have.
A common use case is simply sharing files with a business client. You can do this in two different ways with Foyer.
You can invite clients directly to Spaces (this will require you to know the client's email address).
Or you can send a link to your "SafeDrop" page, so your business clients can send you files without signing in.
I'll show you how to share files both ways! I'll start by showing you how to invite your clients directly to a Space.
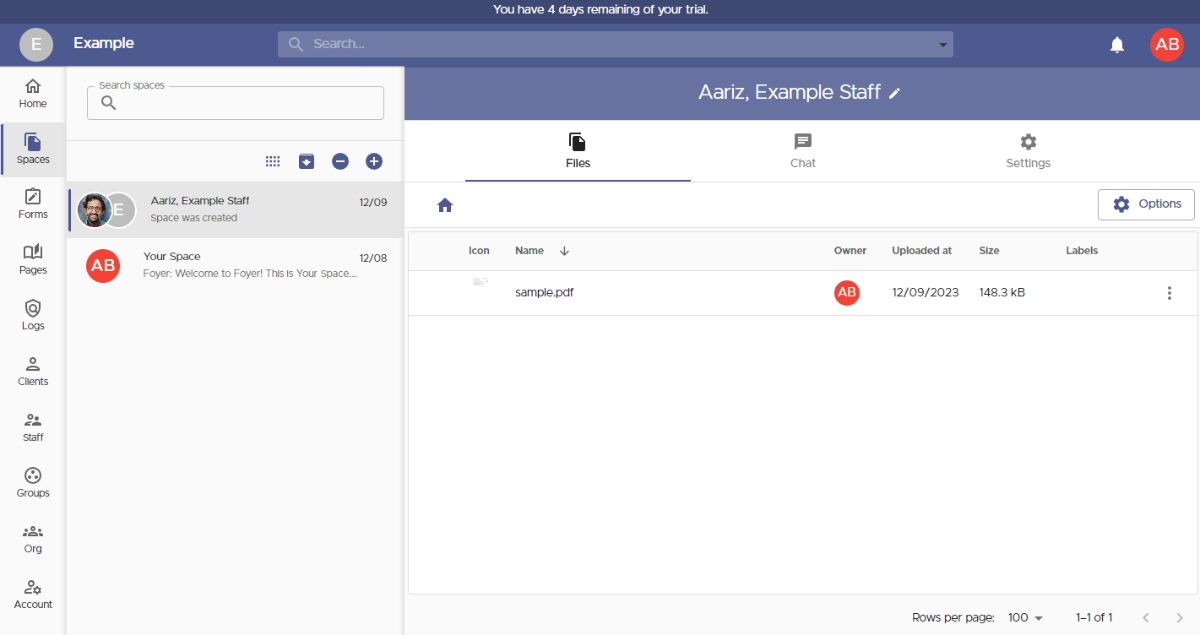
First, let's cover what exactly a "Space" is.
Spaces are secure places where you can share files and send secure messages with clients and your staff. All the files and messages within one Space are only visible by the members of the Space (just like a group chat in Teams, Slack, iMessage, etc...).
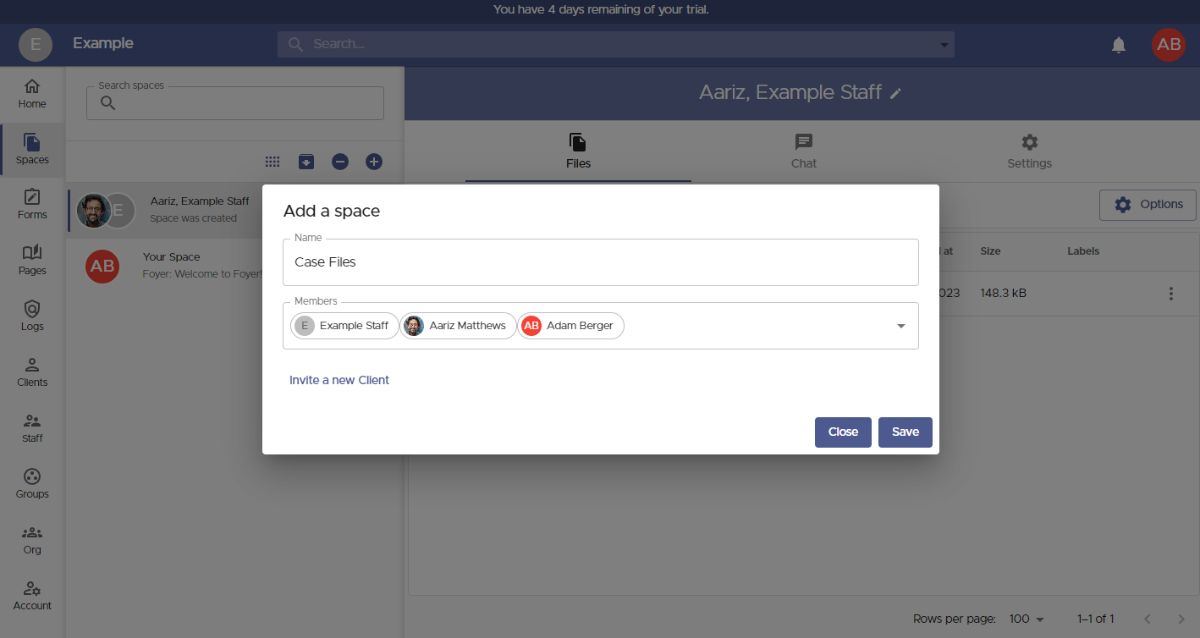
You can making a space by visiting the Spaces page (click on "Spaces" on the left drawer), then by clicking the "+" icon on the left.
When adding a new space, you'll see a dialog like the one below. You can set the name of the Space, and choose which members have access to any files or messages that will be shared.
You can also share spaces with "groups". Groups are a great way to organize your business contacts, so you can assign access to an entire external business all at once. We will cover that in the next step!
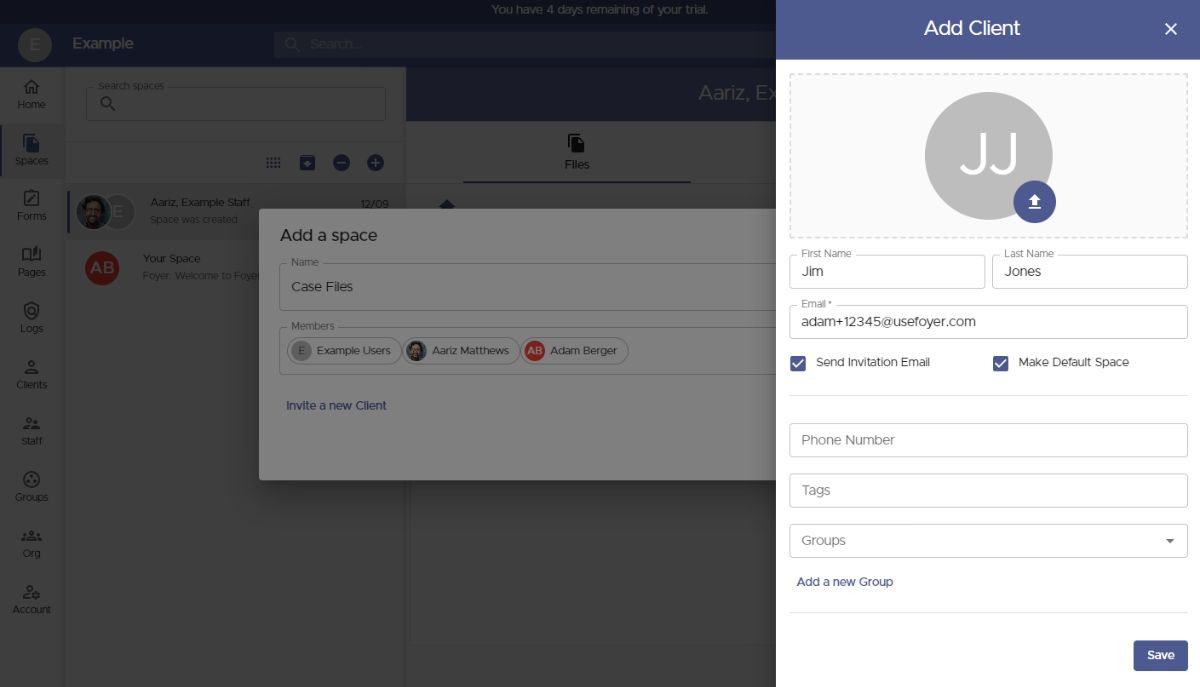
If you need to invite a new client, you can just click the "Invite a new Client" button.
 All you need to invite a new client is their email. Other information like name, phone number, and profile picture are all optional (they are free to fill in those details themselves too)!
Before you save the client, there are two options you might want to check out that are great for use cases.
First, is tags. With tags, you can organize your clients via labels. You could use this to organize your clients by which industry they are in (e.g. "Law Firm", or "Healthcare").
Second, is groups. With groups, you can organize your business clients into what businesses they belong to. Using groups makes it easy to assign access to resources (e.g. Spaces, Pages) to entire businesses all at once, instead of needing to remember which client belongs to which business.
 Any new clients you add will automatically be added to the "Members" list, and they will have access to any files you make in your new Space.
To add a group, just start typing the name of a group, and click on the result. Groups are added to this list just like clients.
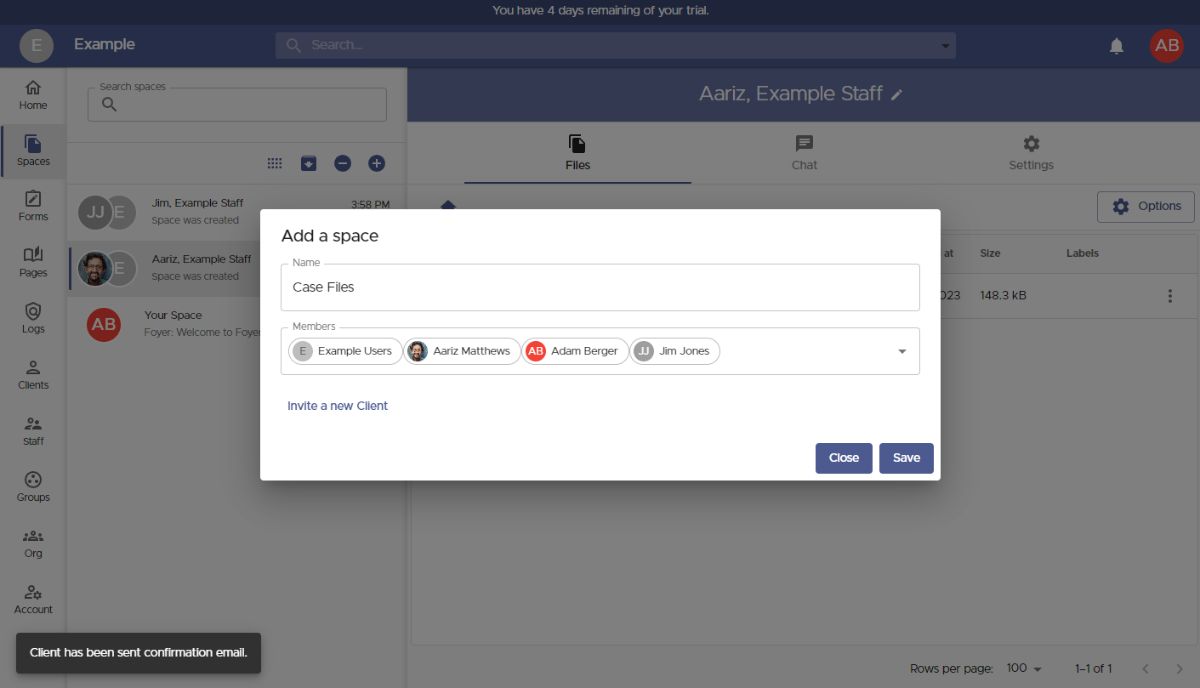
When you've added all the users and groups you need, click "Save", and you'll be directed to your new Space.
You can share files with everyone in the Space, by just dragging and dropping a file, or use the "Options" button. You can upload any files of any size, and any type. You can even upload entire folders!
To add or remove users or groups from the Space, visit the "Settings" tab, and edit the members list.

That covers the first option of sharing files with your client portal using "Spaces". Now let's talk about the second option, which is to allow business clients to send you files without needing to login.
In your Foyer client portal, this workflow is called SafeDrop.
Every organization has a SafeDrop portal included. You can find you link on the "Home" tab, or by visiting "example.usefoyer.com/upload" (replacing "example" with your org's subdomain name).
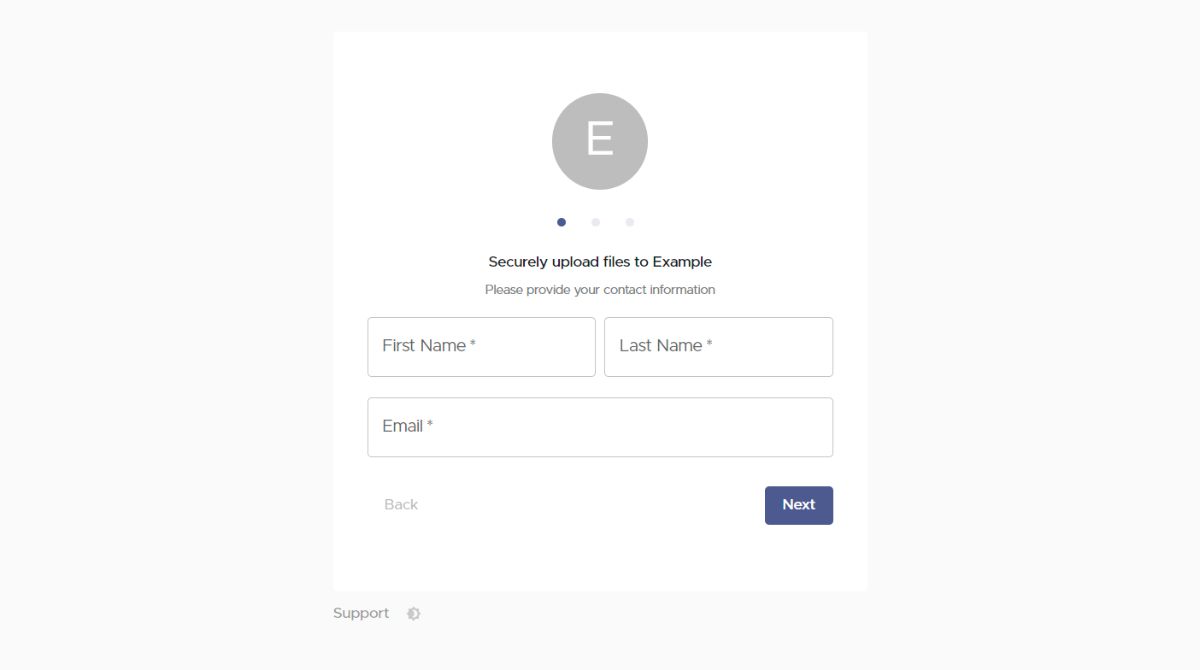
You can send your Foyer SafeDrop link to any client, and they can easily send you files from any device. They just have to enter their name, email, an optional message, and then any number of files.
Any files uploaded this way will show up on your Spaces page, and have a name like "SafeDrop from ...". Just like normal Spaces, you and the client will receive a notification for any files that are uploaded.
Anyone who has used your SafeDrop portal will show up as a "guest" client on your Clients page. To help manage your business contacts, you can click on any entry on the Clients page, and assign them to their relevant tag or groups.
White-Labeling Your Client Portal
 With any customer portal, it is critical that you can white-label the portal to match your own brand. White-labeling helps your business clients recognize your brand, and build trust that your customer portal is legitimate. There are plenty more reasons why white-labeling is beneficial too.
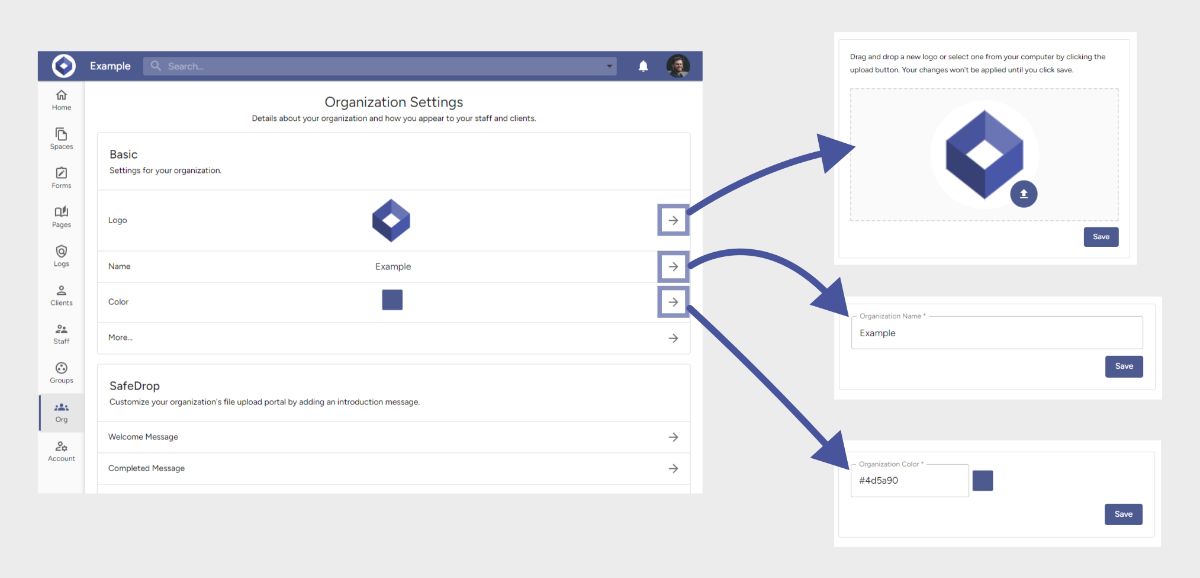
Foyer's customer portal lets you customize colors, logos, emails, your domain name, and more.
On the "Org" page you can update:
- Your Logo
- Shown on the login/sign up pages, all pages when logged in, on all forms, and on your SafeDrop page.
- Name
- Shown in the header, and on login/sign up pages
- Color
- Used in the header, on all buttons for every page
If you scroll down on the Org page you'll also find Foyer's email template that allows you to customize all your client and staff invitation emails.
How to Create Knowledge Bases In Your Client Portal
With your Foyer client portal, facilitating knowledge exchange among your team and clients is seamless.
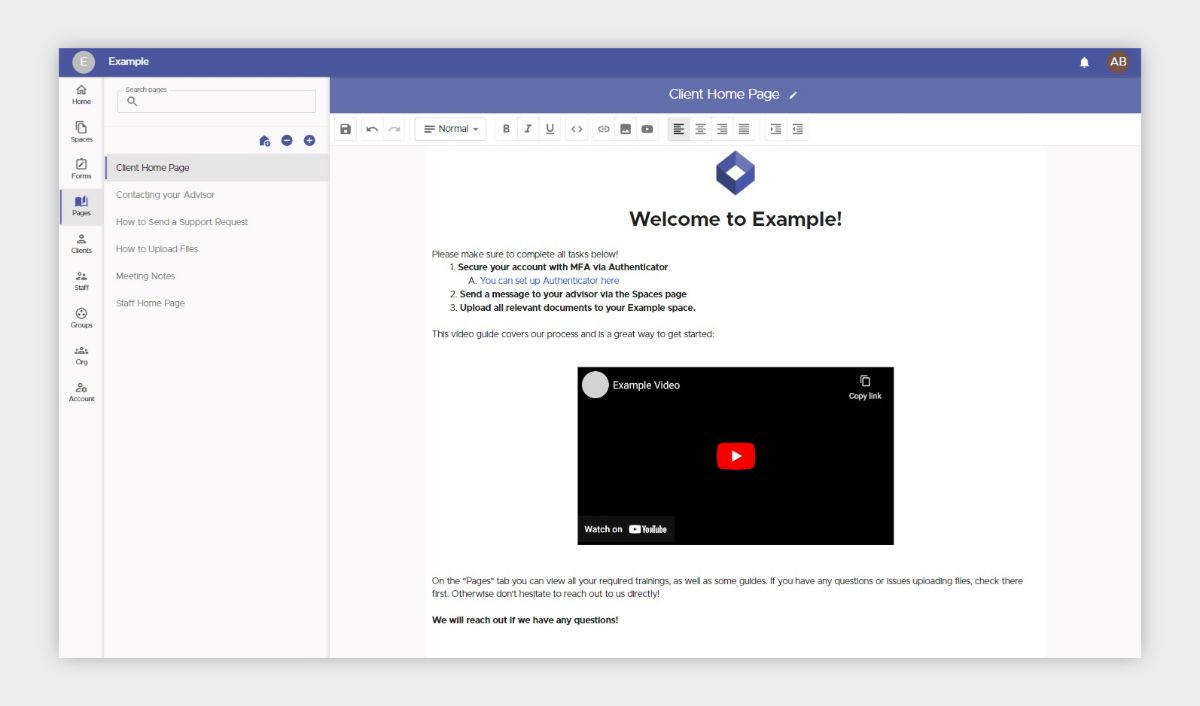
To create knowledge base pages, navigate to the "Pages" section and click the "+" icon in the left drawer. Name your page and incorporate content using the rich-text editor. You can: embed videos, images, format text, and more.
Under the edit icon (beside the page title), you can designate which users and groups have access to the page. Shared pages will appear under the recipients' "Pages" tab, enabling knowledge base collaboration among your staff, while clients retain read-only access.
Moreover, you can assign a knowledge base page as the home page, ensuring that clients or staff are welcomed with specific content upon login. This proves invaluable for onboarding and seamlessly linking back to resources, enhancing your customer portal's utility.
Some business opt to use a dedicated service for knowledge bases, like Notion, but it is nice to have your knowledge base integrated right into your customer portal with Foyer.
How to Make Custom Forms For Your Client Portal
When you're interacting with other businesses, you'll often want to collect custom data (whether it be for feedback gathering or collecting onboarding information).
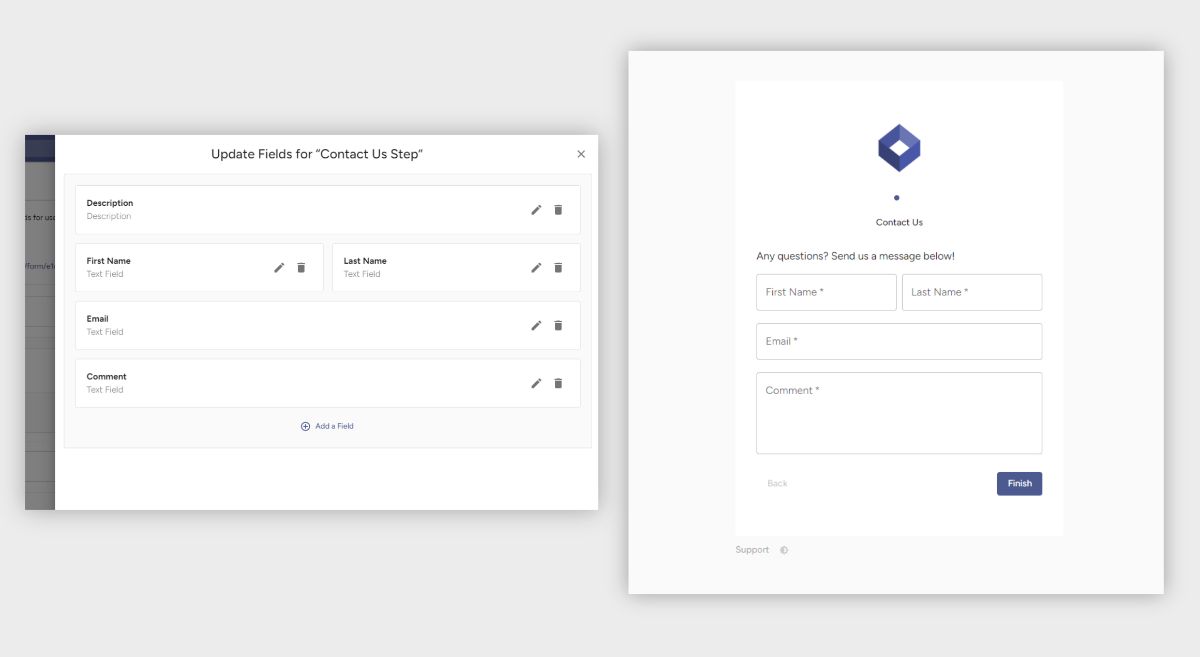
Foyer provides a solution just for this called Forms. Forms enable you to collect the exact information you need by letting you choose and a wide array of fields (e.g. text, files, multiple choice).
All data collected by your forms go straight into your customer portal where it can be easily shared internally in your organization. You can even collect files of any type and size (including large files). All you do is add a field, and choose the "file" field, and save the form.
You'll get an email to all your staff whenever a form is submitted so you never miss any updates from your clients. Anyone can opt-out of these notifications by visiting their notification preferences.
To get started, visit the "Forms" tab, click "Form Definitions", and "Add Form".
Each form is comprised of "steps", and each step has any number of fields. Fields can be textboxes, file inputs, or multiple choice check boxes.
You can choose the style of your form between the two built-in settings: "stepper" and "row". Stepper will treat each step as a different page (perfect for mobile), while "row" will show the whole form as a single page (ideal for desktop).
You'll often see business create forms using a service like Jotform, but having your forms built-in to your own customer portal is a great convenience.
How to Keep Your Customer Portal Secure Using Audit Trails
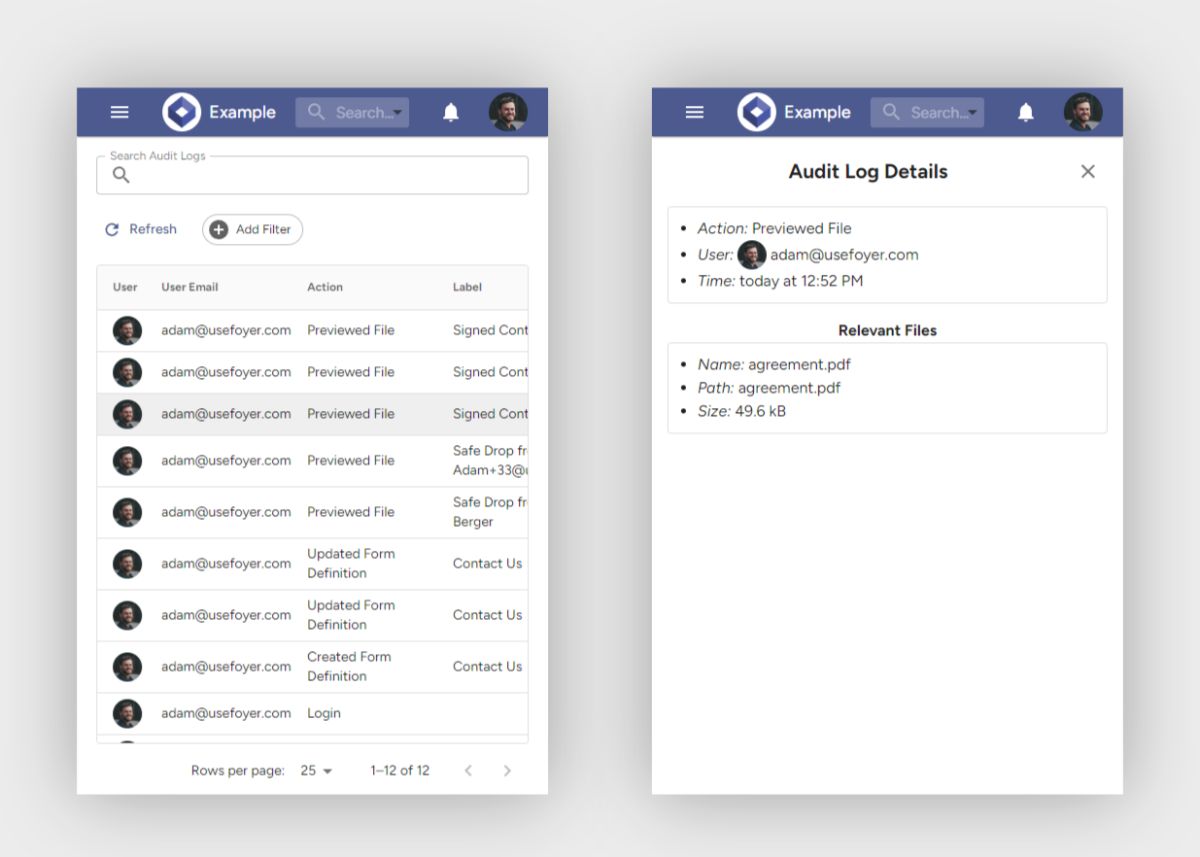
Client portals are not only about productivity, but also security. That's why Foyer has complete audit trails built-in, so you can track every security event that occurs within your organization to keep your clients and your business as a whole safe.
Each audit log is stamped with when it occurred, who did it, and what exactly happened. For security, these logs cannot be deleted. So you'll always have a way to go back in time to replay what happened. Here are a few example audit log actions:
- Deleting files
- Previewing files
- Disabling or enabling Two Factor Authentication (2FA)
- Important to know if someone is subverting security measures
- Unsuccessful Login Attempts
- Tells you if someone may be attempting to access your account
There are over 50 different audit log actions, so you'll have the full picture of what's going on in your client portal.
Also, if any of your customer are in the healthcare industry, audit trails is essential if you are storing HIPAA data or any other personally identifiable information (PII).
In addition, Foyer provides searching, filtering, and sorting through all audit logs to make auditing easy.
How to Secure Your Email Using Foyer's Secure Email Outlook Add-in
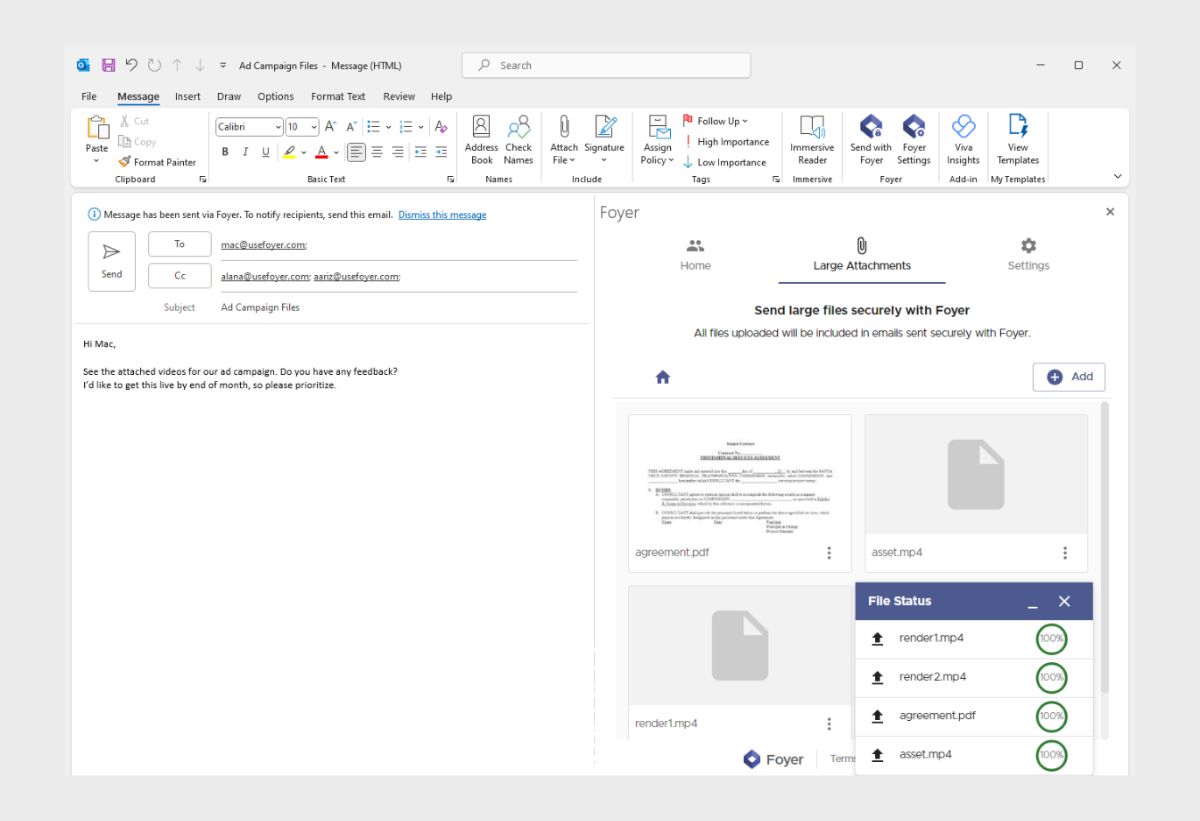
Foyer's Secure Outlook Add-In facilitates secure email communication, which is ideal for use cases where you're exchanging contracts, forms, and other sensitive data. It is particularly effective for:
- Sending end-to-end encrypted files and messages via email.
- Transmitting large files of any size and type through email.
Given the inherent risks associated with standard email for file transmission, adopting a secure email service is paramount for many businesses. Foyer's Secure Email Outlook Add-in addresses this concern by encrypting all file attachments and email contents, ensuring robust protection against data leaks.
Additionally, the add-in simplifies the process of sending large files, surpassing the typical small attachment limit imposed by traditional email providers. You can seamlessly drag and drop any file, regardless of its size, for secure email transmission.
Whether you use Foyer secure email or not, you should really be encrypting all your email.
How Will You Use Your Microsoft Word Client Portal?
I hope this guide has helped you understand how to make a Microsoft Word Client Portal. I also hope I made it clear how to use features like secure file sharing, custom forms, knowledge bases, and secure email to boost your business's productivity and security.
Still comparing tools for a client portal? Check out our breakdown of the top 10 best client portals to see how Foyer stacks up.
If you have any existing data that you need to migrate into your client portal, let our Support team know, and we can discuss a solution for you.
Thanks for reading. If you have any feedback, please send a comment below!